This guide is for whoever runs the school account — usually the school office or the principal. The school account is the master account: it sets everything up, adds every person and can see every record.
Getting started — sign in, find your way around and set up your school in the right order.
People, Academics and Schedule — everyone at your school, your classes and your timetable.
Records — attendance, grades, exams, homework, behaviour notes and events.
Finance and School — payments, invoices, documents, leave and settings.
Read Getting started first. After that, jump to any section from the contents — each one stands on its own.
Signing in
Shkolla.app runs in your web browser — there is nothing to install. It works on computers, tablets and phones.
Open portal.shkolla.app in your browser.
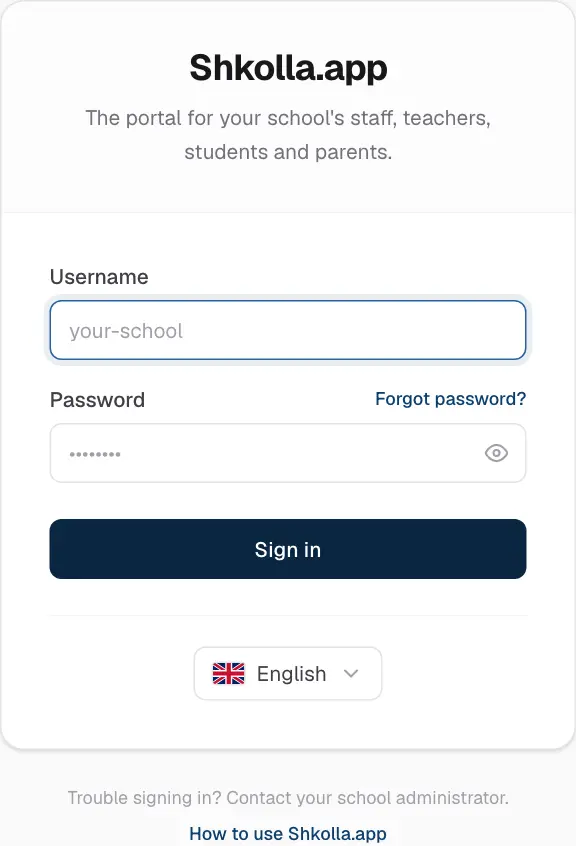
Choose your language at the bottom of the sign-in card. The app remembers it next time.
Enter your Username and Password.
Click Sign in.
The sign-in page.
Forgot your password?
The school account can reset its own password by email:
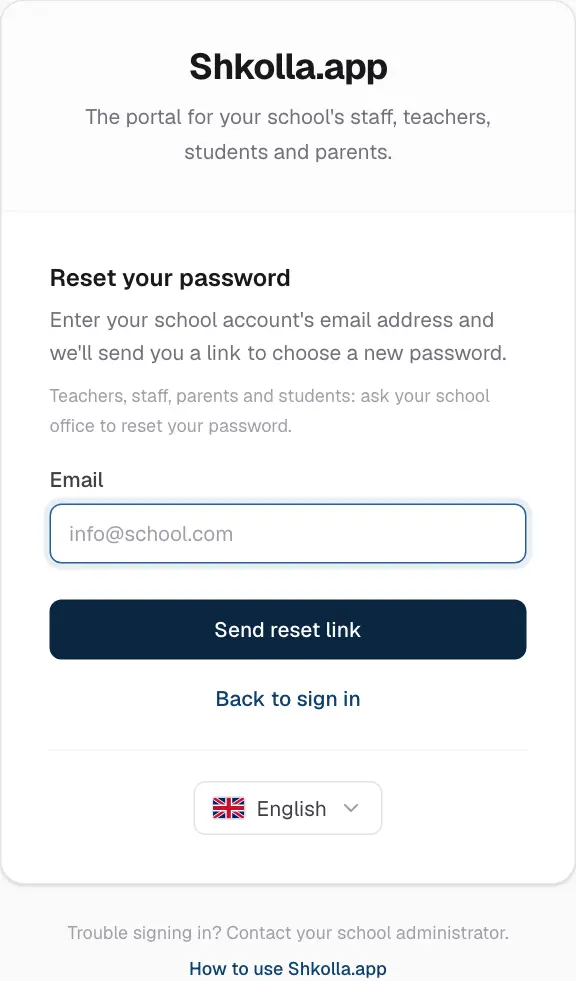
On the sign-in page, click Forgot password?.
Enter the email address of your school account and click Send reset link.
Open the email from support@shkolla.app and click the button in it. The link works once and expires after one hour.
Type your new password twice (at least 8 characters) and save. Sign in with it straight away.
Asking for a reset link.
Finding your way around
After signing in you land on the Dashboard. Everything else is one click away in the sidebar on the left.
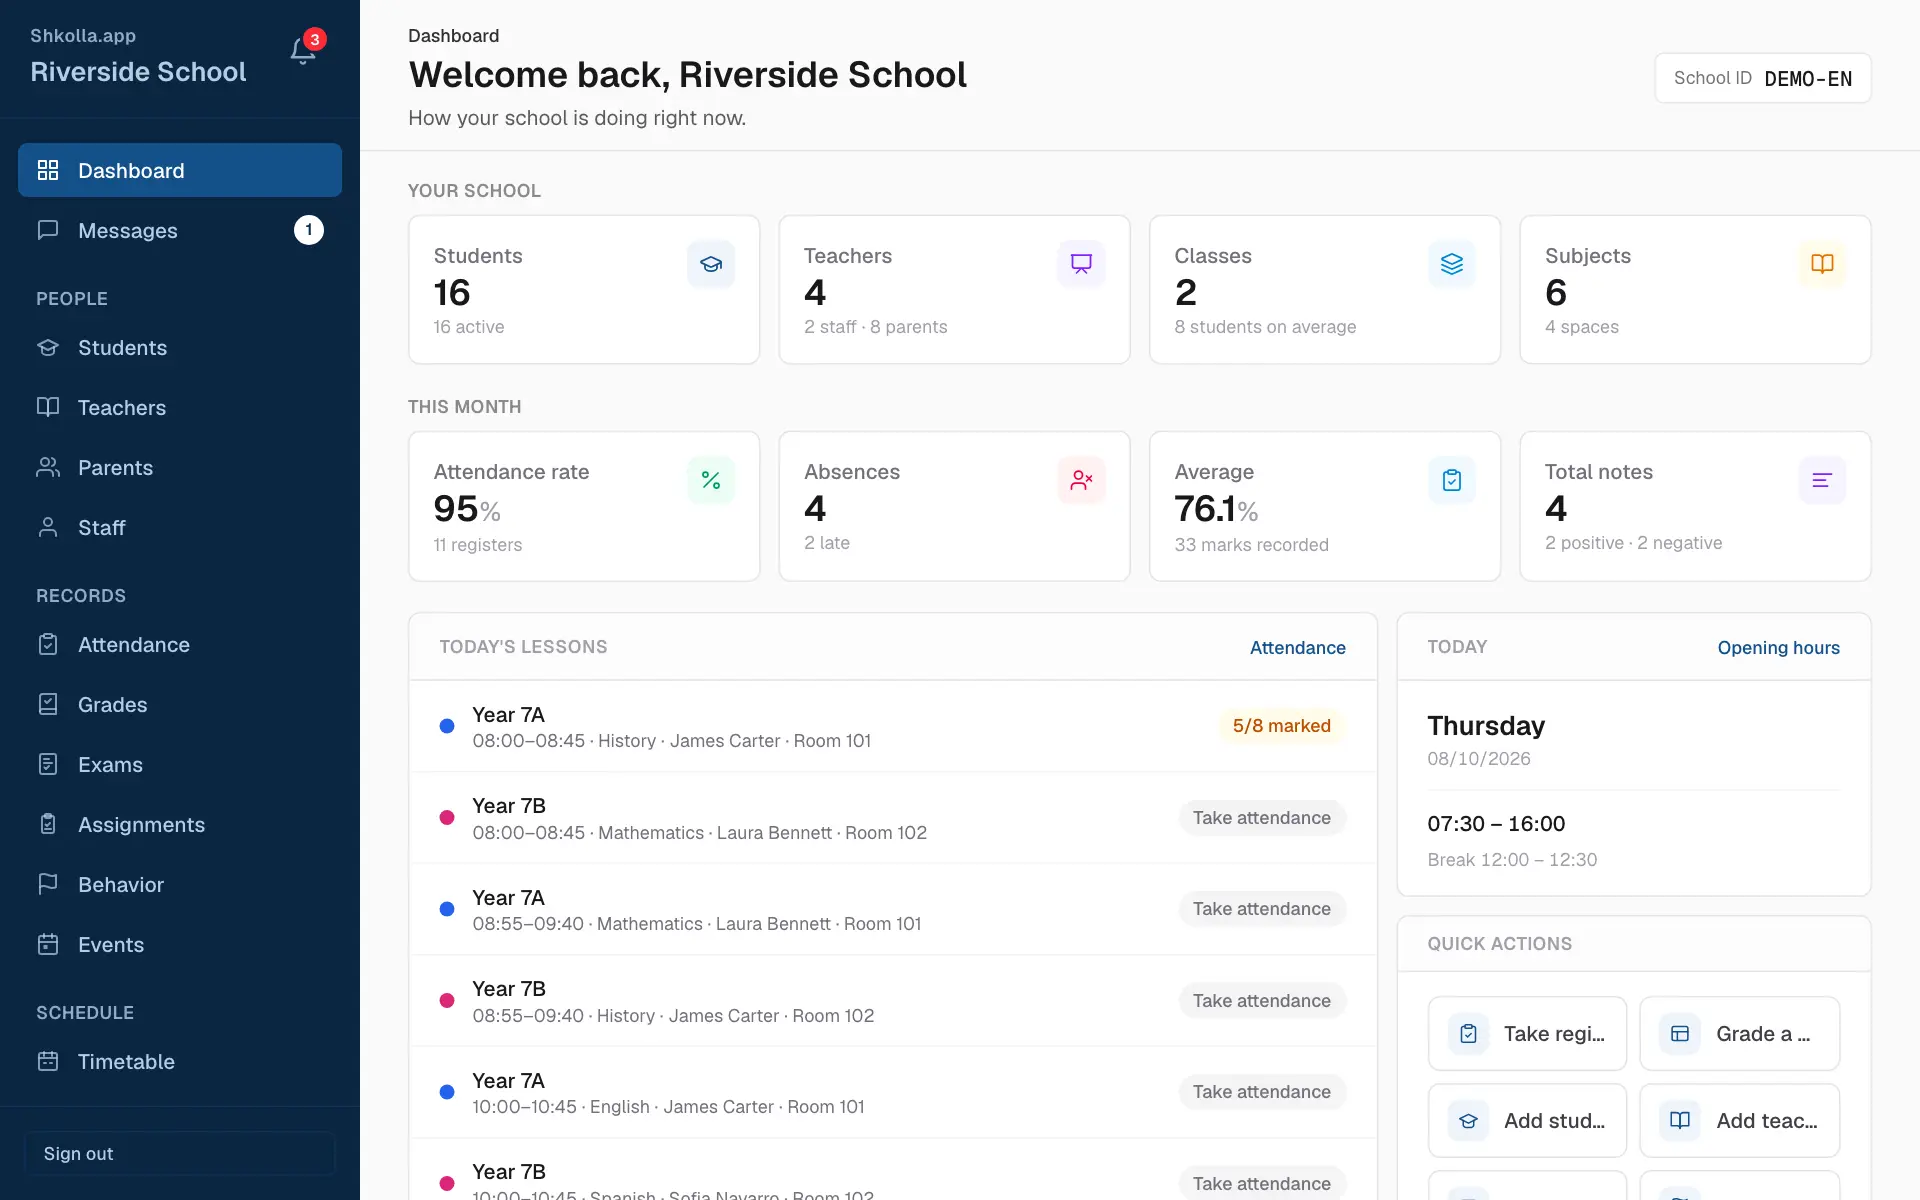
The school dashboard, with the sidebar on the left.
The sidebar groups every page into People, Records, Schedule, Finance, Academics and School. The page you're on is highlighted.
The bell at the top shows your notifications. A red number counts the unread ones.
Messages opens your conversations. The number beside it counts unread messages.
Sign out is at the bottom. Always sign out on a shared computer.
Most pages work the same way: totals at the top, then search and filters, then a table. The icons at the end of each row let you View, Edit or Delete an entry, and the main button at the top right adds a new one.
On your phone
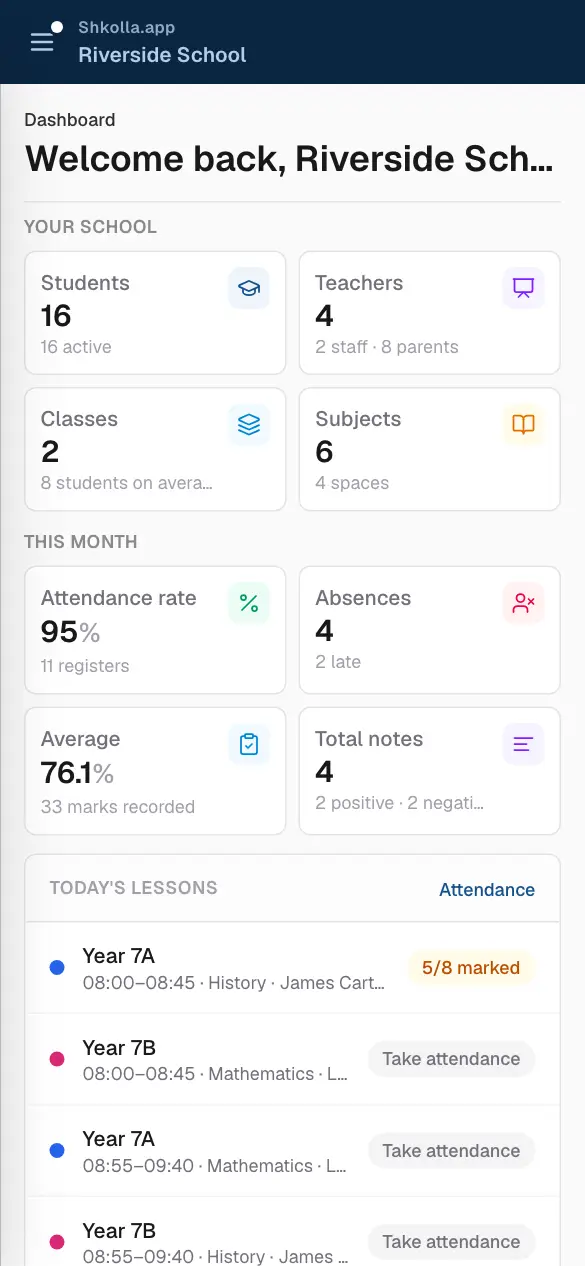
On a phone the sidebar folds away. Tap the menu button (☰) at the top left to open it, then tap a page.
Shkolla.app on a phone.
Setting up your school
Set up in this order, and every list you need is already filled in when you reach the next step:
Settings — your language, currency, grading scale and colours.
Global information — your school's name, logo, address and contact details. They appear on invoices and report cards.
Academic years — this school year and its terms.
Opening hours and Holidays — when the school is open, and when it's closed.
Subjects and Spaces — what you teach, and where.
Teachers, Students, Parents and Staff — your people, typed in or imported from a spreadsheet.
Classes — teachers, students and subjects brought together.
Timetable — each class's week.
From then on, daily work — attendance, grades, homework, messages — happens on its own pages, and your dashboard keeps track of it all.
02
Your dashboard
The dashboard
The dashboard is your school at a glance, always up to date.
The school dashboard.
Your school — how many students, teachers, classes and subjects you have.
This month — the attendance rate, absences, the average of all grades, and behaviour notes.
Today's lessons — every lesson on today's timetable and whether its register is done. Take attendance opens it.
Today — today's opening hours and breaks.
Quick actions — shortcuts for what you do most: take a register, grade a class, add a student, teacher or class, log a behaviour note.
Further down you'll find attendance for the last seven days, marks this month, and what's coming up: exams, assignment due dates and events.
03
People
Who's who
Everyone at your school has one of four roles. The role decides what they see when they sign in:
Students — their own timetable, homework, grades, exams, attendance and messages.
Teachers — the classes they teach: registers, grades, exams, homework, behaviour notes and messages with students and families.
Parents — everything about their own children, plus payments and school news.
Staff — office staff. They see exactly the tabs you open for them and nothing more.
Each person gets their own username and password. Usernames are unique across Shkolla.app, so a simple pattern helps — for example name.surname.
Students
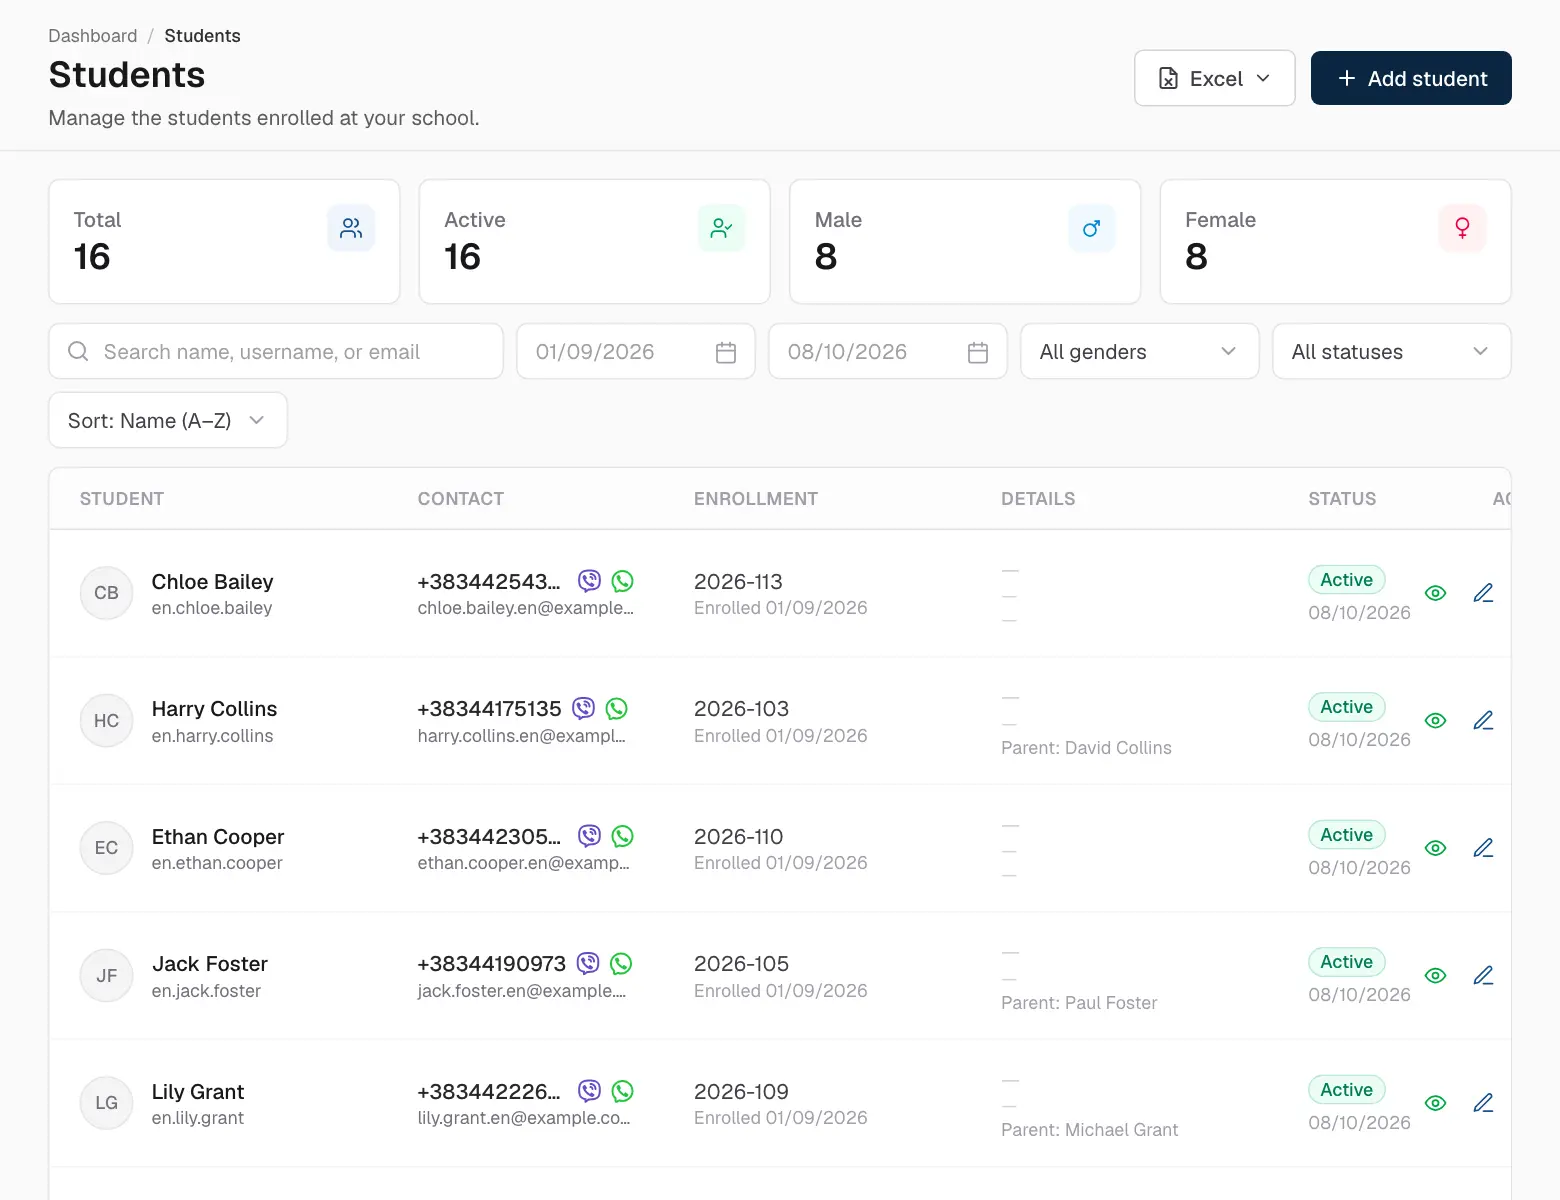
Students lists everyone enrolled. The cards at the top count them. Search finds anyone by name, username or email; the filters narrow the list by enrolment date, gender and status.
The student list.
Each row shows contact details, the student number and parent. The icons at the end let you view, edit or remove the student. Teachers, Parents and Staff work exactly the same way.
Adding a person
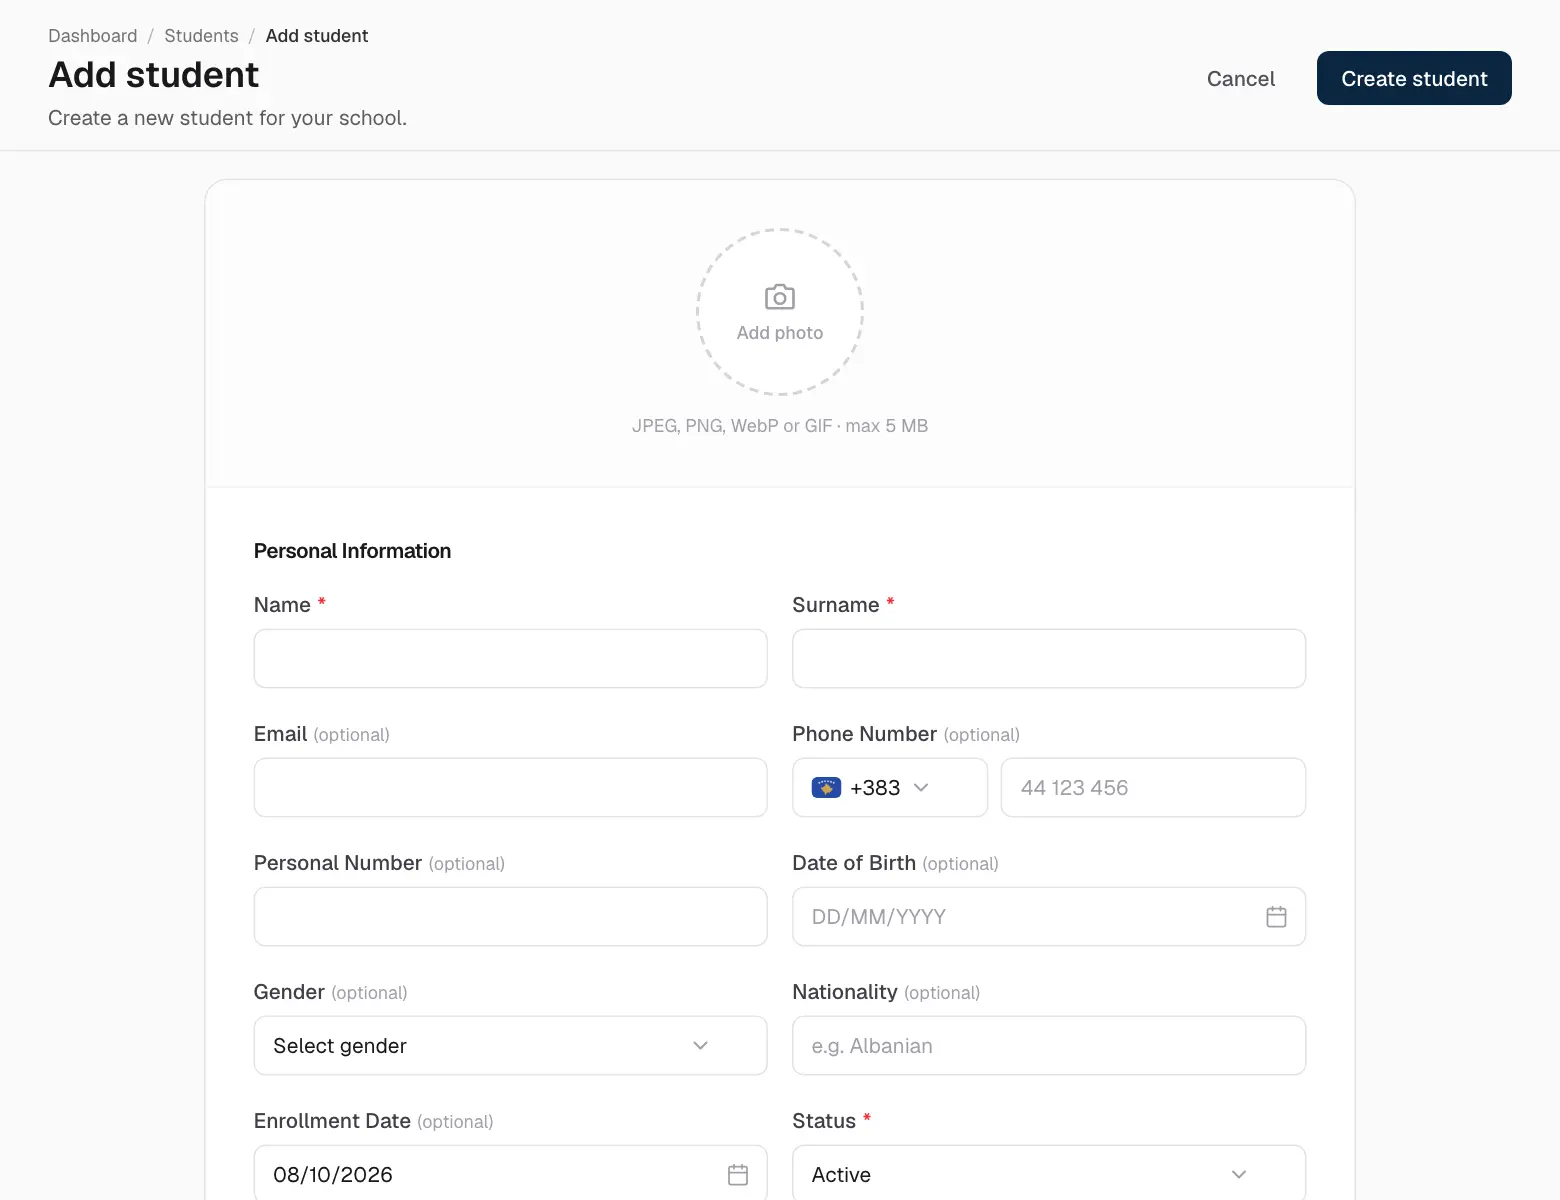
Adding a student, teacher, parent or staff member works the same way on each page:
Open the page — for example Students — and click Add student.
Enter the name and surname. Anything marked optional can wait.
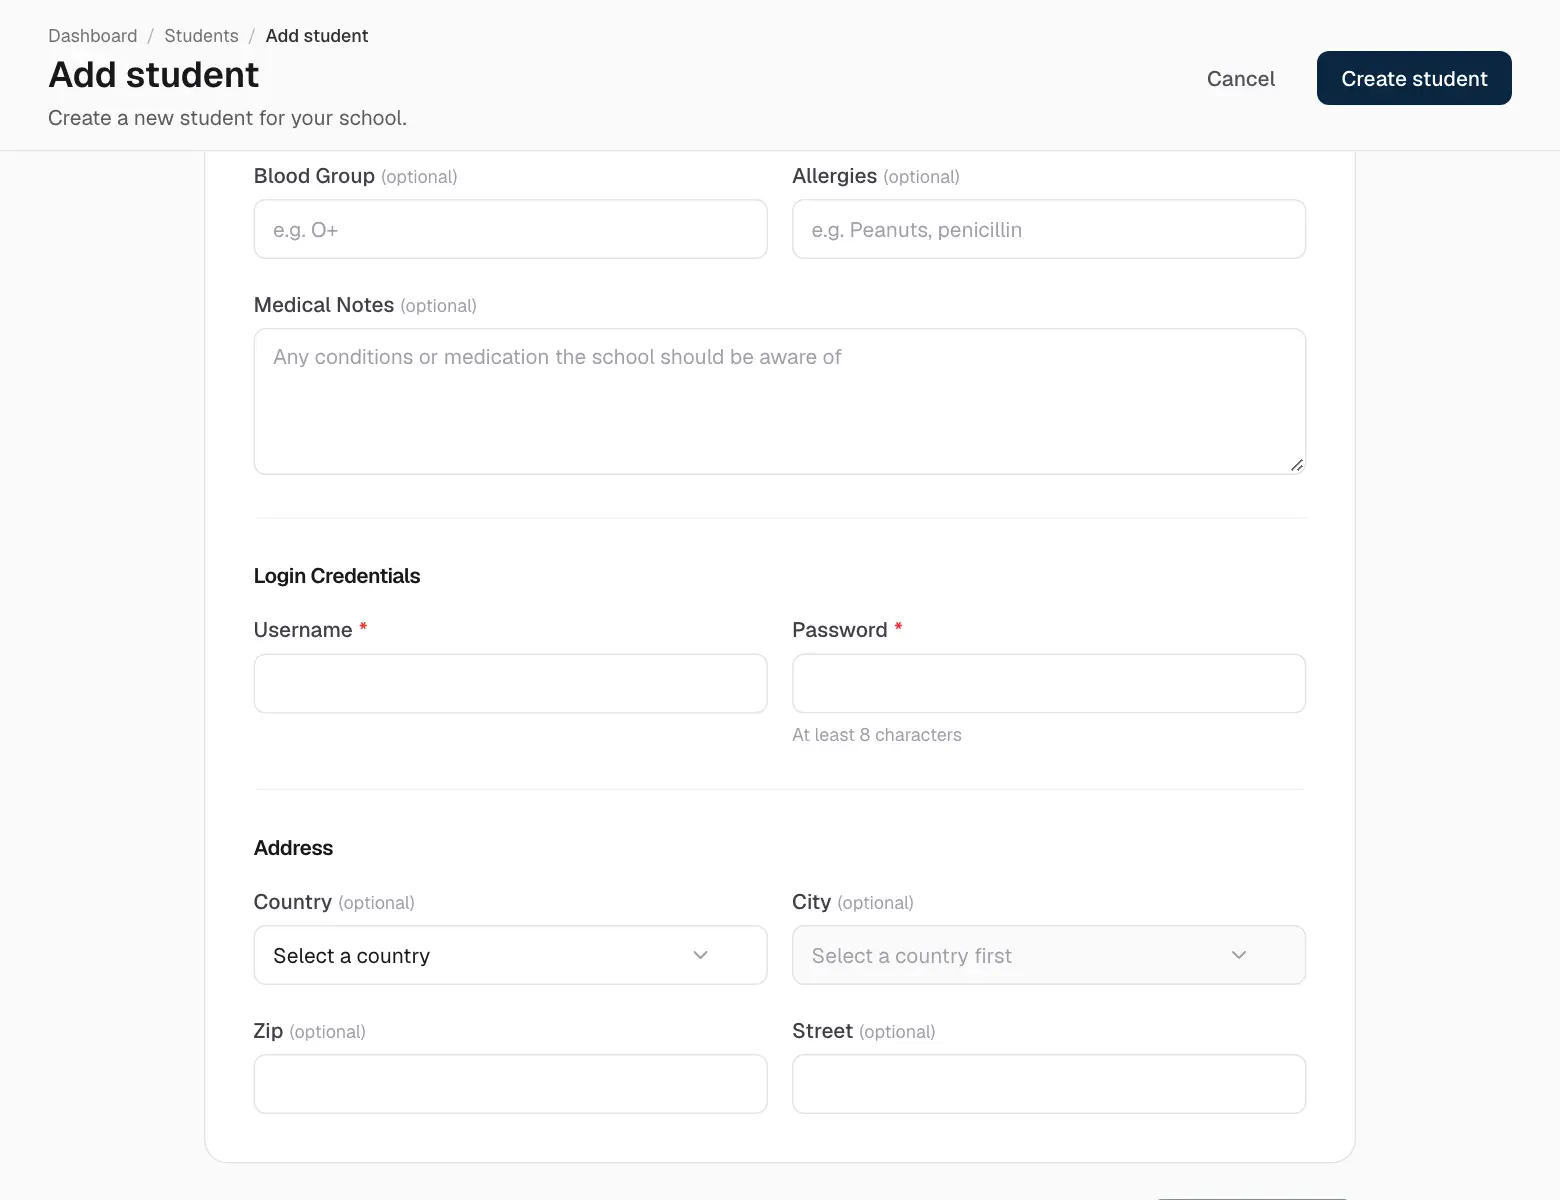
Add a photo, email, phone and personal details if you have them. Students also have a student number and medical notes; teachers a qualification, employment type and subjects; staff a job title and department.
Under Login Credentials, choose a username and password.
Click the save button at the top right.
Adding a student.
Every person gets their own username and password.
Importing from a spreadsheet
Already have your students in a spreadsheet? Import them all at once:
On Students (or Teachers, Parents, Staff), click Excel → Import from CSV.
Click Download a template. It has the right columns and one example row.
Fill in the template in Excel or Google Sheets and save it as CSV.
Choose the file and click Import.
Passwords left blank are generated for you and shown once on screen — copy them before you close the window.
Editing and removing people
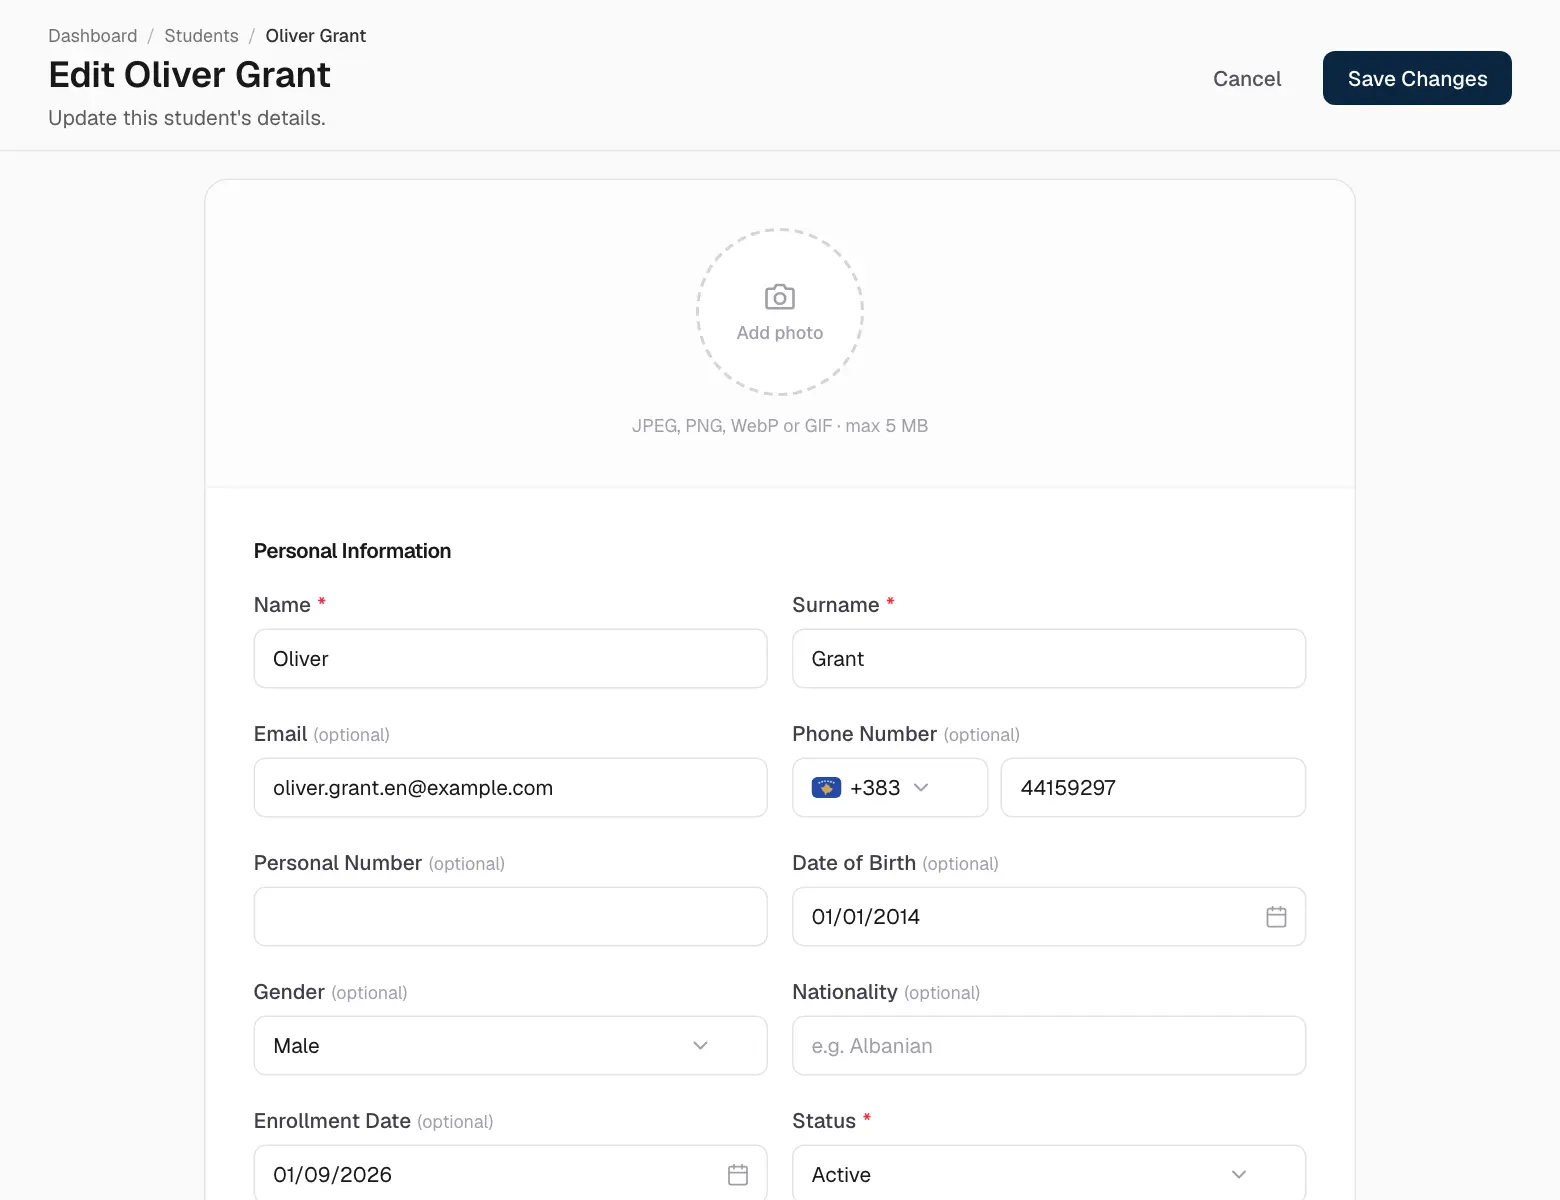
Click the pencil icon on any row to change a person's details.
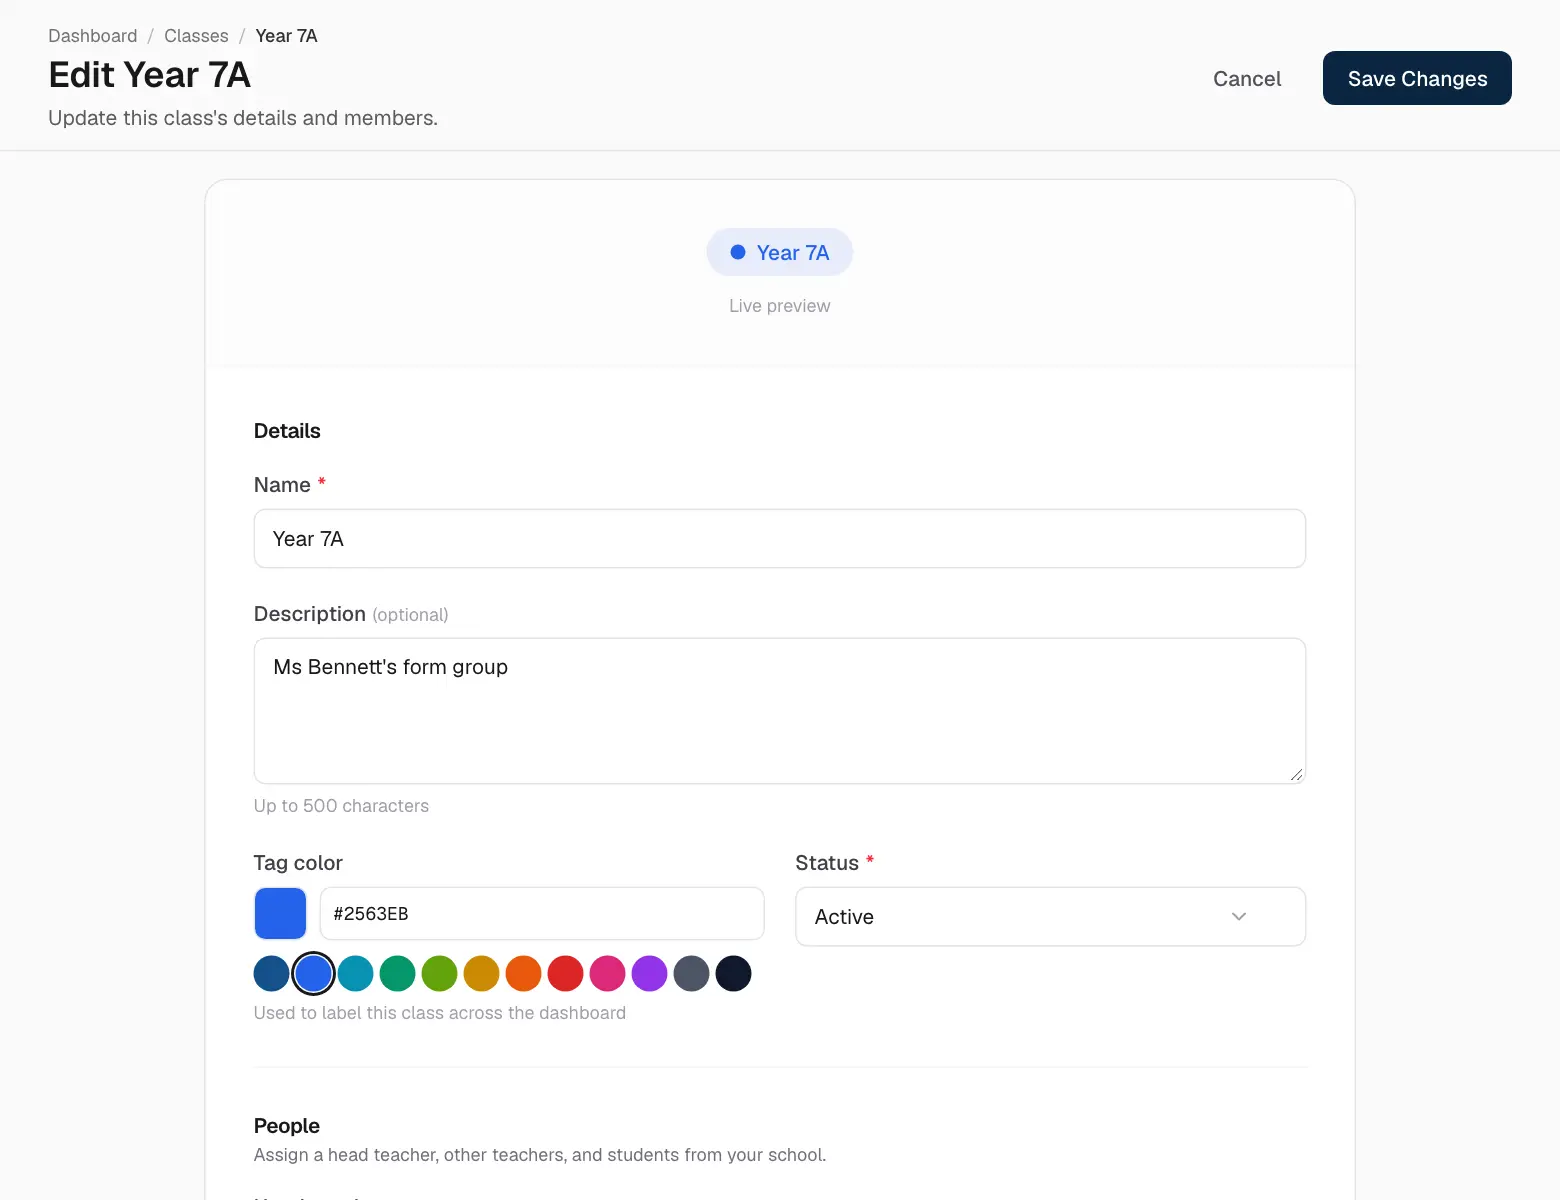
Editing a student.
A new password — under Login Credentials, type a new password and save. This is how you help someone who forgot theirs. They are signed out everywhere and use the new password from then on.
Status — only active people can sign in. Choose inactive, suspended or pending to pause someone's access without deleting anything.
Removing — the bin icon removes the person and takes them off every list. If they might come back, change their status instead.
Teachers
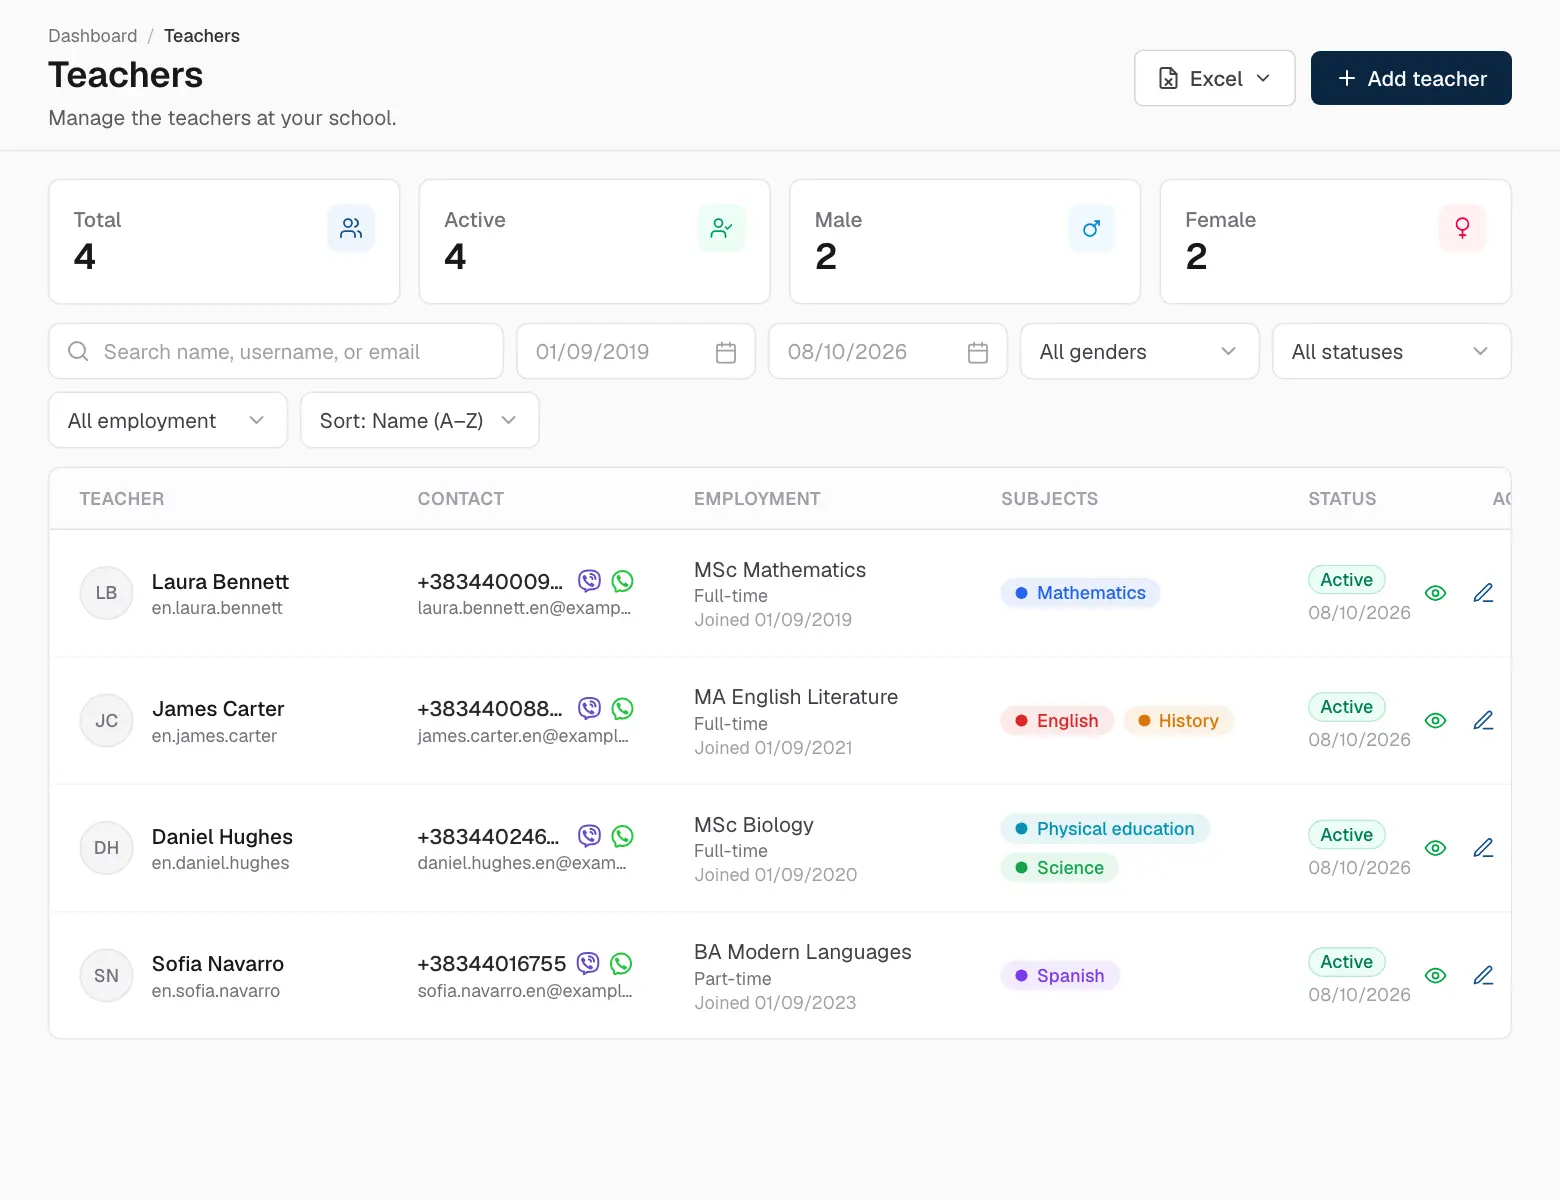
Teachers works just like Students. A teacher's form also has their qualification, employment type and the subjects they teach.
The teacher list.
A teacher sees the classes they belong to — and the students and parents of those classes — but not the rest of the school. Put teachers into classes in Classes.
Parents and their children
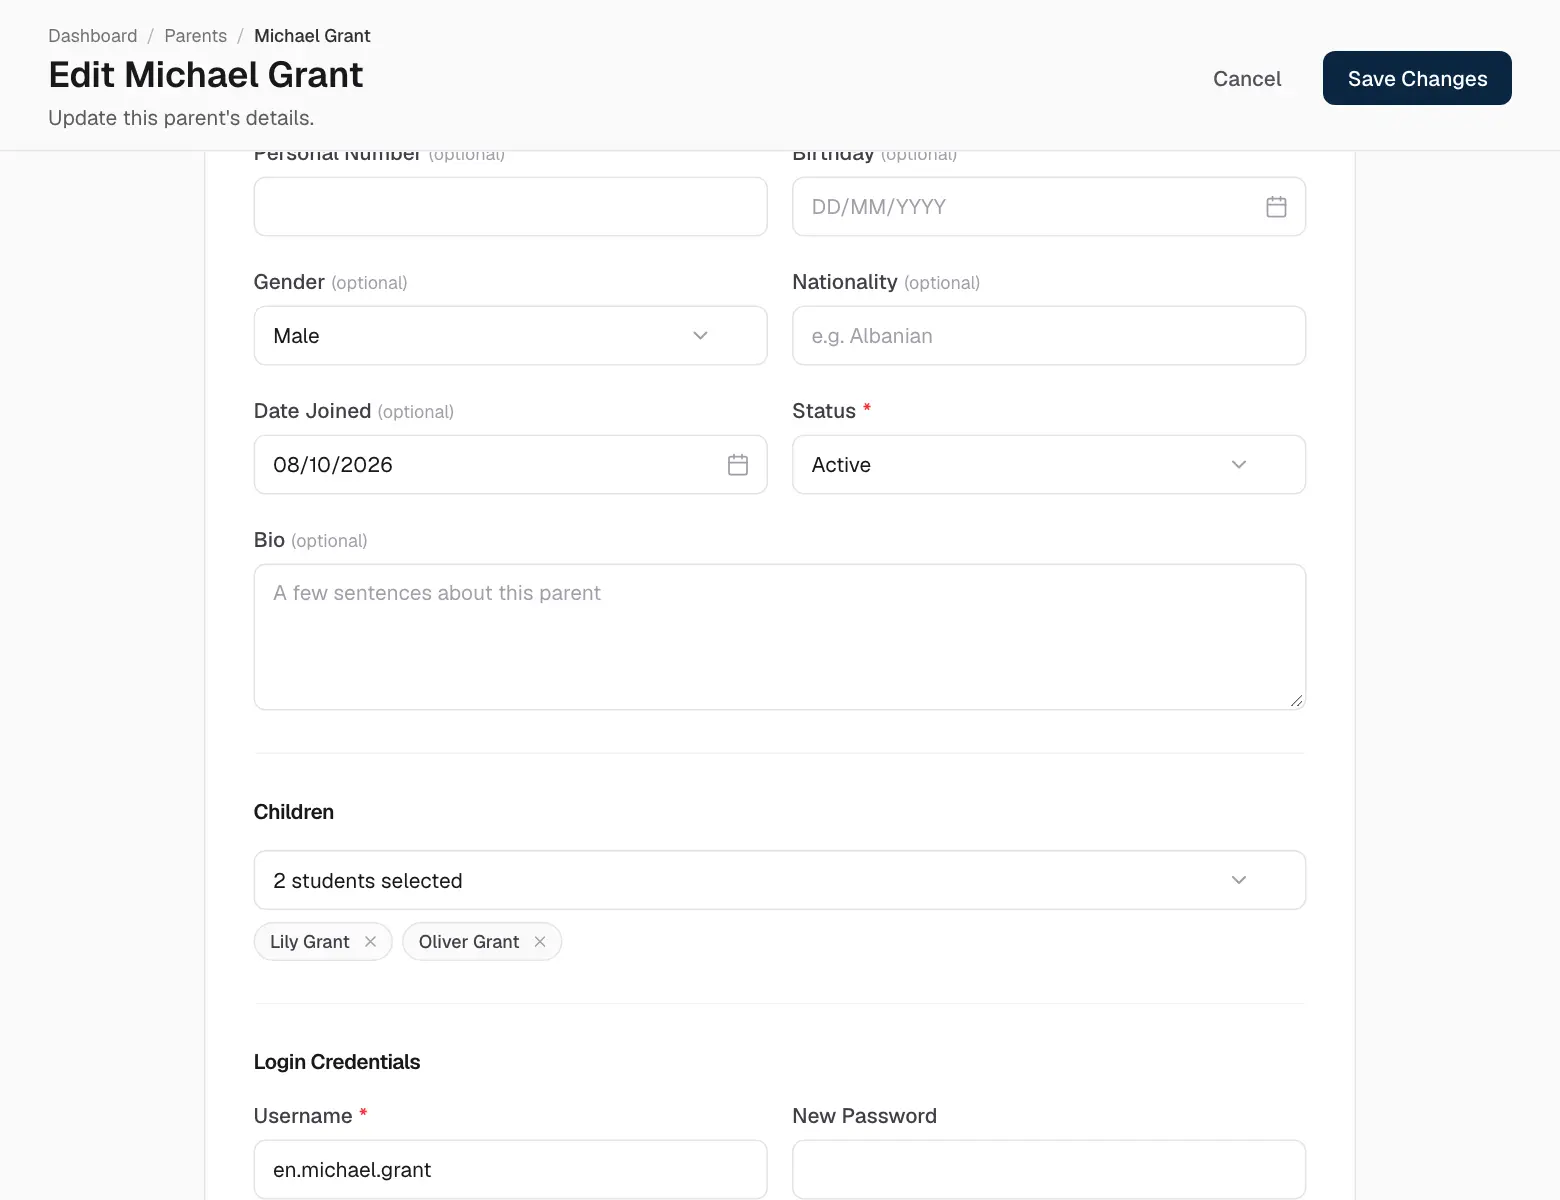
Parents see only their own children, so linking them is the step that matters:
Open Parents and add the parent, or edit an existing one.
Scroll to Children and pick each of their children. A parent can have several children, in any classes.
Save.
Linking a parent to their children.
Staff and their permissions
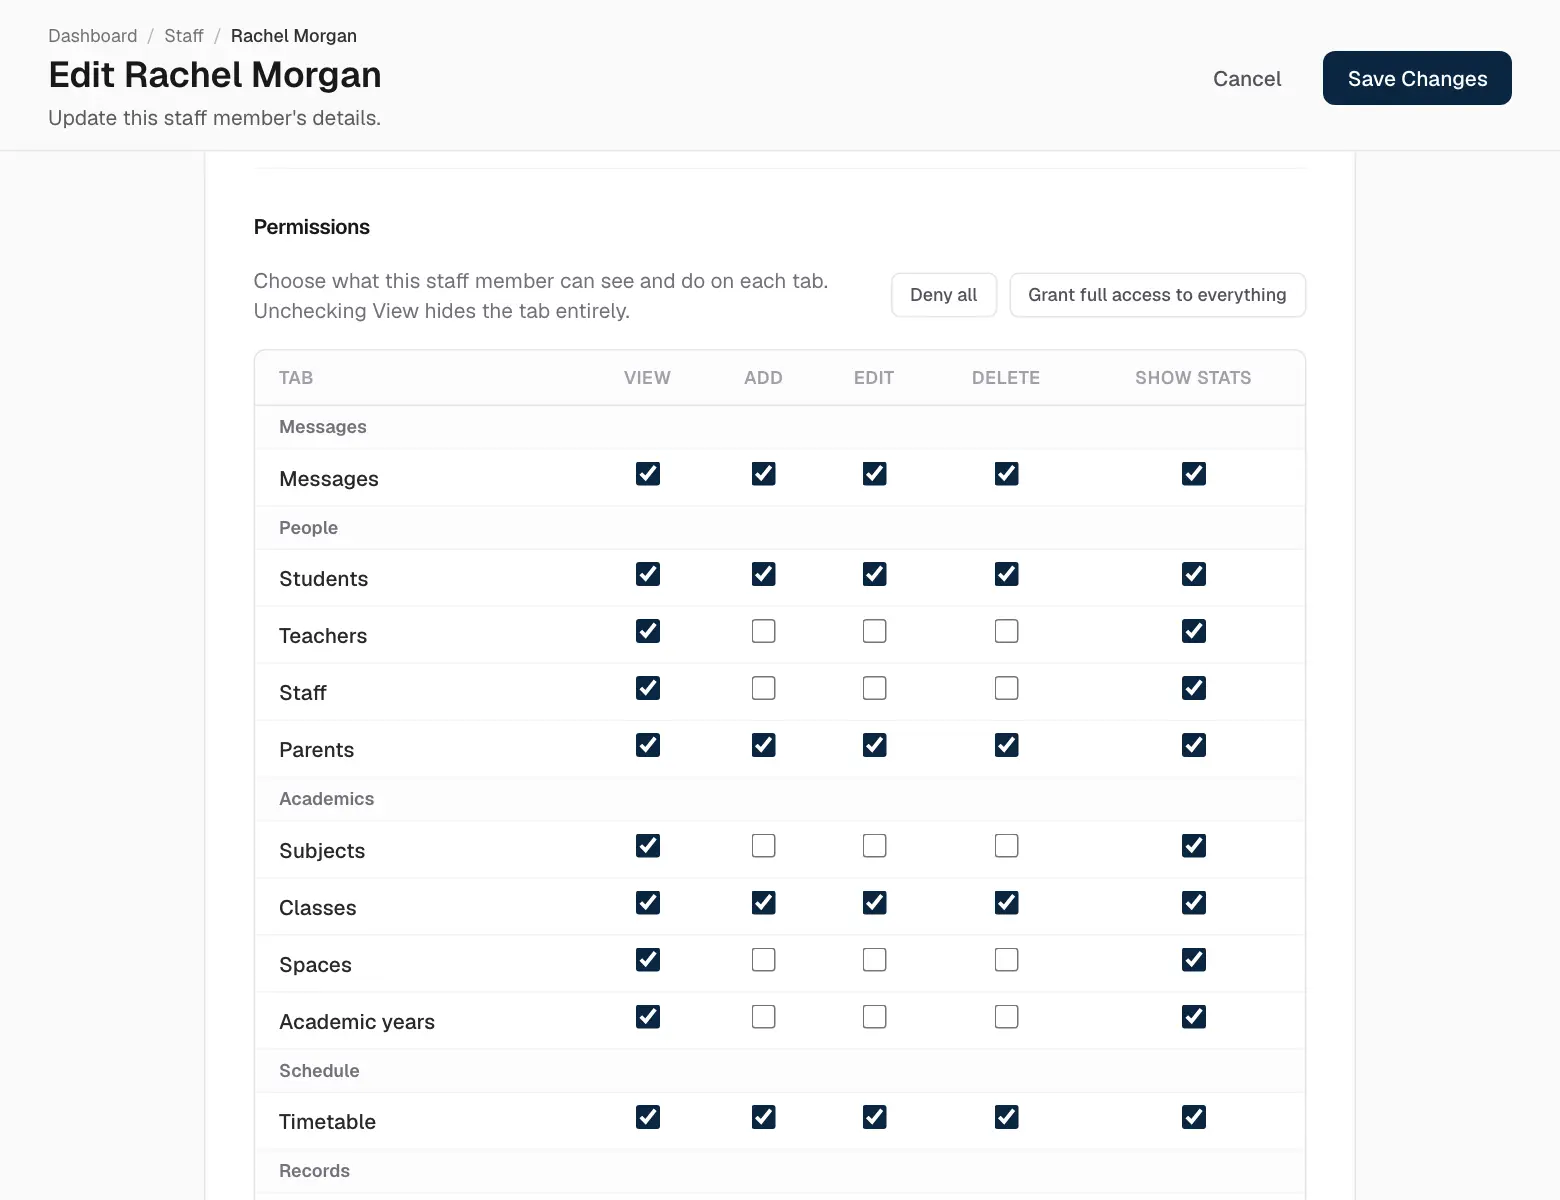
Staff members see only the tabs you allow. For each tab you decide whether they can view it, add to it, edit, delete, and see its statistics.
Open Staff and edit the staff member (or add a new one).
Scroll to Permissions.
Tick what they may do on each tab. Unticking View hides the tab completely.
Save. The change applies the next time they open a page.
A staff member's permissions.
04
Academics
Subjects
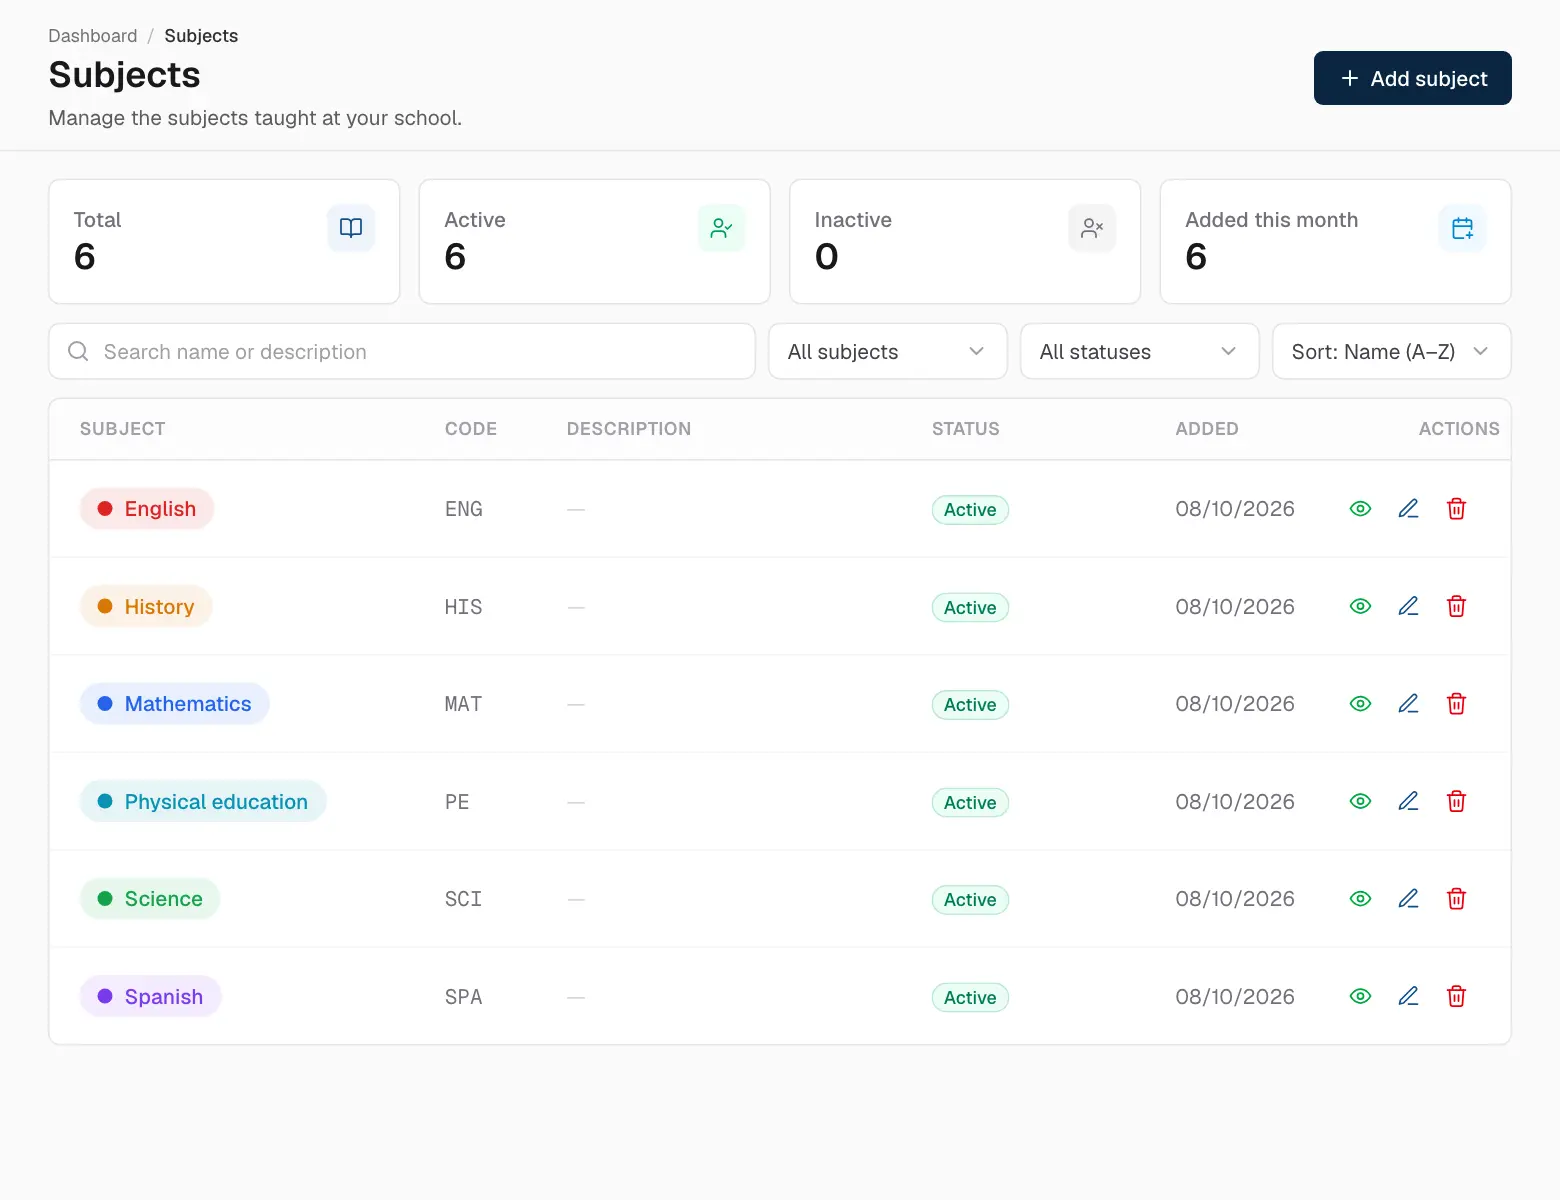
Subjects is the list of what your school teaches. Each subject has a name, an optional short code and a colour — the colour follows the subject everywhere: the timetable, grades and report cards.
Click Add subject.
Enter the name, code and colour.
Save.
Subjects.
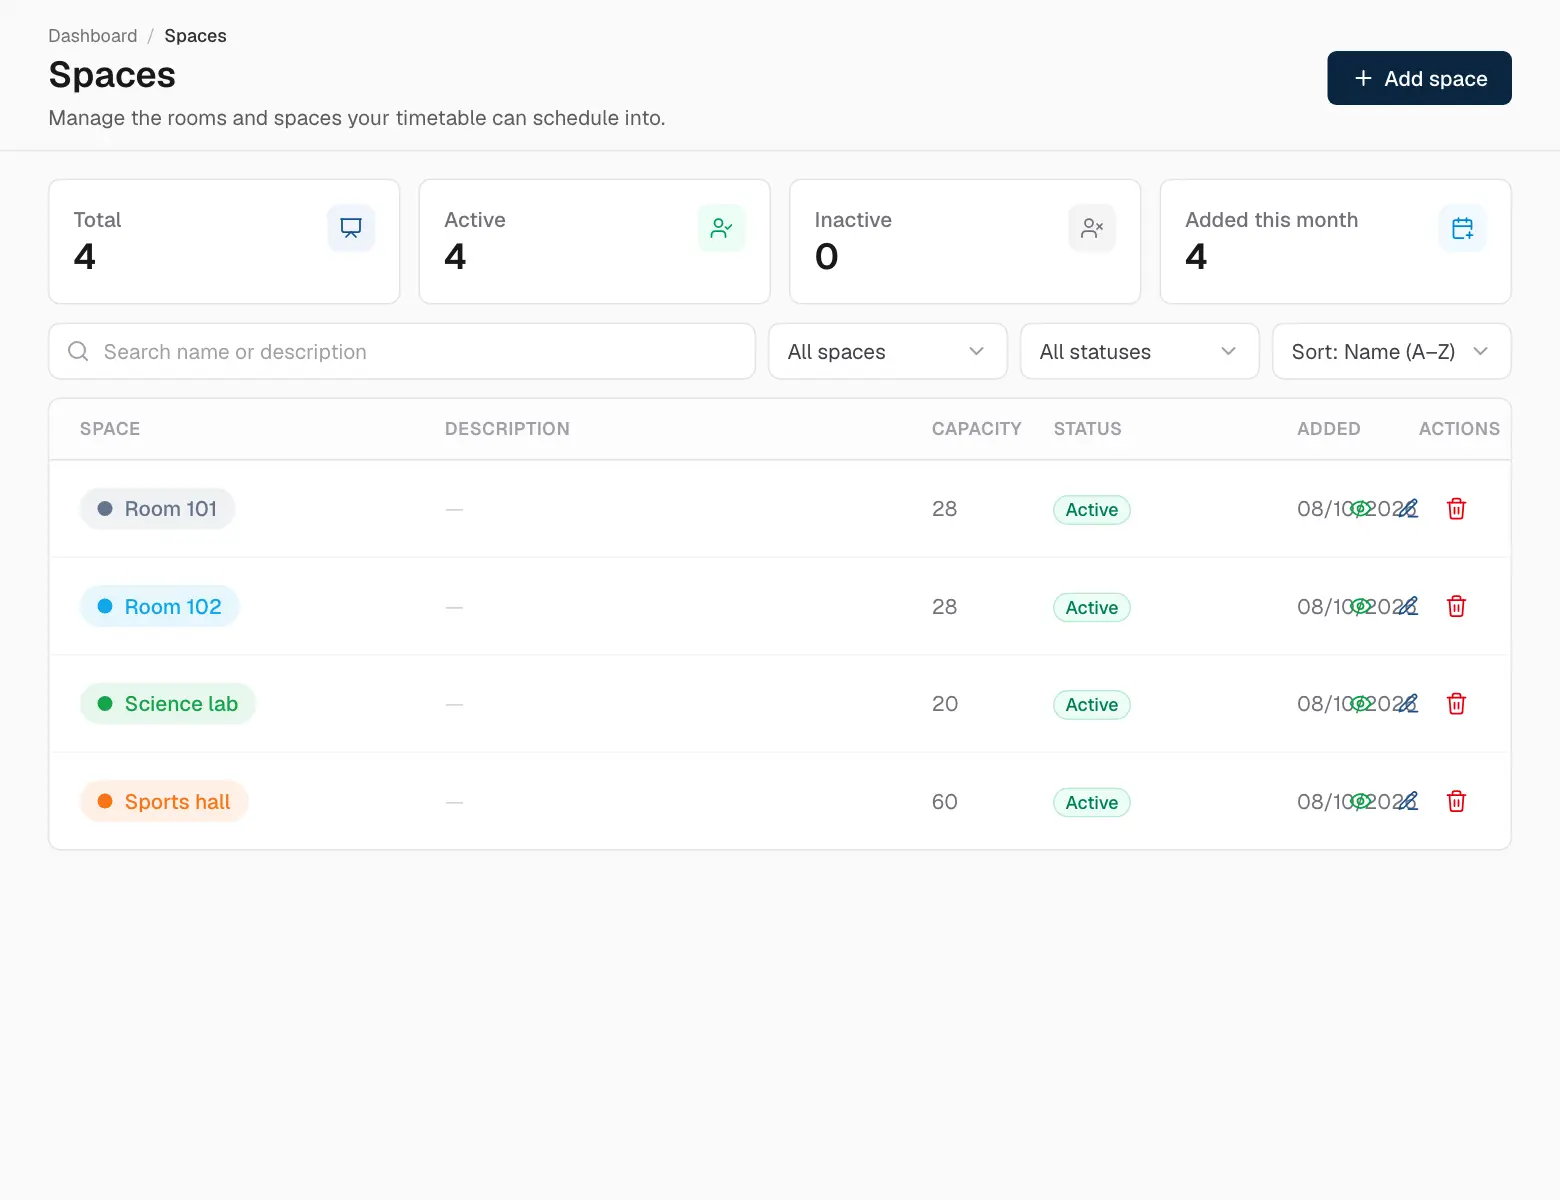
Spaces
Spaces are the places lessons happen — classrooms, labs, the gym. Add a capacity if it helps. You pick a space for each lesson in the timetable, and the timetable can show everything booked in a space.
Click Add space.
Enter the name, colour and capacity.
Save.
Spaces.
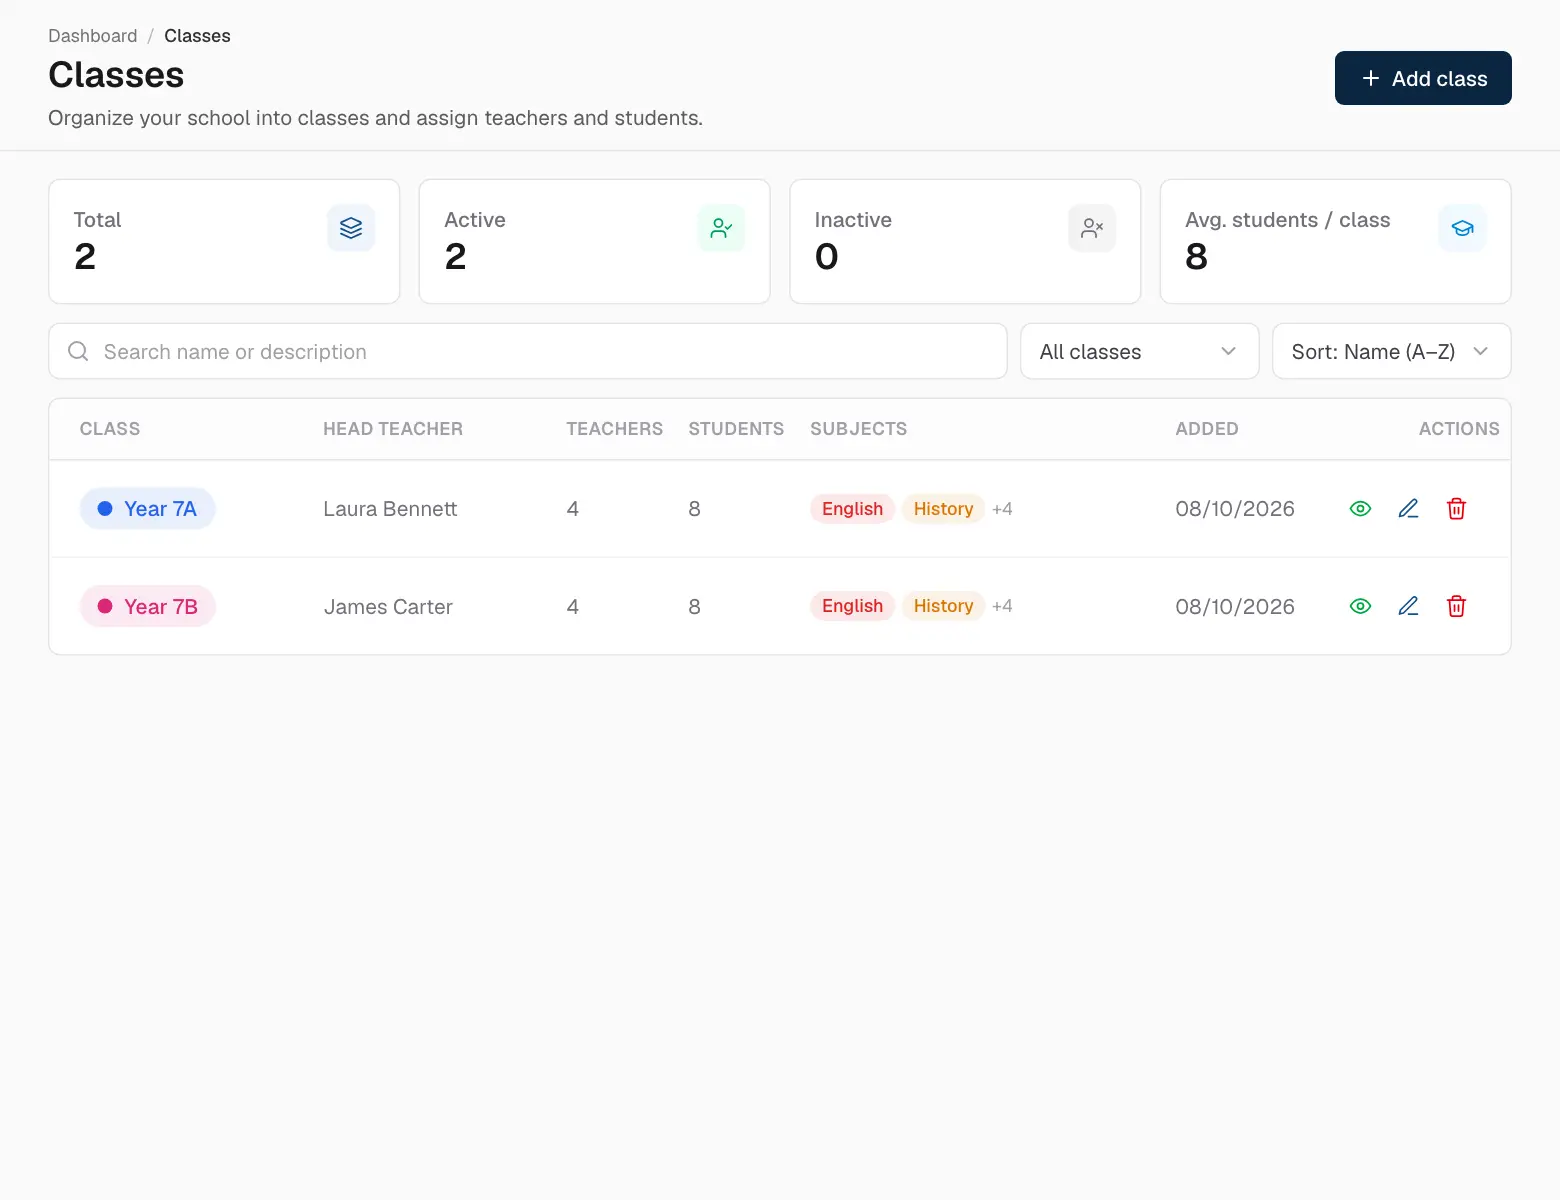
Classes
A class brings together a head teacher, the teachers who teach it, its students and its subjects. Teachers, students and parents see what belongs to their classes, so classes are the heart of the app.
Classes.
Click Add class.
Give the class a name, a colour and, if you like, a description.
Choose the head teacher, then the other teachers.
Pick the students and the subjects.
Click Create class.
A class's teachers, students and subjects.
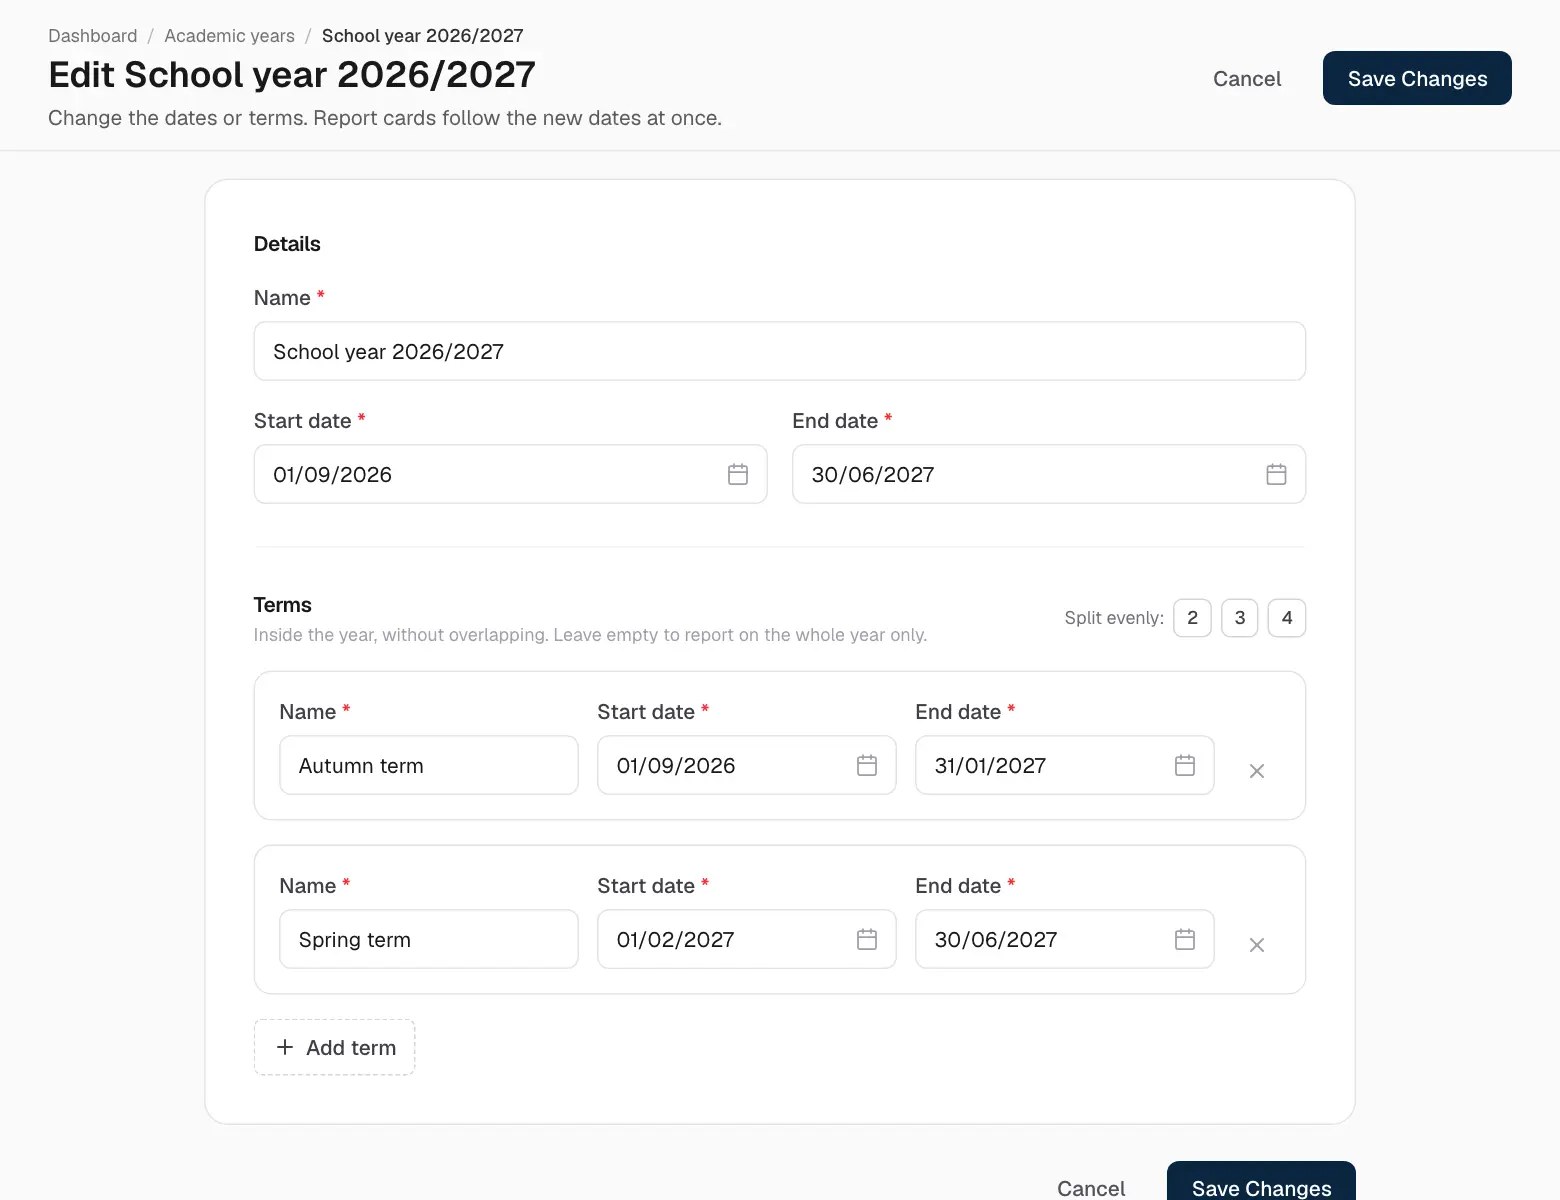
Academic years and terms
The school year and its terms (semesters, trimesters…) are what term averages, final grades and report cards are calculated over.
Click Add academic year.
Enter the year's name and its first and last day.
Add each term with its dates.
Save.
A school year with two terms.
05
Schedule
Opening hours
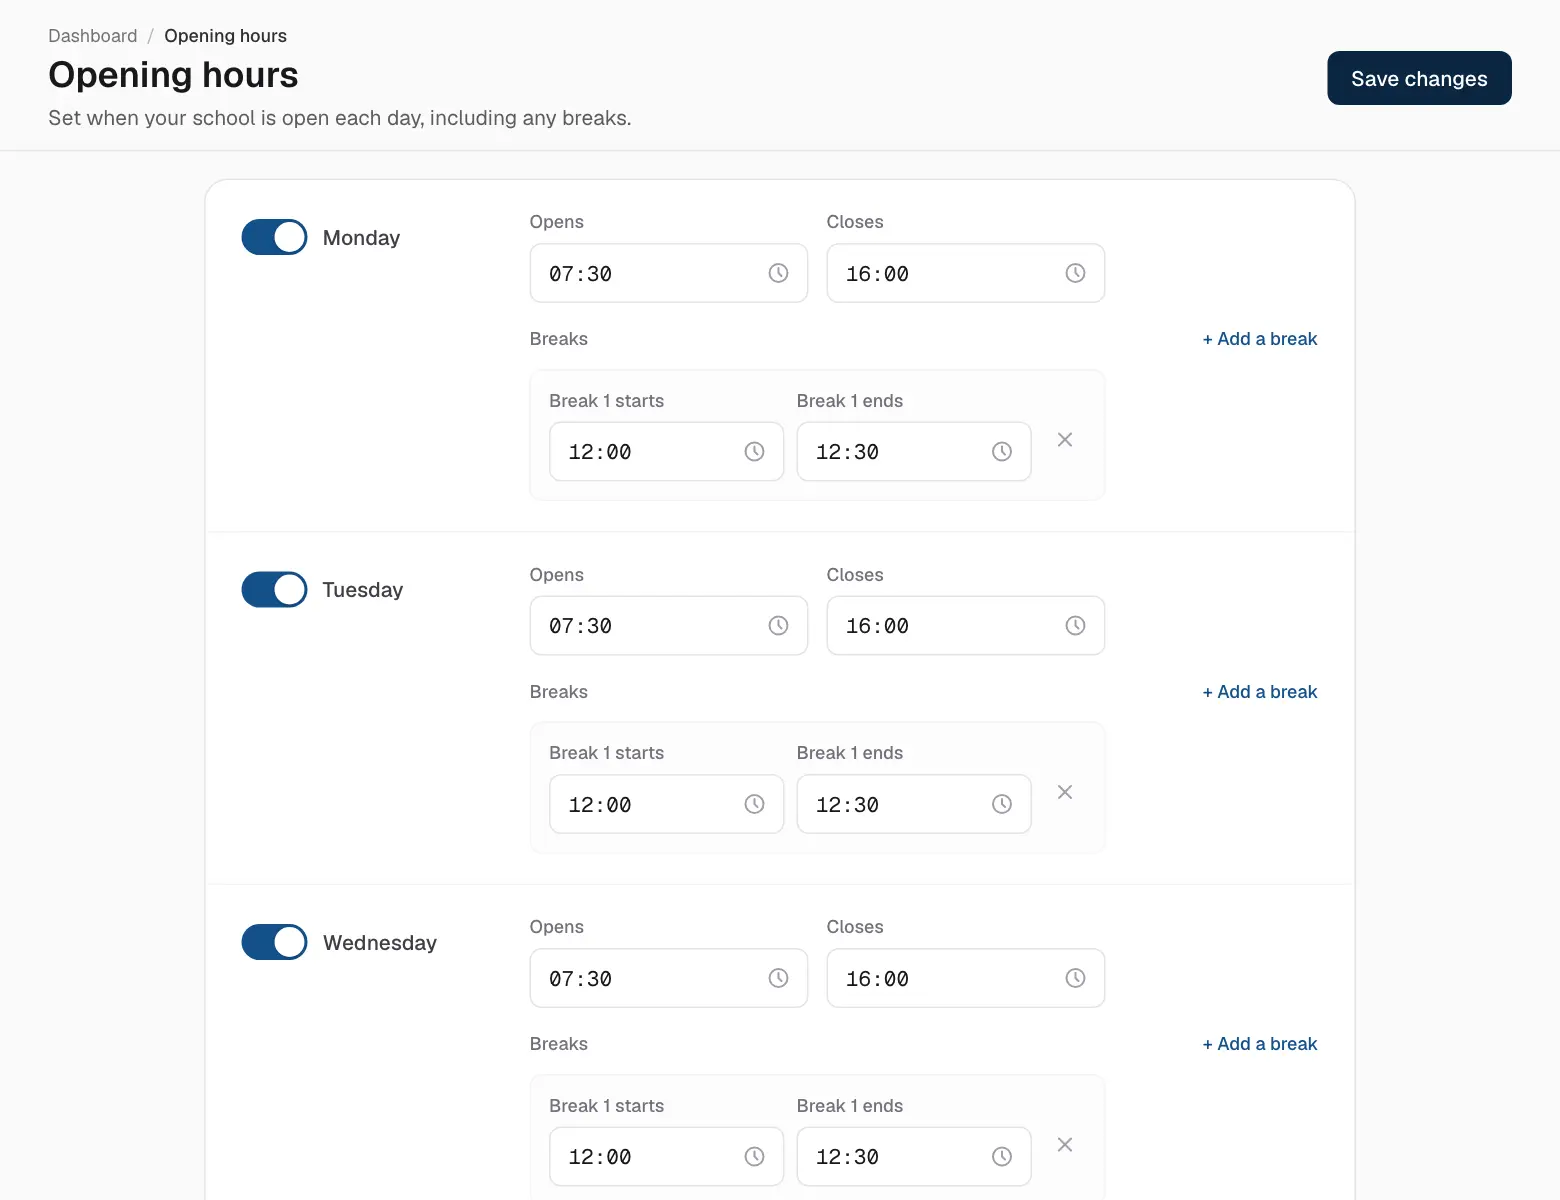
Set when the school opens and closes each day, and any breaks such as lunch. Lessons in the timetable fit inside these hours, and everyone's dashboard shows today's hours.
Opening hours and breaks.
Holidays
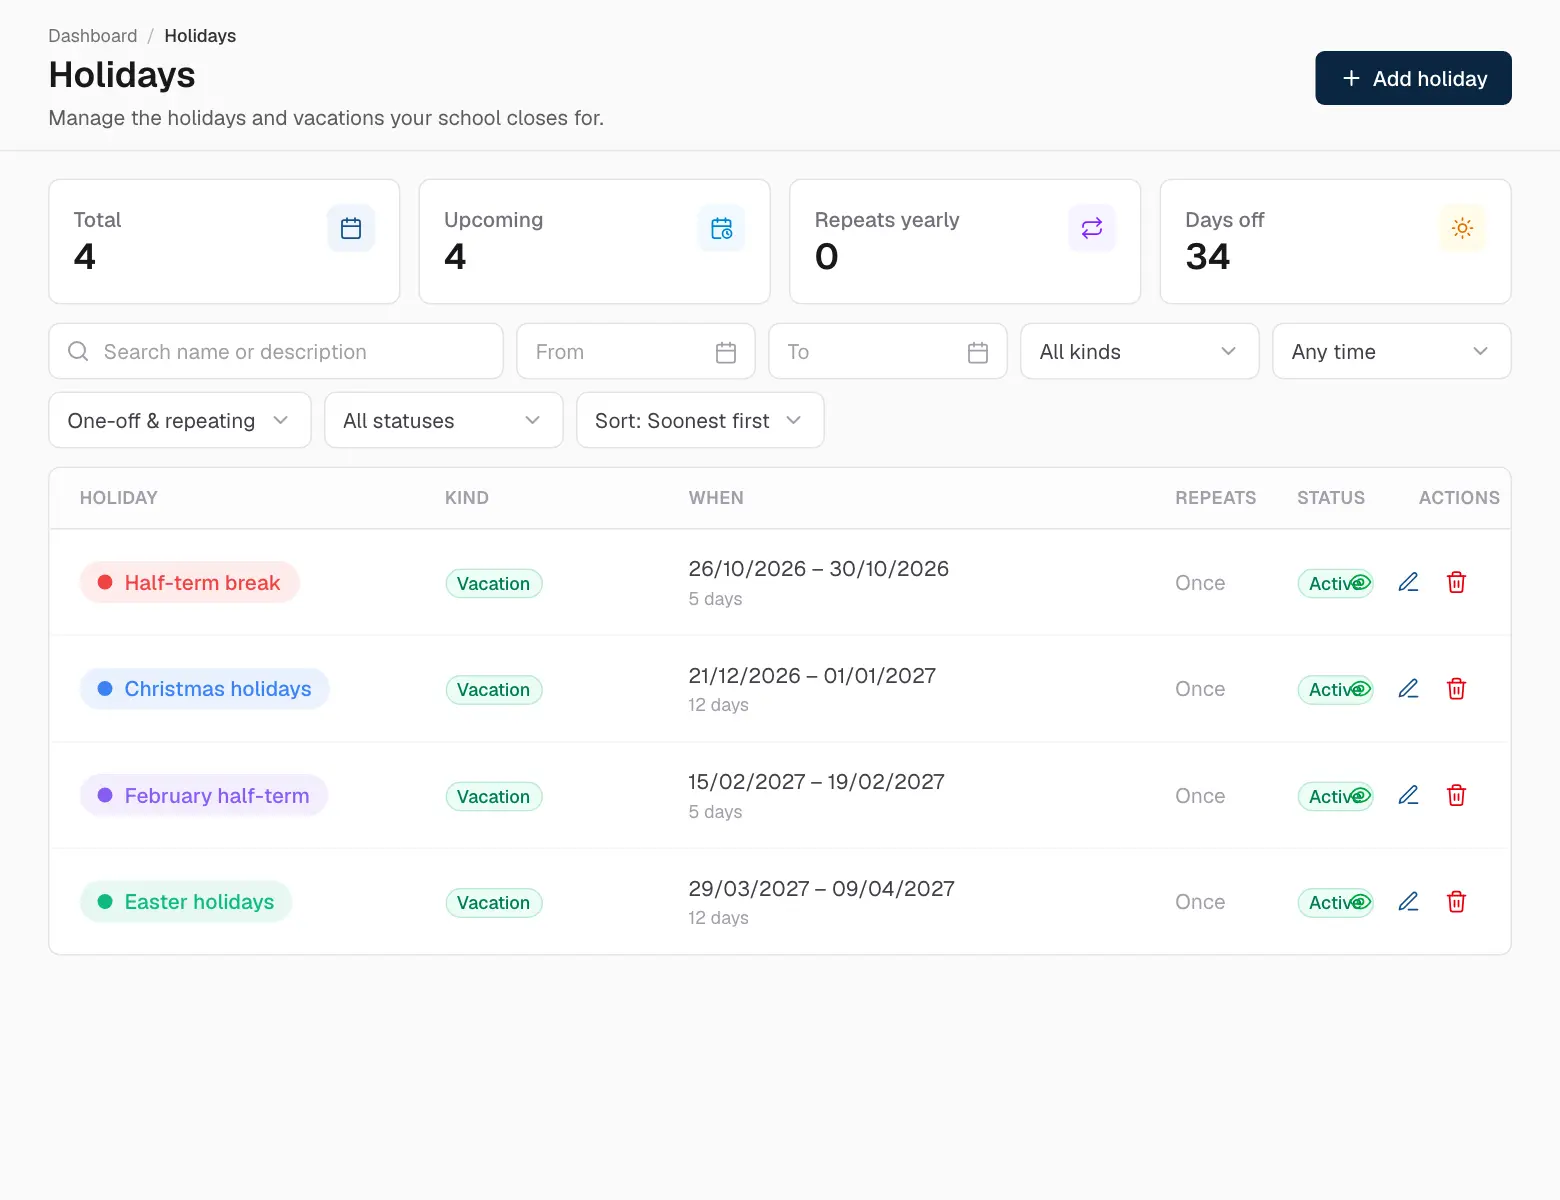
Holidays are the days the school is closed: public and religious holidays, school holidays and vacations. They appear on everyone's calendar.
Click Add holiday.
Enter the name, choose the type and colour, and pick the first and last day.
Turn on Repeats every year for holidays that fall on the same date each year.
Save.
Holidays.
Timetable
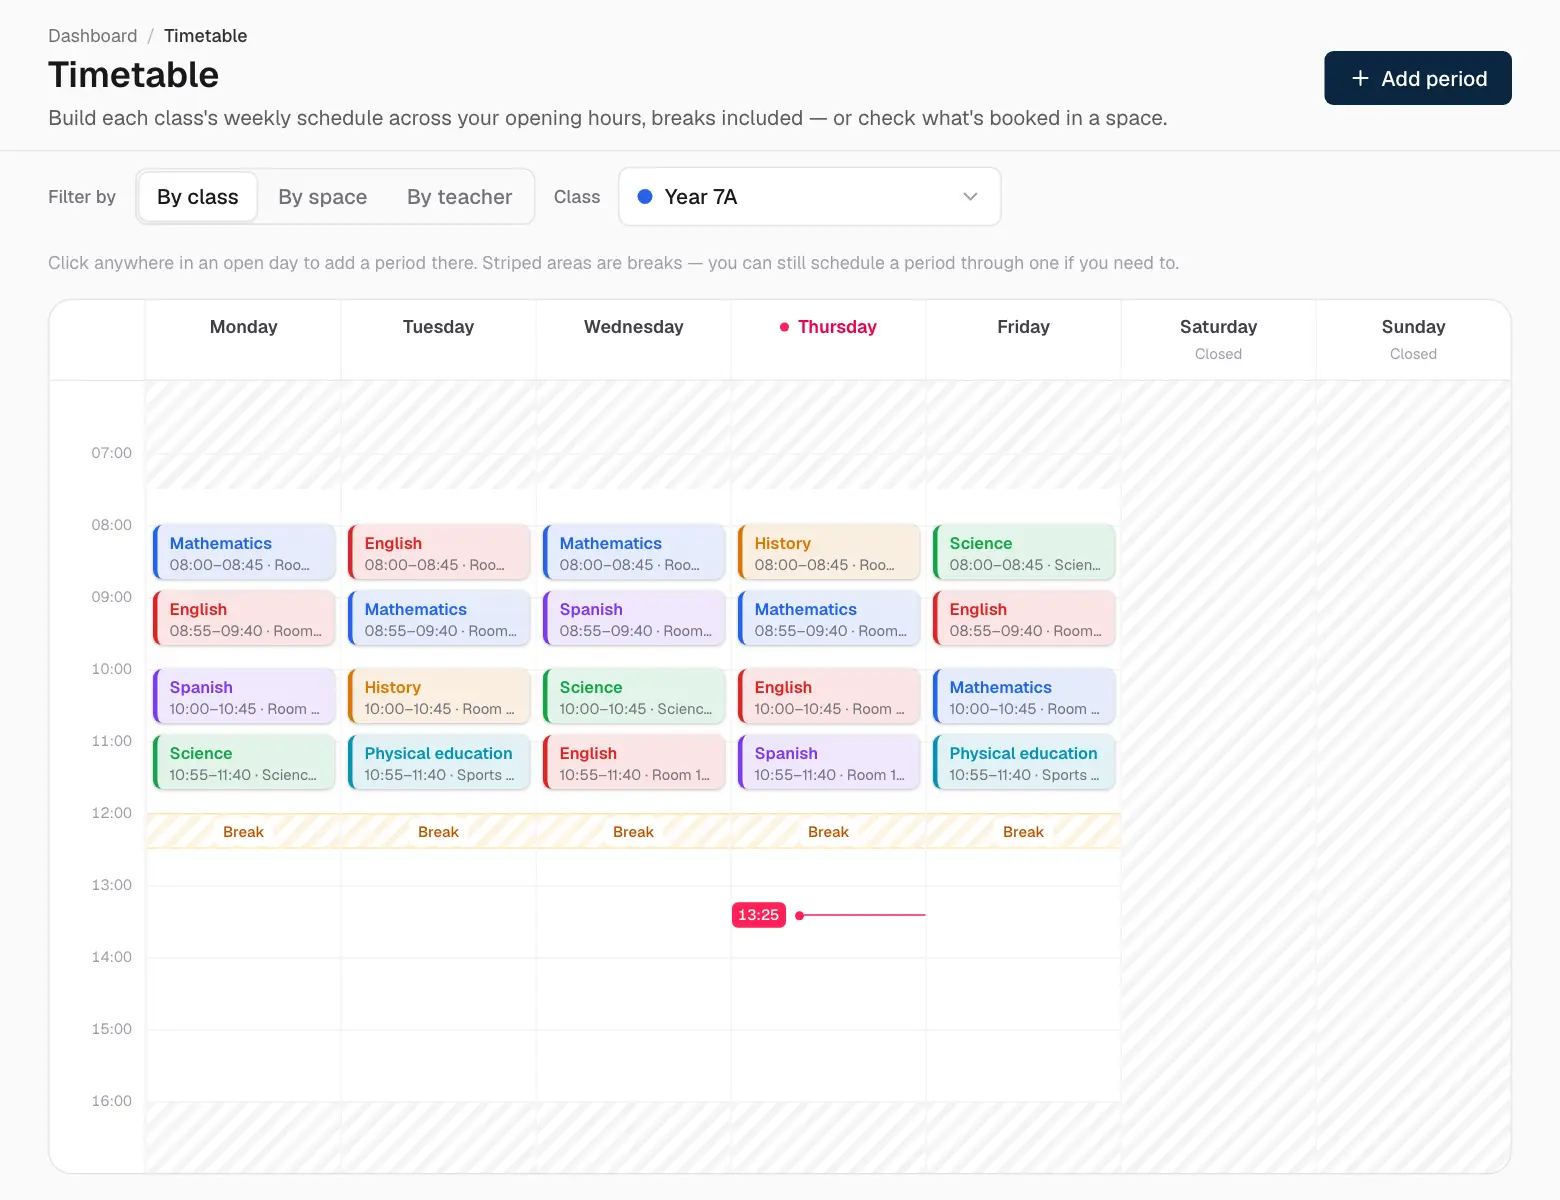
The timetable is each class's week, lesson by lesson.
A class's week.
Choose the class at the top.
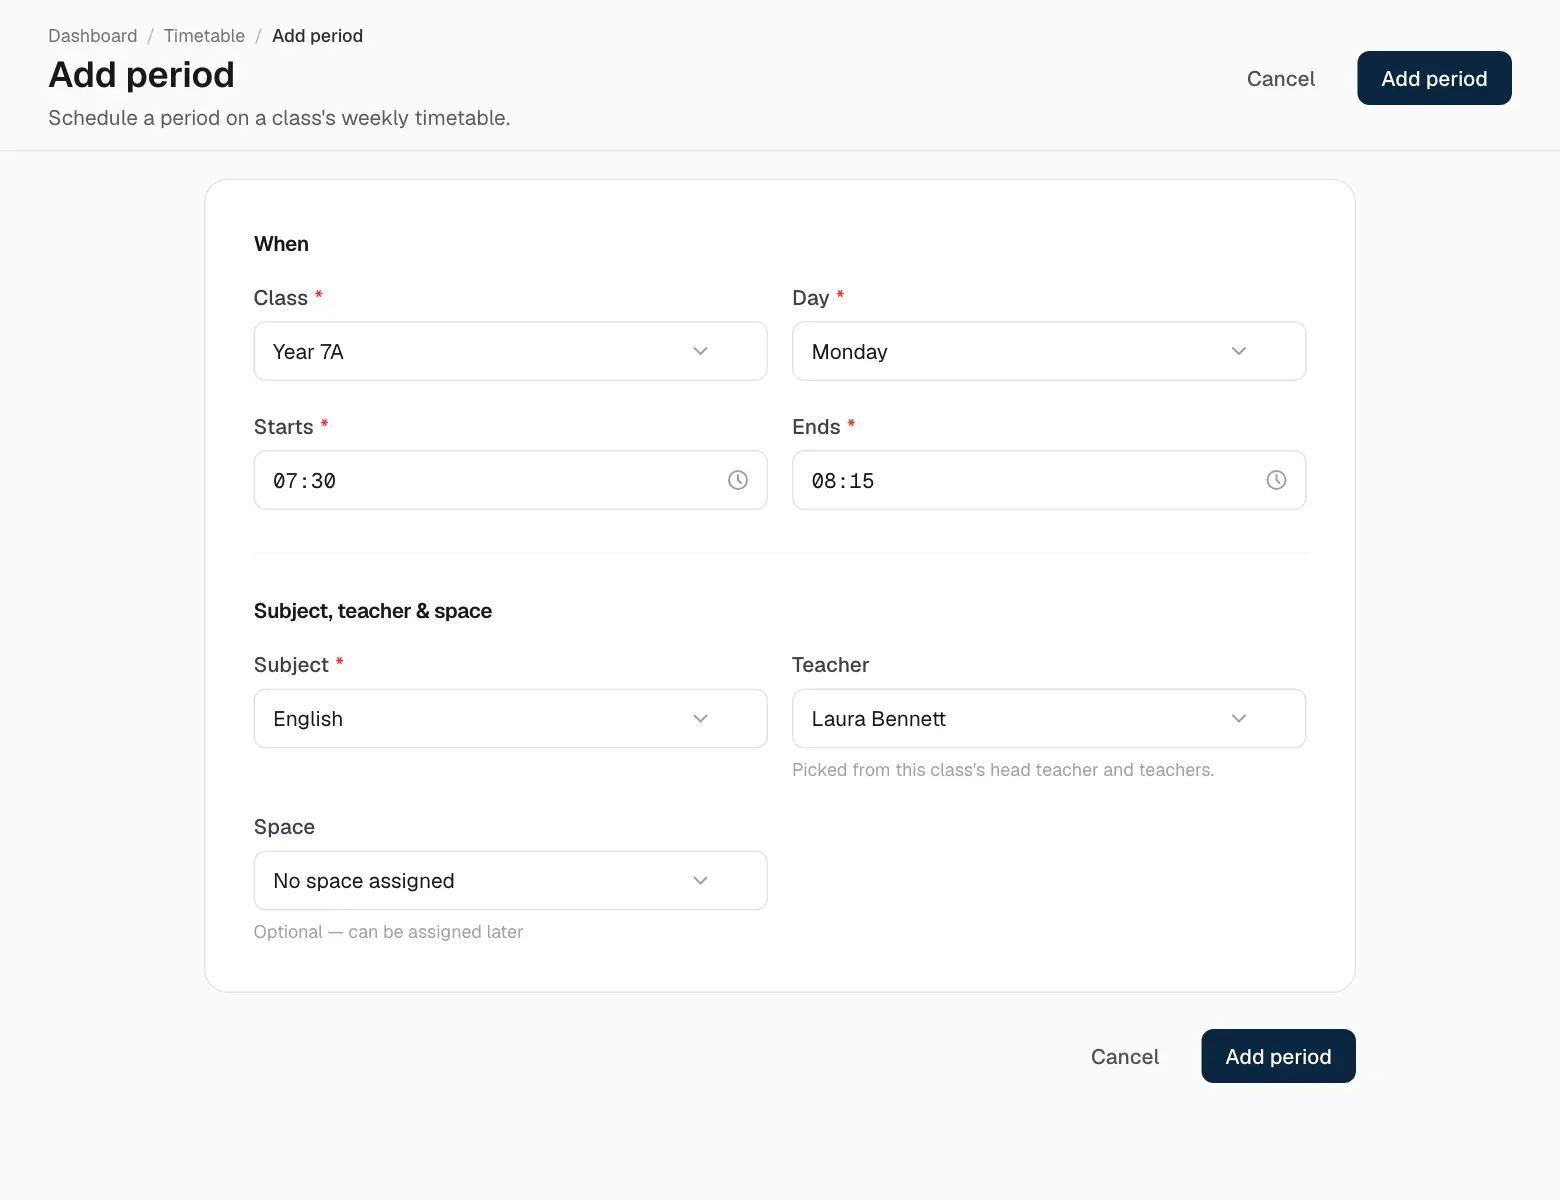
Click an empty spot on the grid — or Add period — to add a lesson.
Pick the subject, the teacher (only the class's own teachers are offered), the room, the day and the times.
Save. The lesson appears on the grid and on its teacher's and students' timetables.
Adding a lesson.
Switch between By class, By space and By teacher to check a room's bookings or a teacher's week. Striped areas are breaks and closed days.
Calendar
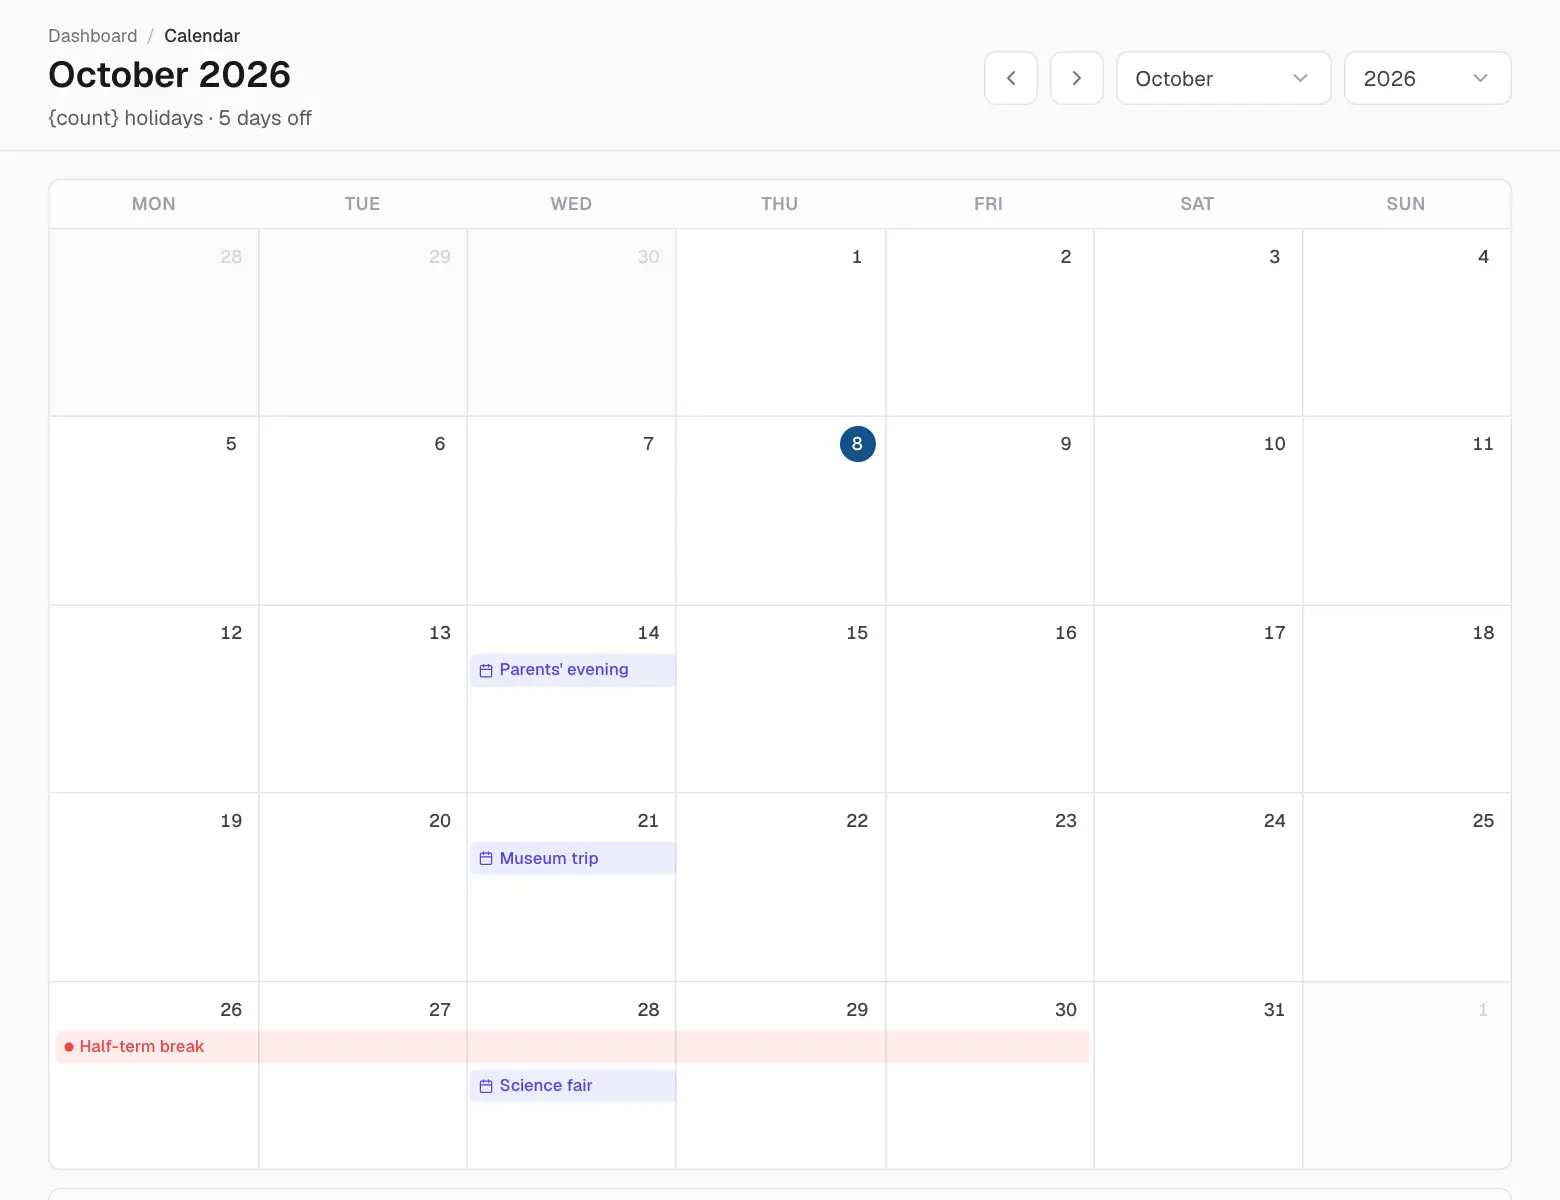
Calendar shows the whole month at a glance: holidays, school events and, for those who manage leave, who is away. Use the arrows to change month and click an entry for its details.
The month calendar.
06
Records
Attendance
Attendance is taken with registers: one per lesson (or per day), listing every student in the class.
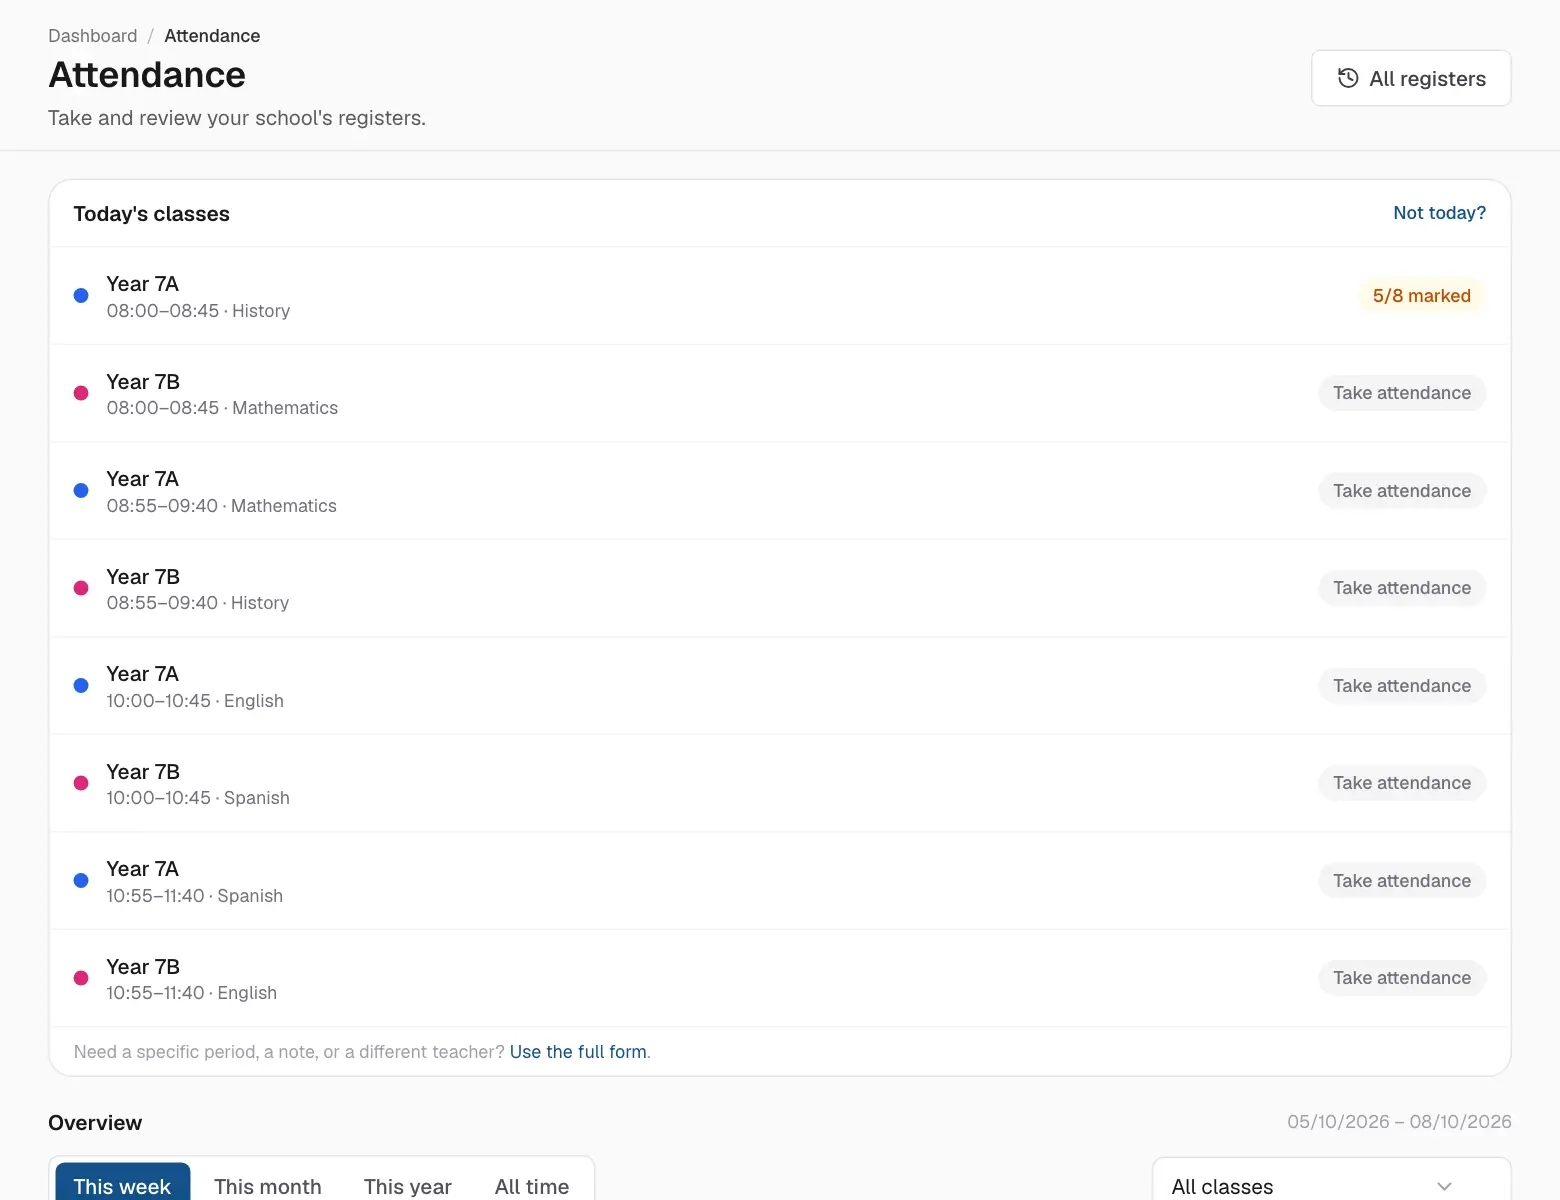
Today's lessons and the attendance overview.
Open Attendance. Today's lessons are listed at the top.
Click Take attendance beside the lesson.
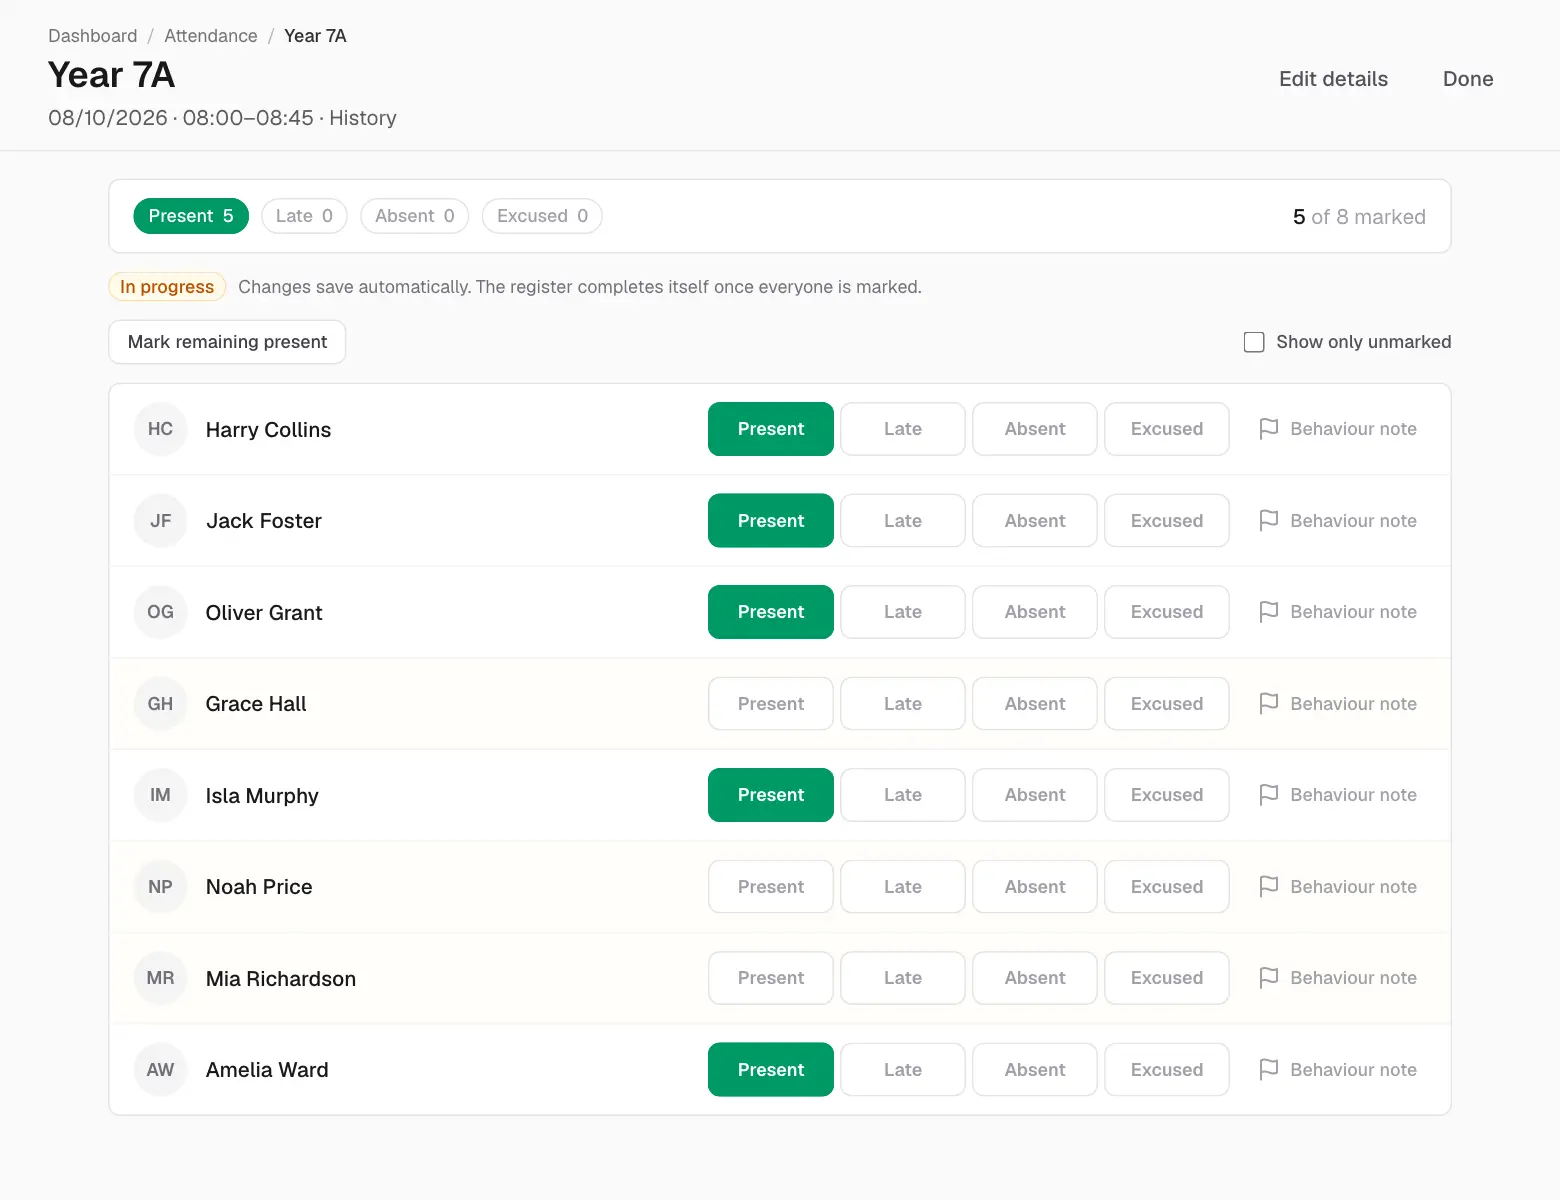
Mark each student Present, Late, Absent or Excused. Mark remaining present fills in everyone you haven't marked yet.
That's it — every click is saved instantly.
A register in progress.
In progress means some students are still unmarked; the register becomes Complete once everyone is marked.
The flag beside a student adds a behaviour note without leaving the register.
Not today? opens a register for another day, lesson or teacher.
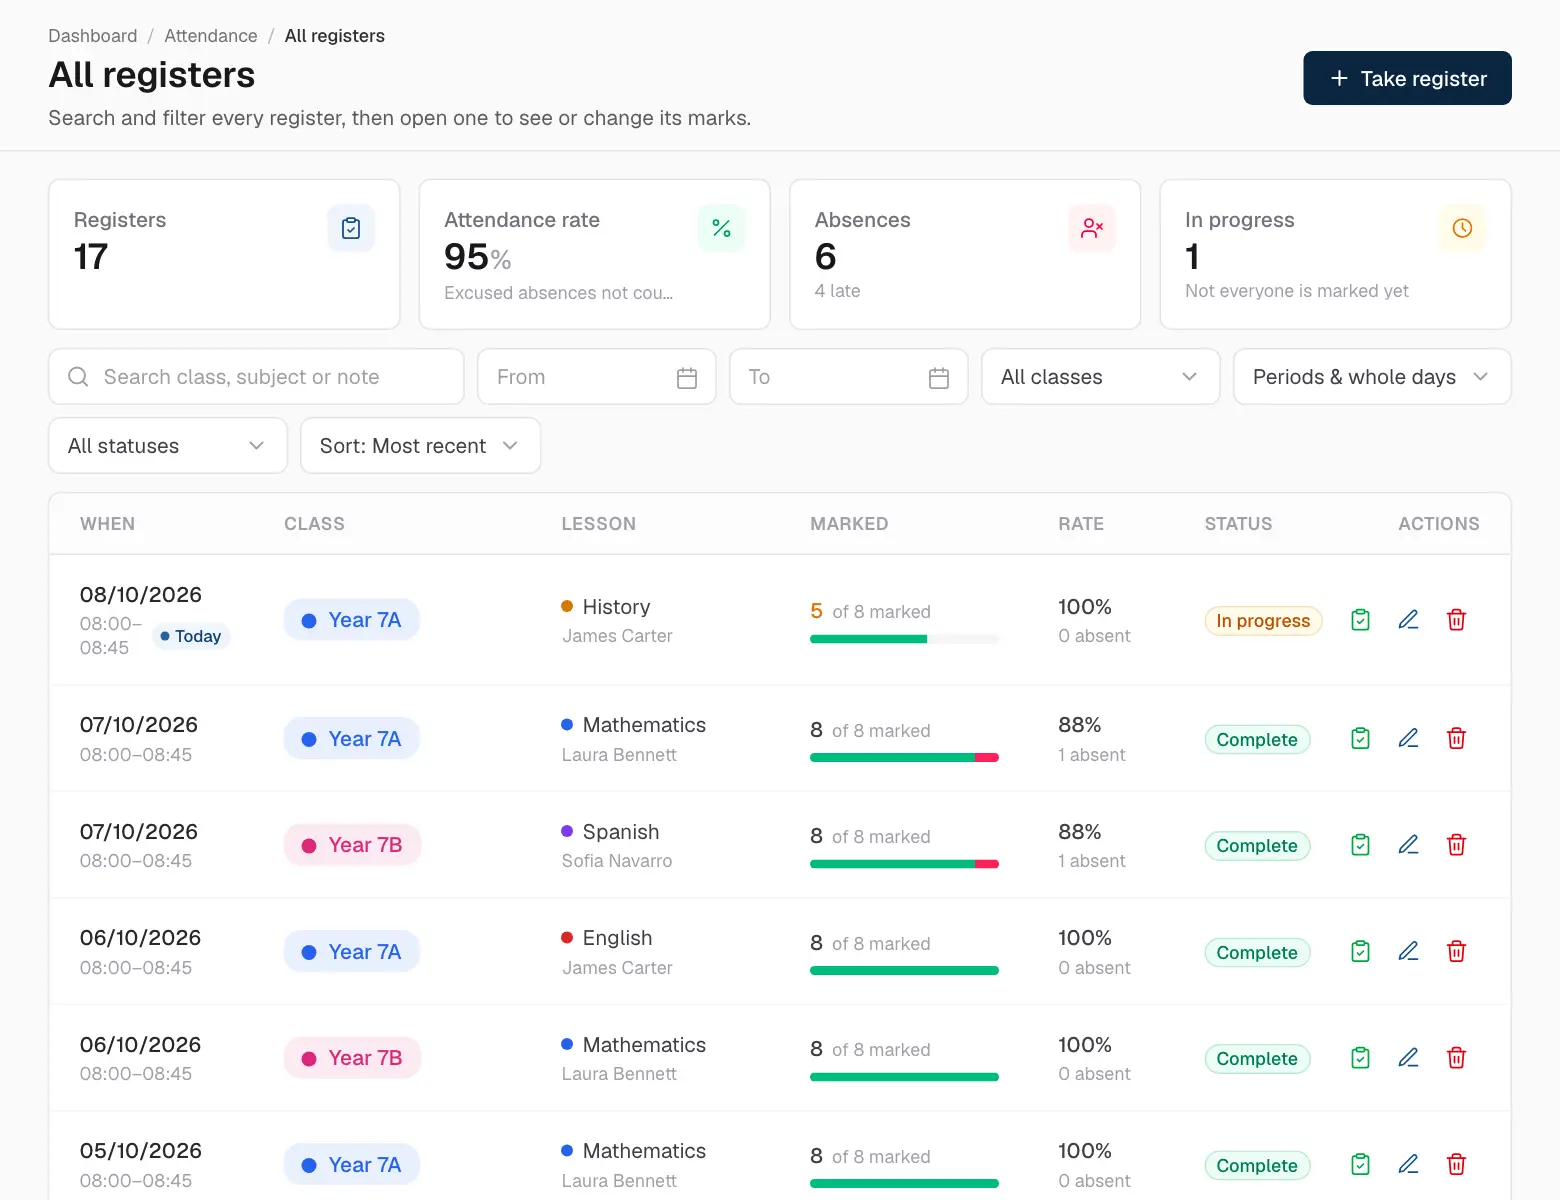
All registers lists every register ever taken, with filters.
Every register, with filters.
Below today's lessons, the overview shows attendance for this week, month or year: the rate, absences and registers still in progress.
Grades
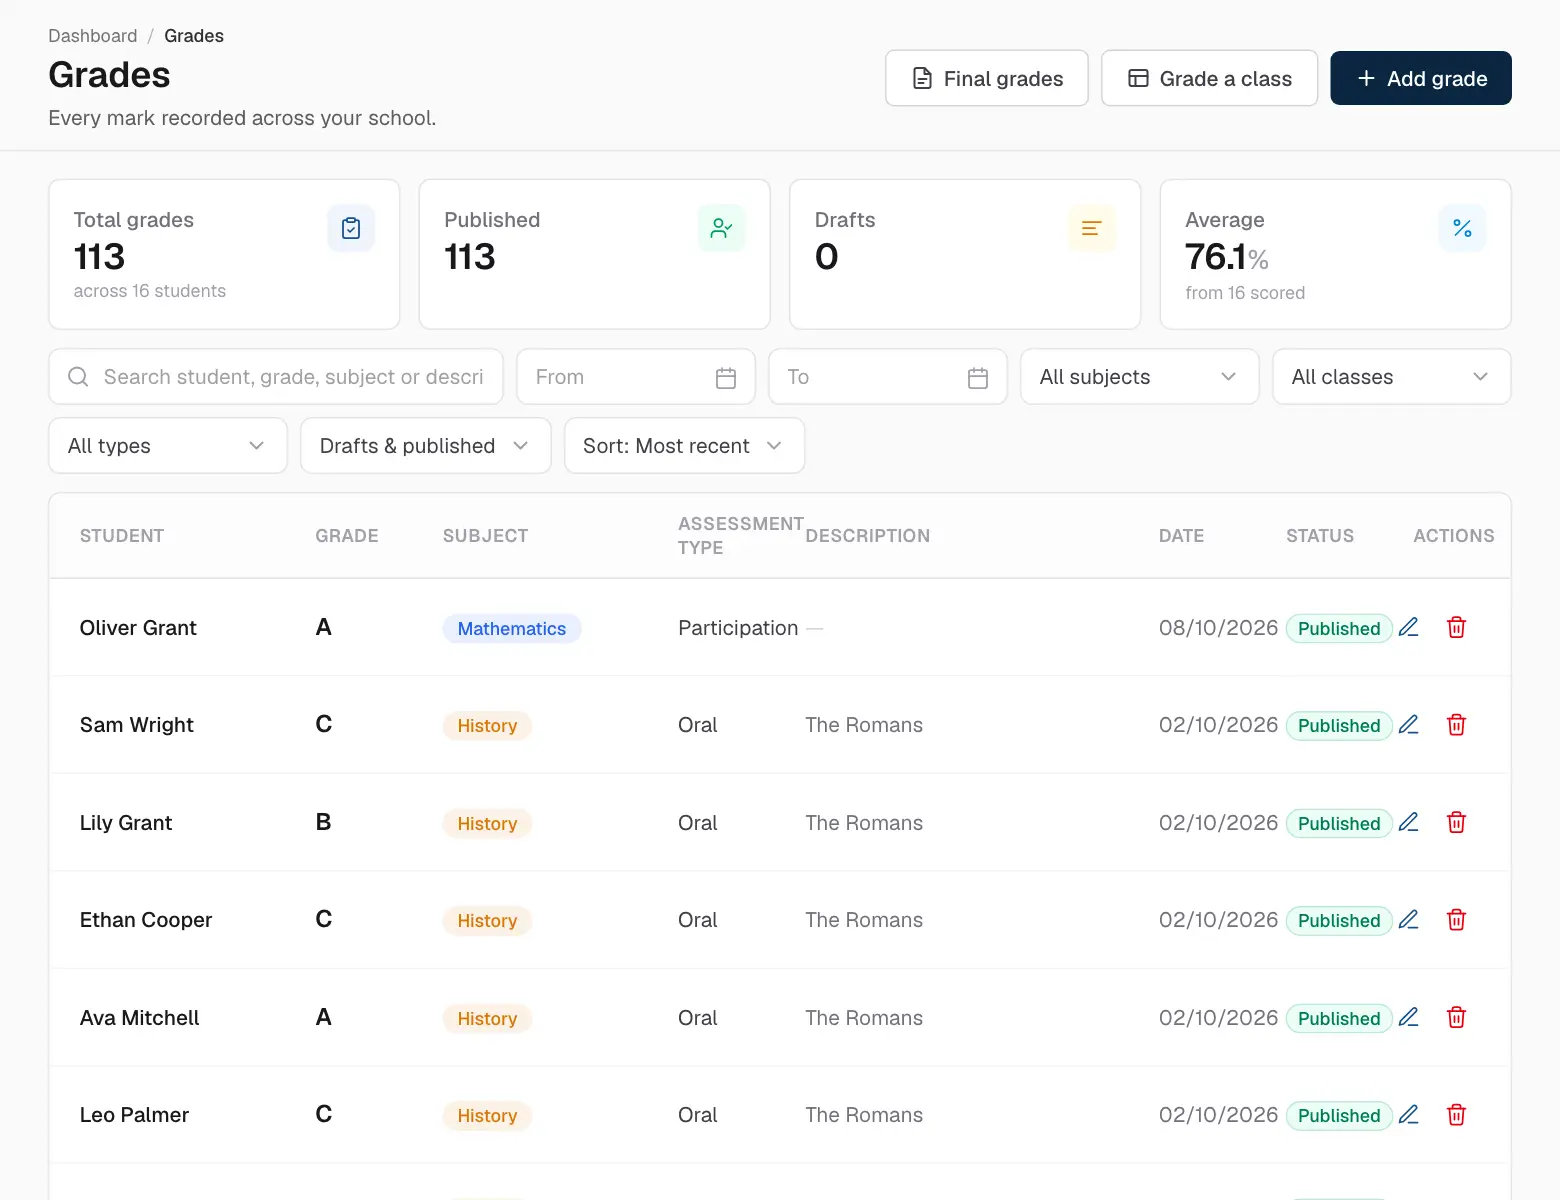
Grades holds every mark given at your school. Marks follow your school's grading scale (chosen in Settings).
All grades, with filters.
Click Add grade.
Choose the student, subject, type (exam, quiz, homework, oral…) and the mark. Add a score too if you like — for example 18 out of 20.
Choose Published to show it to the student and their parents straight away, or Draft to keep it private for now.
Save.
Grading a whole class
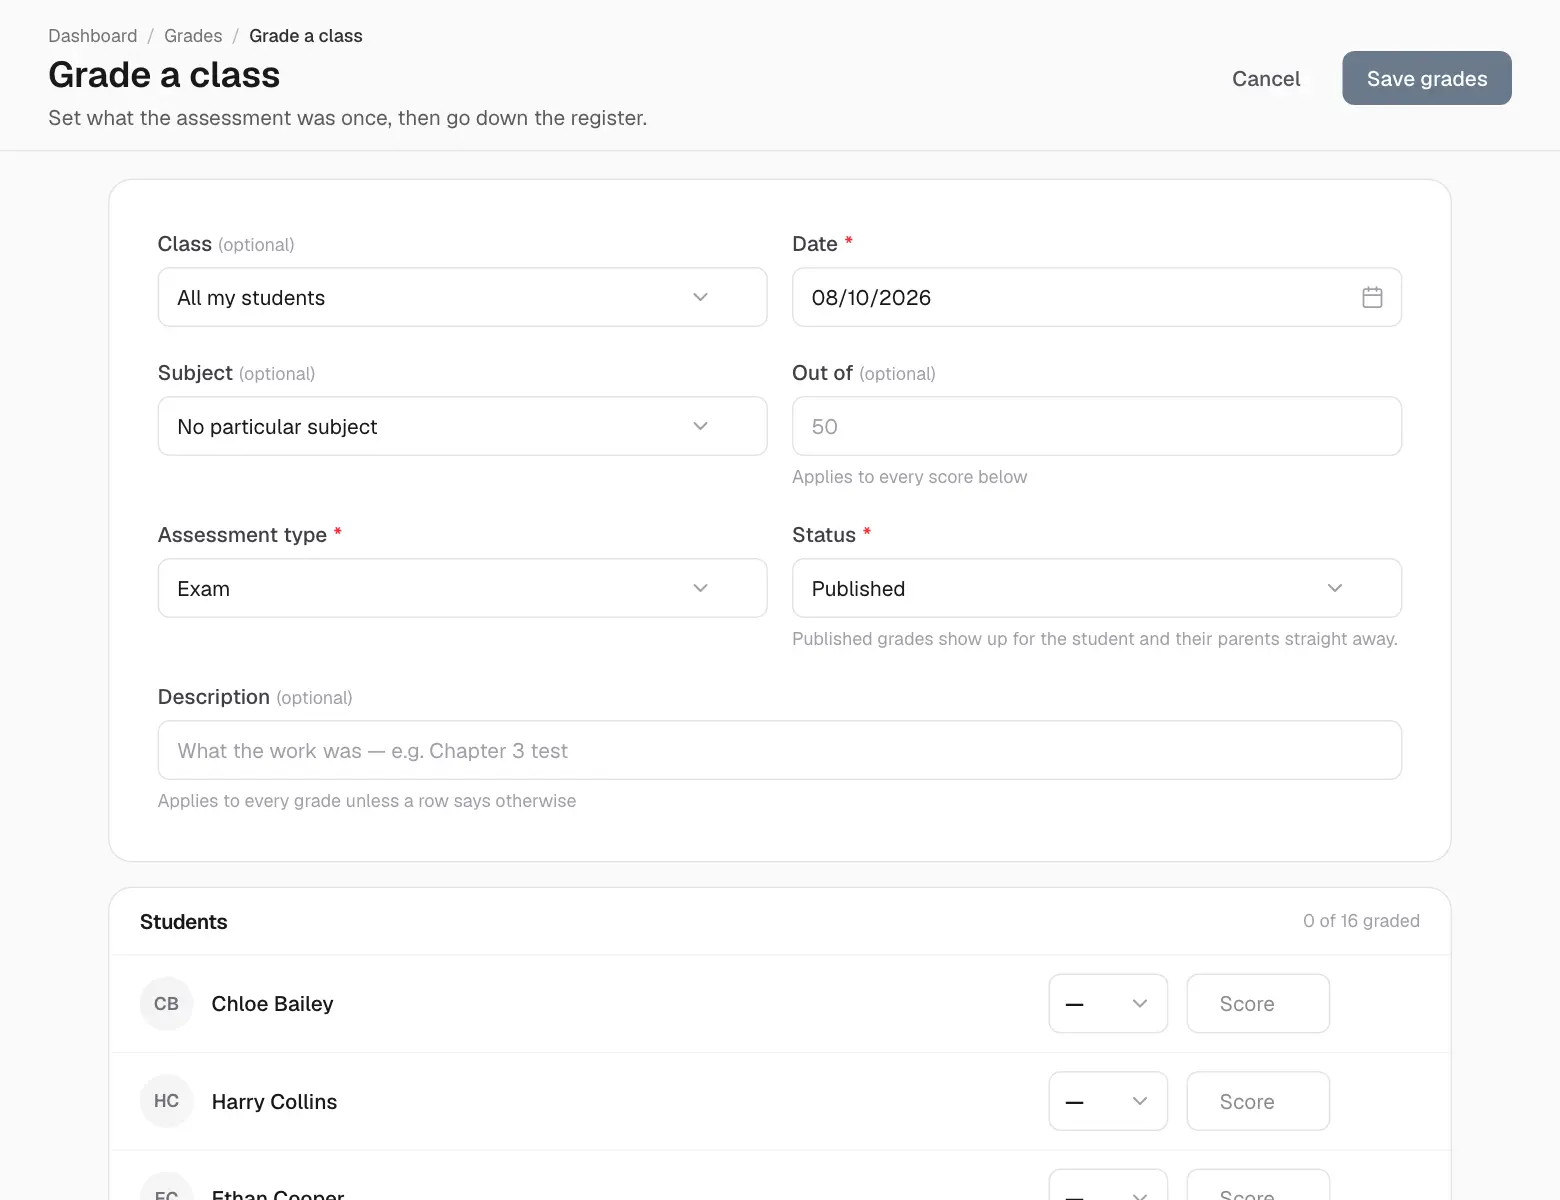
Grade a class is the fastest way to mark a test: describe it once, then go down the list.
Click Grade a class (on Grades or on the dashboard).
Choose the class, subject, date and type — and the maximum score if you use points.
Enter each student's mark and/or score.
Click Save grades.
Grading a class in one go.
Final grades
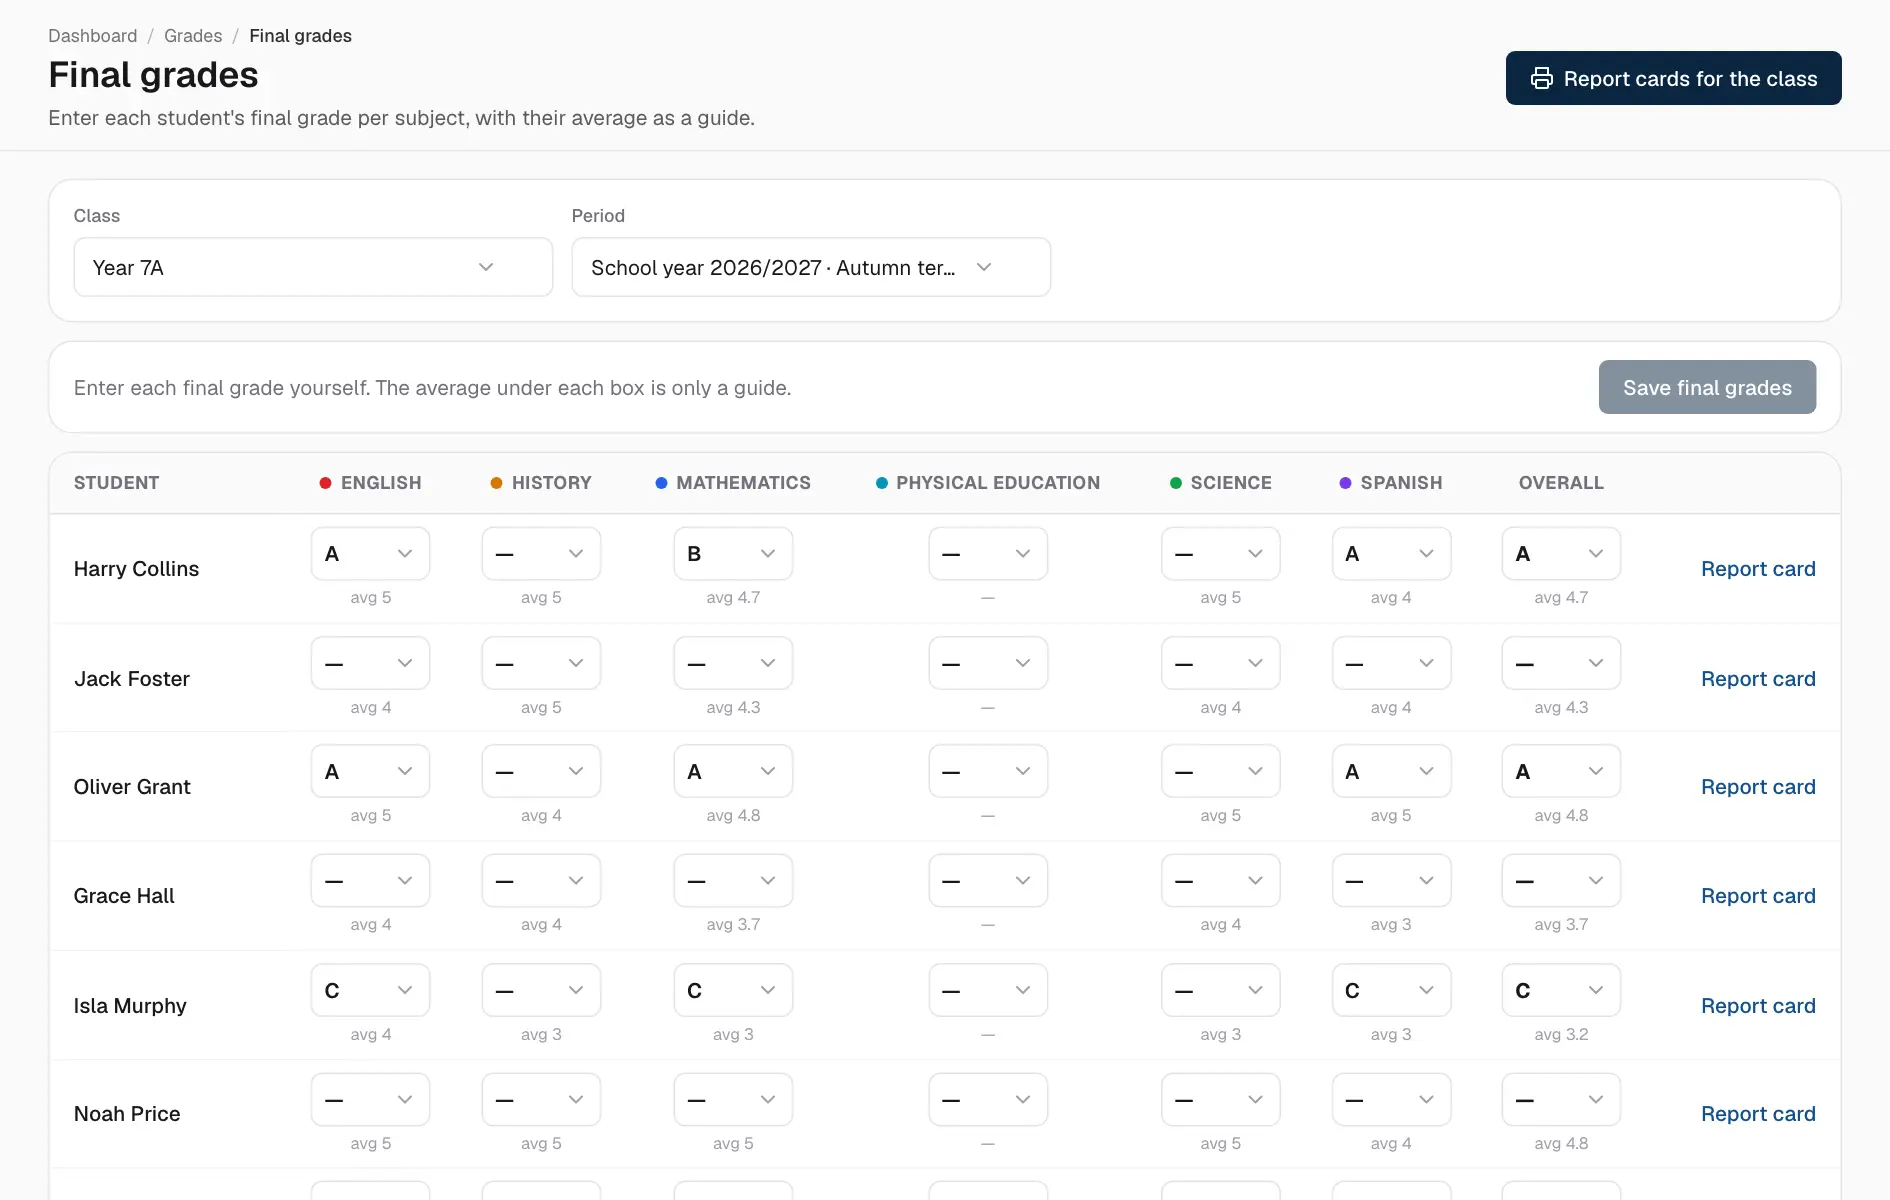
At the end of a term, Final grades shows each student's average in every subject so you can give their final grade.
On Grades, click Final grades.
Choose the class and the period — a term or the whole year.
Enter each final grade. The average under each box is only a guide.
Click Save final grades.
Final grades, with each student's averages.
Report cards
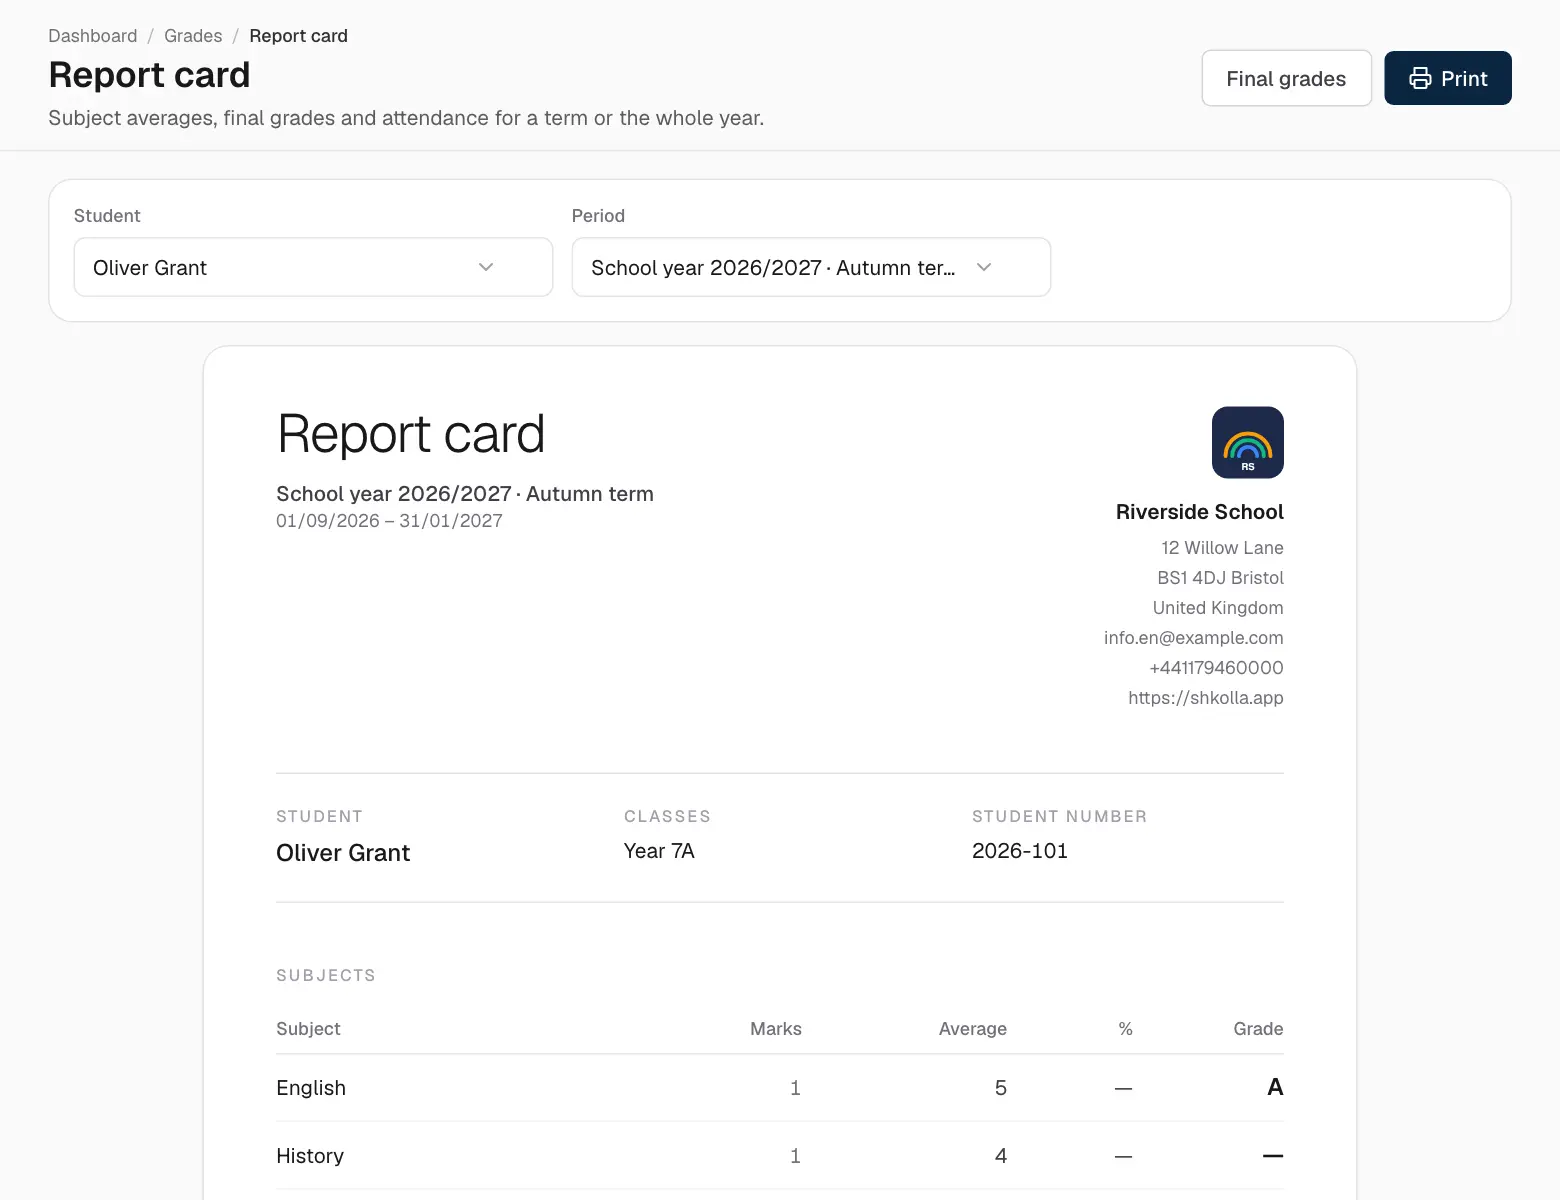
A report card collects a student's subject averages, final grades and attendance for a term or a year, under your school's letterhead.
Open Report card from Grades (or from Final grades).
Pick the student and the period.
Click Print to print it or save it as a PDF.
A report card.
Exams
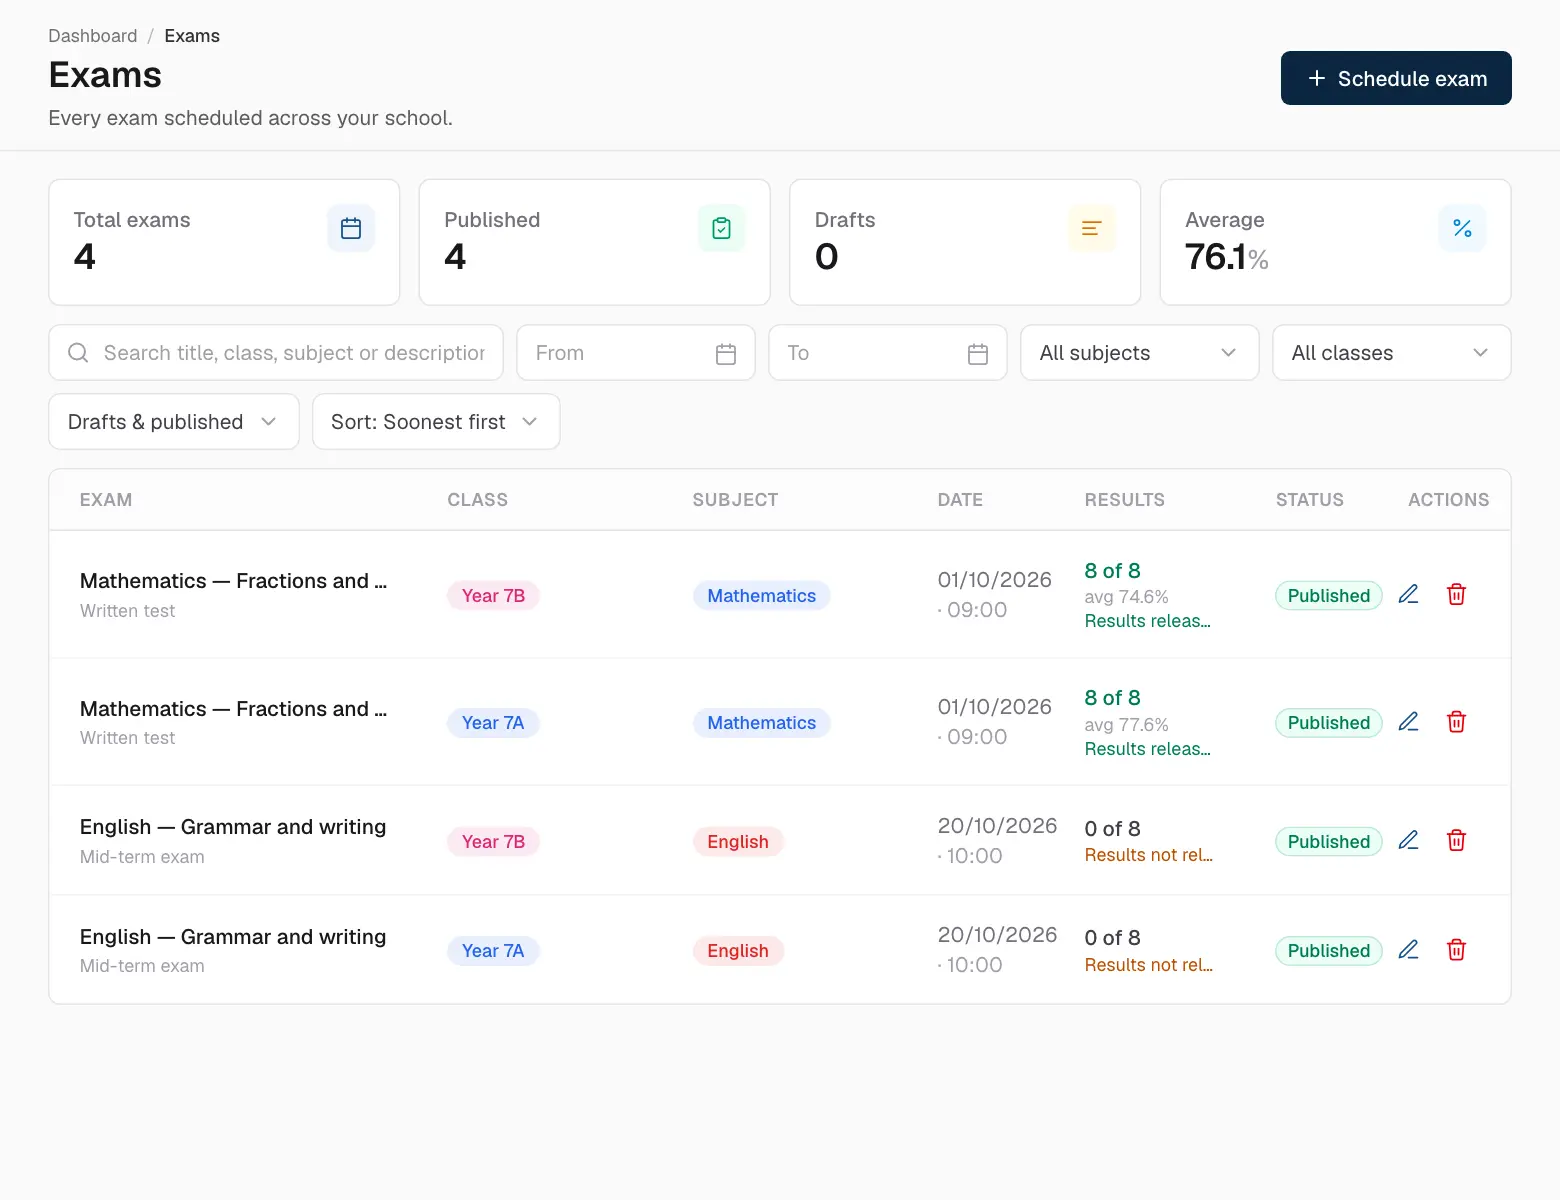
Exams are scheduled in advance, so students and parents see them coming. The results you enter become grades automatically.
Exams.
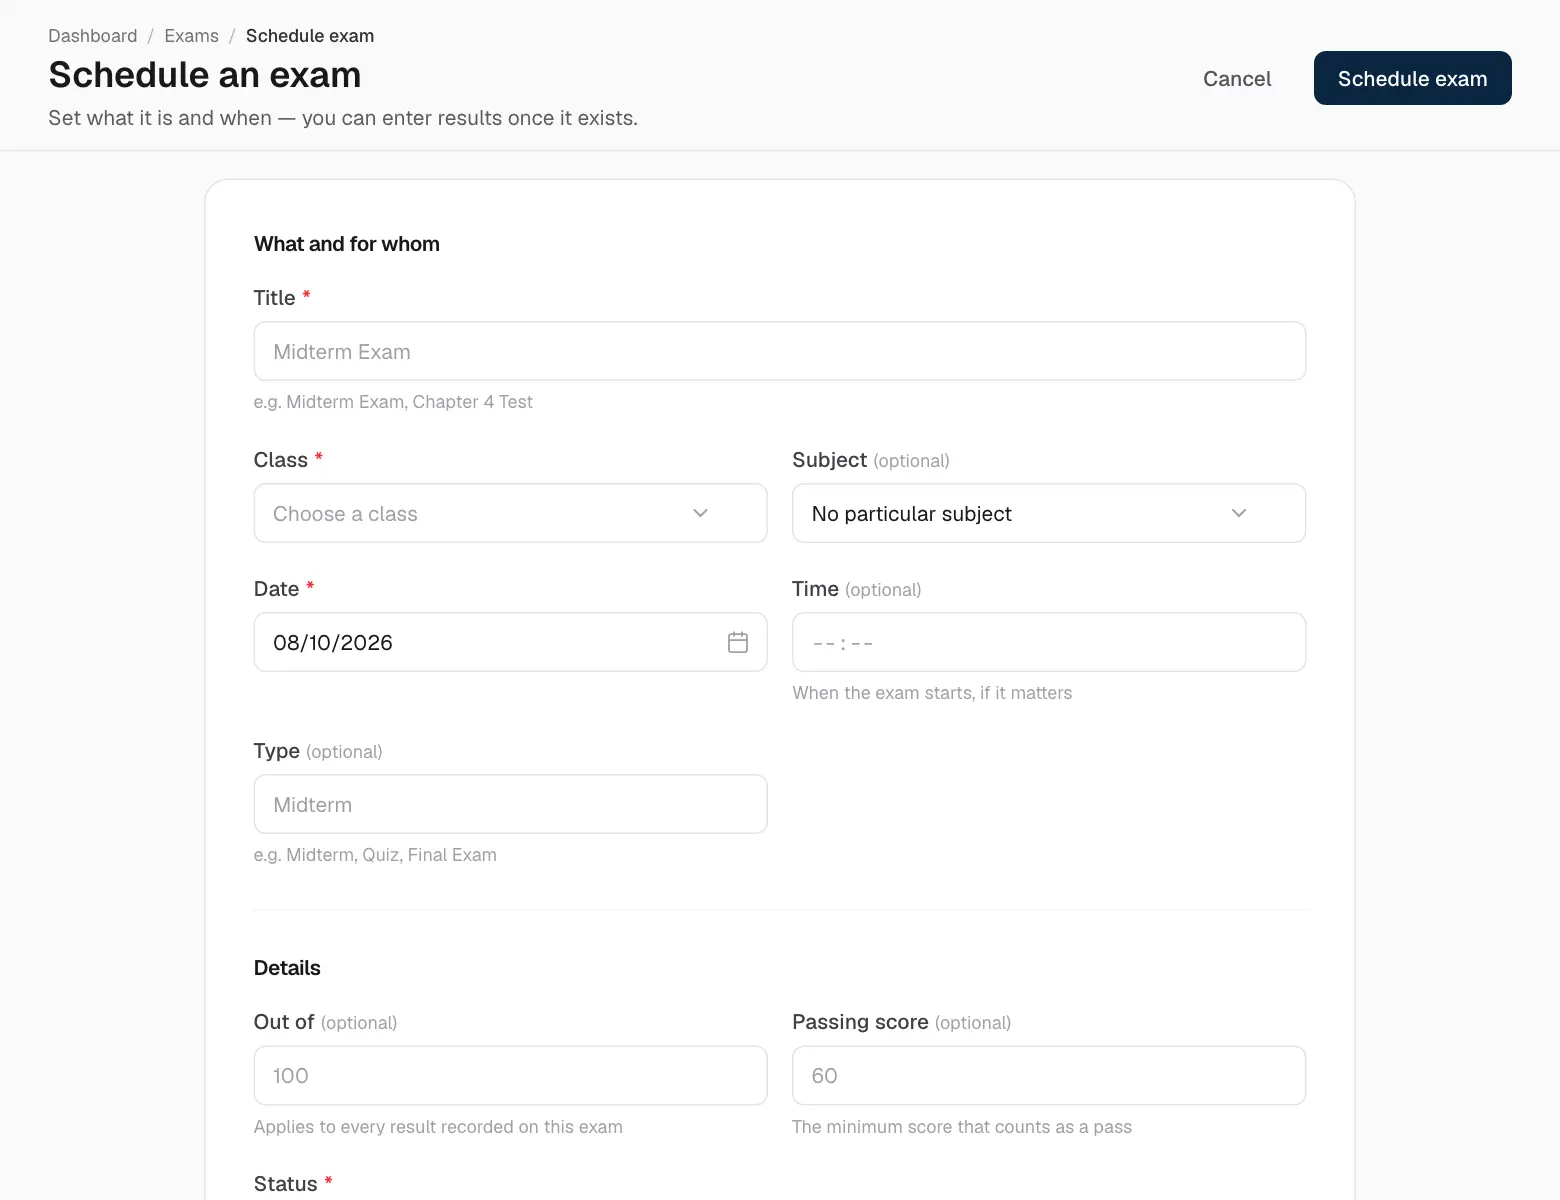
Click Schedule exam.
Choose the class and subject, then give it a title, type, date and time — and if you like a maximum and a passing score.
Save. It appears on the exam list of every student in the class.
Scheduling an exam.
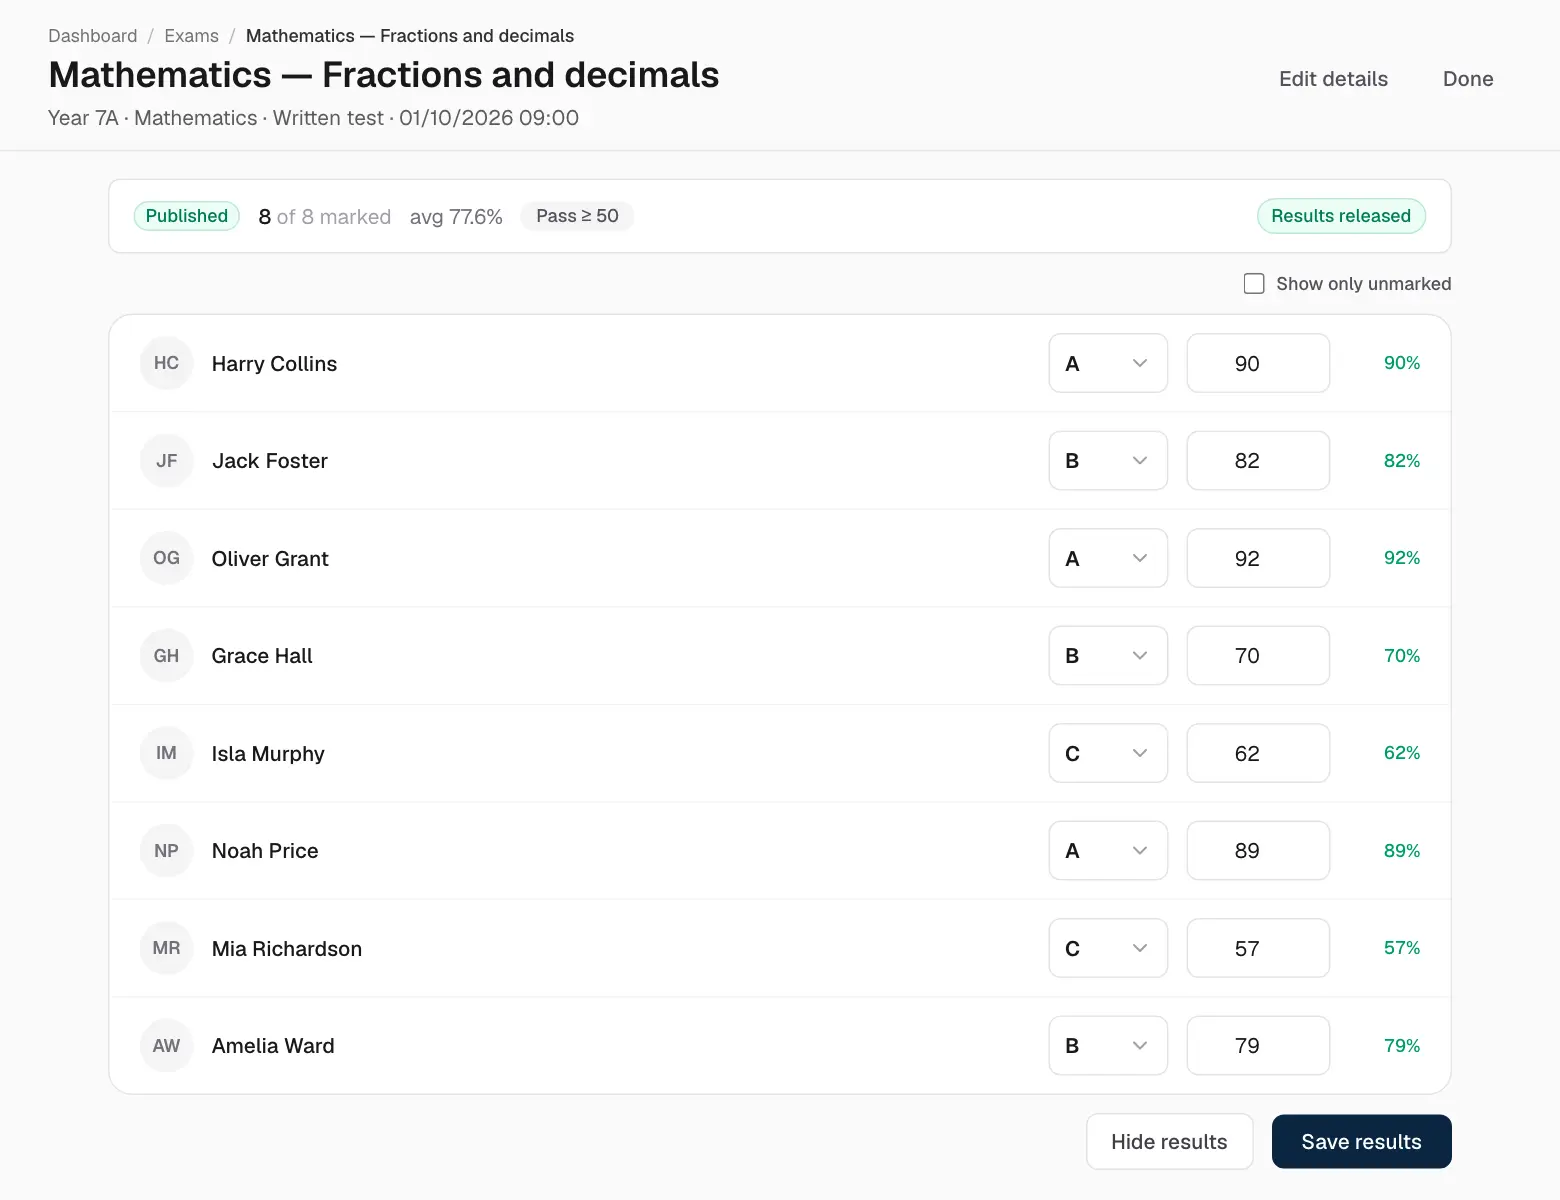
After the exam, open it to enter the results:
Enter each student's score and/or mark. The percentage and the pass or fail colour are worked out for you.
Click Save results to save them privately, or Save & release results to show them to students and parents.
Changed your mind? Hide results hides released results again.
Results, released to students and parents.
Assignments
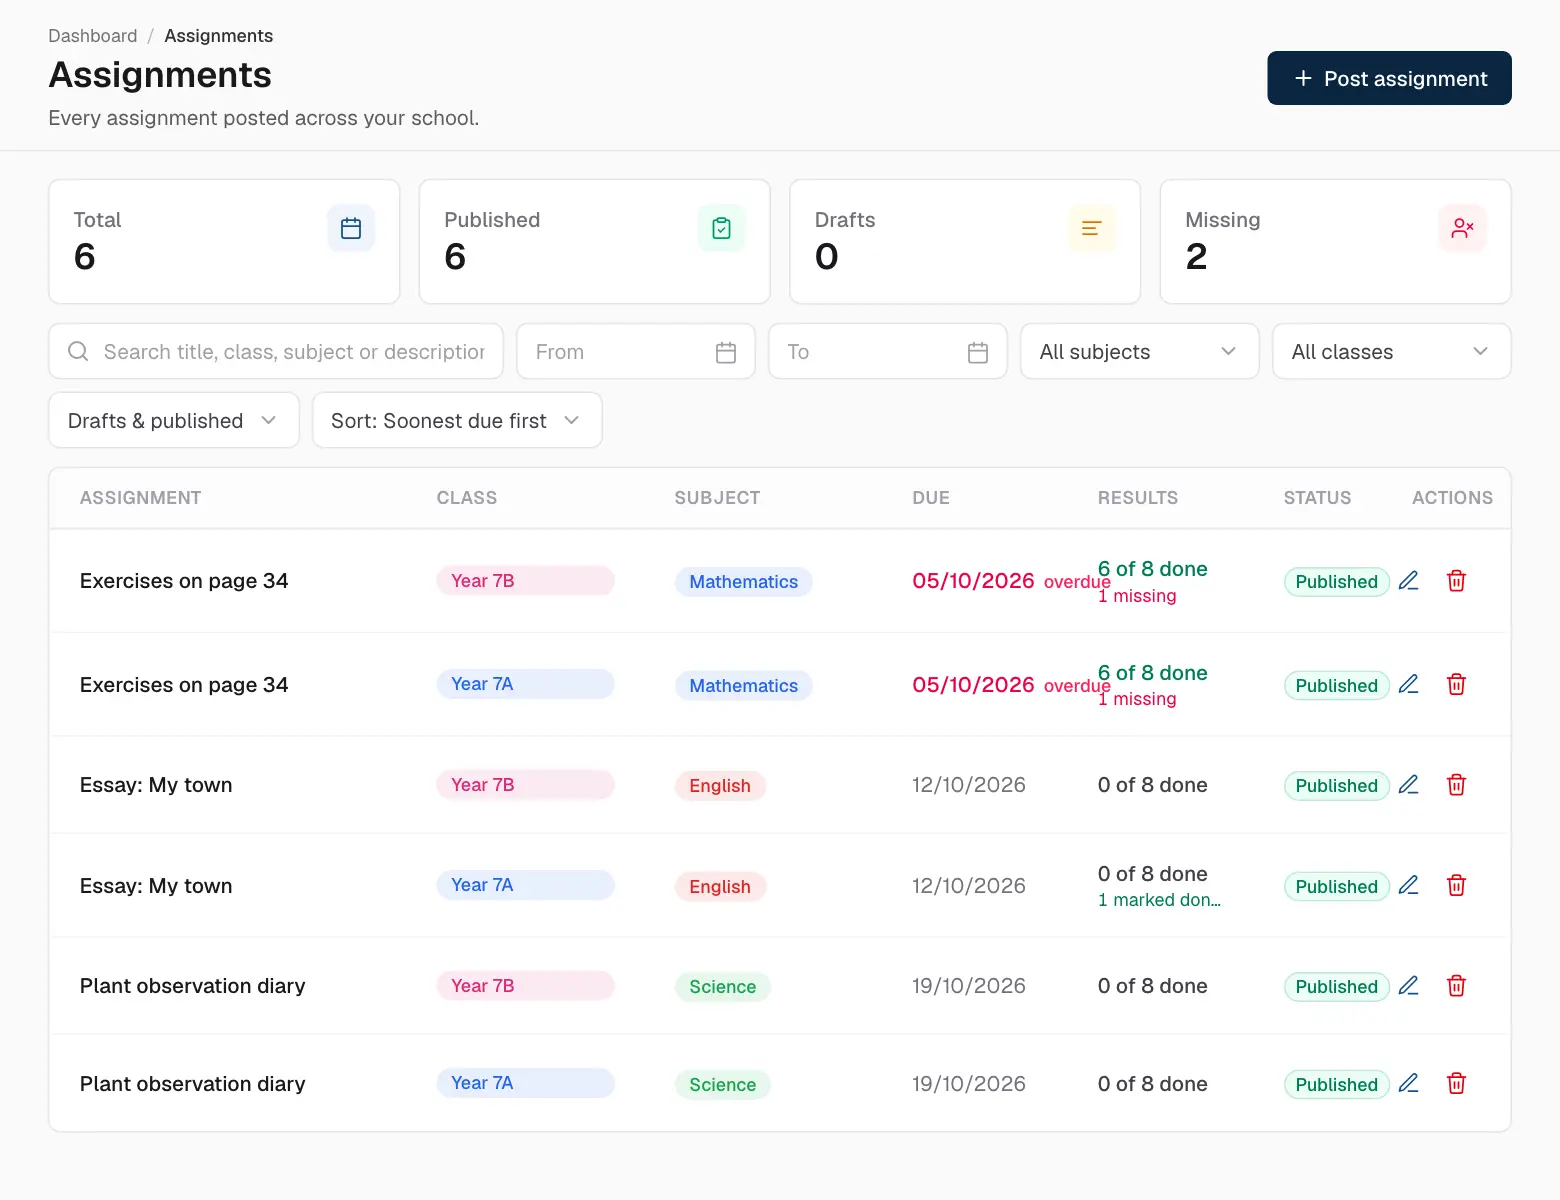
Assignments are homework and projects with a due date. Students and parents see them on their own Assignments page.
Assignments.
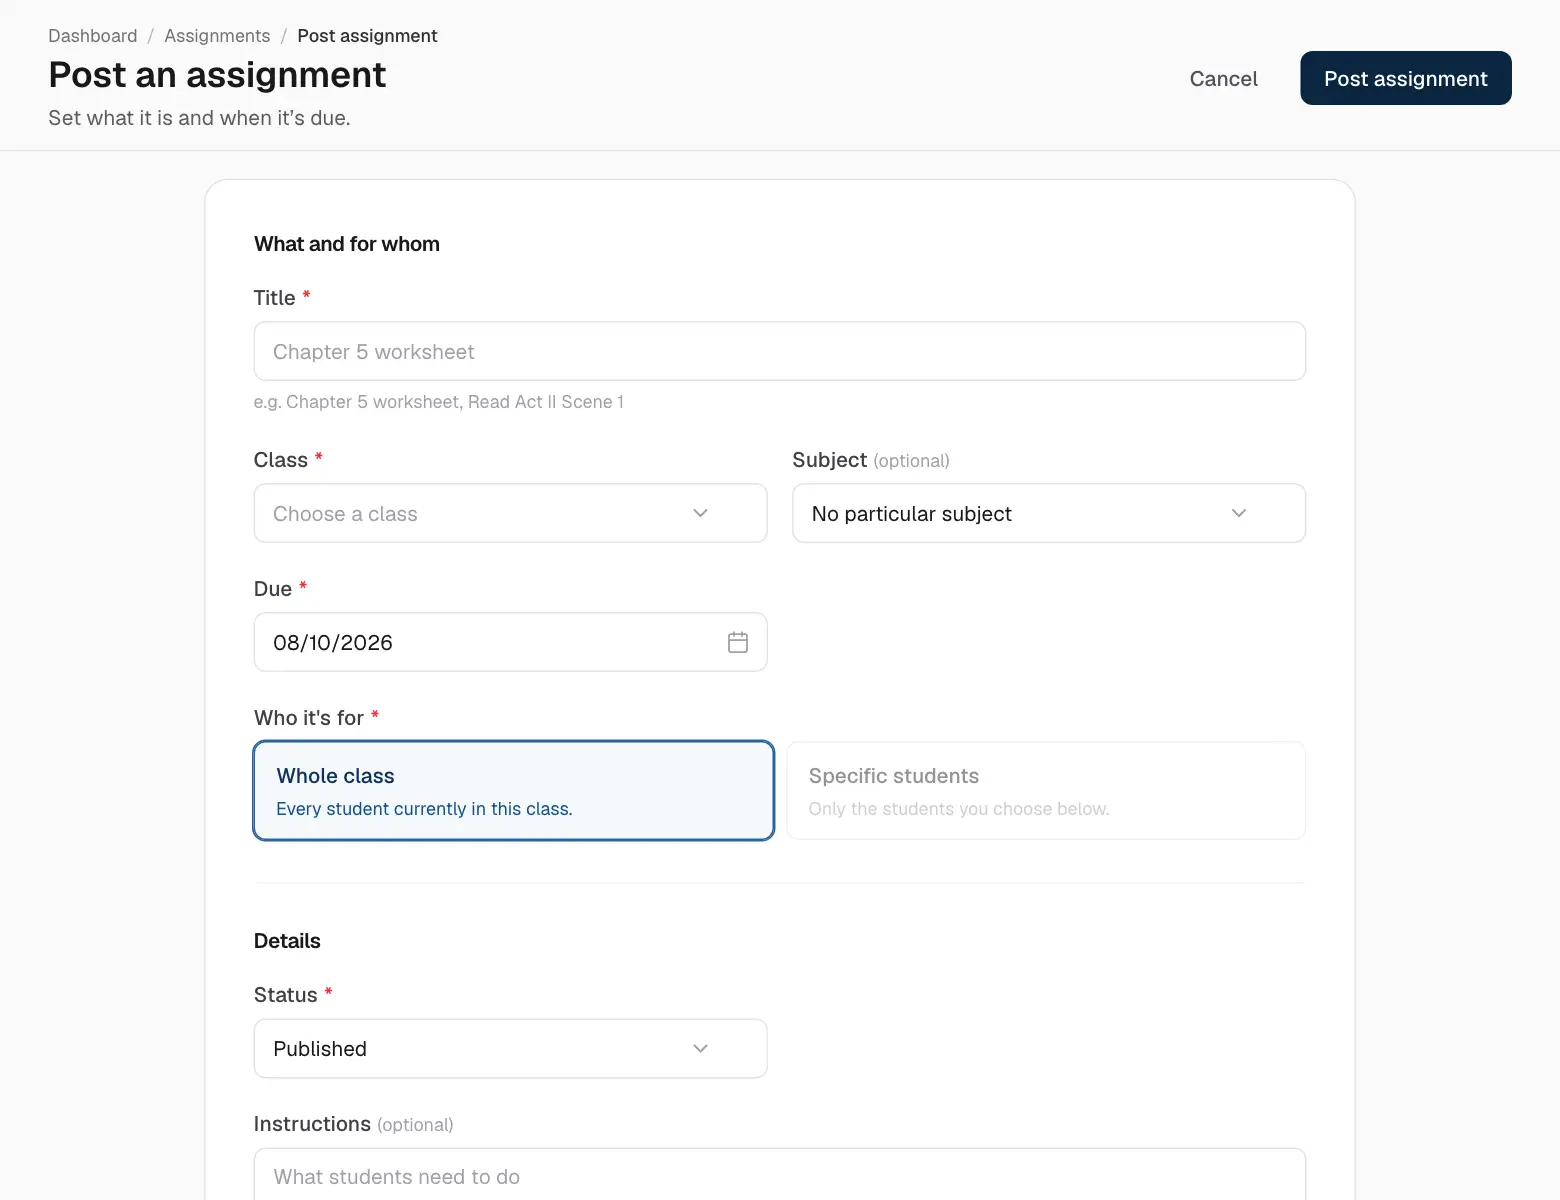
Click Post assignment.
Choose the class and subject, write the title and instructions, and set the due date.
Choose who it's for: Whole class or Specific students.
Click Post assignment.
Posting an assignment.
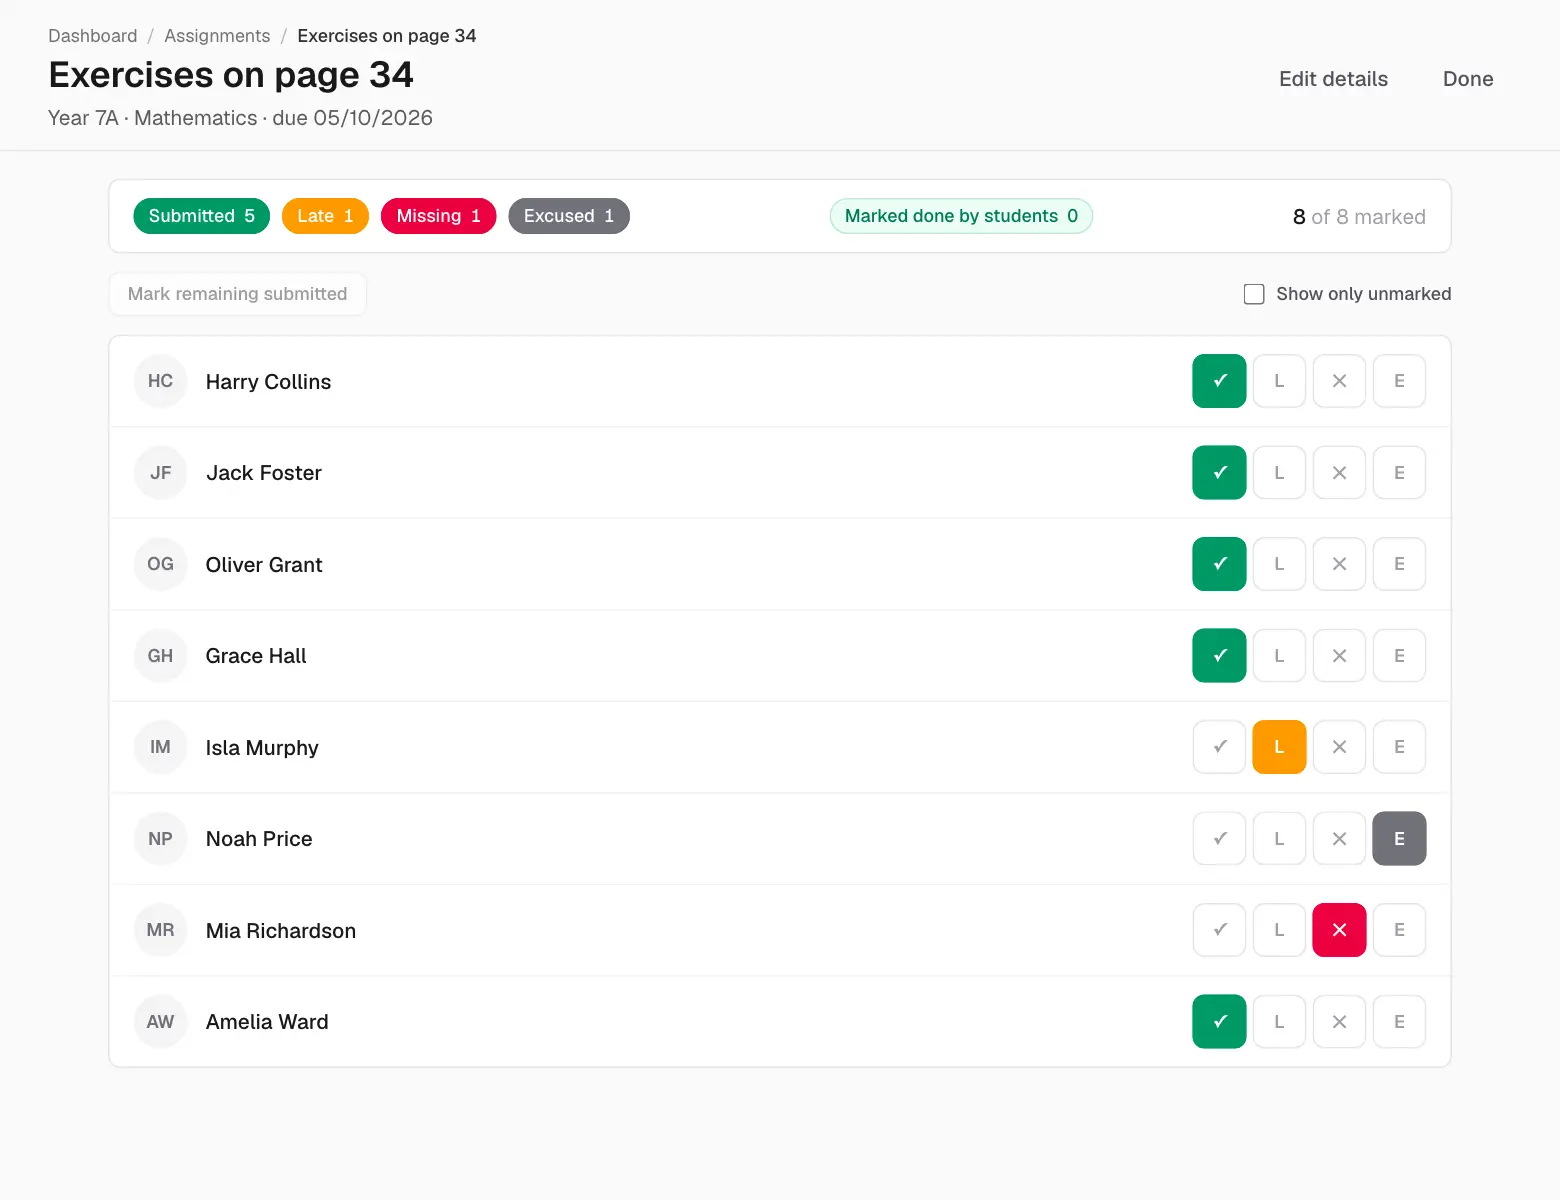
After the due date, open the assignment to check it off: mark each student Submitted, Late, Missing or Excused. Students can also tick Mark as done themselves — the count is shown at the top.
Checking an assignment off.
Behaviour notes
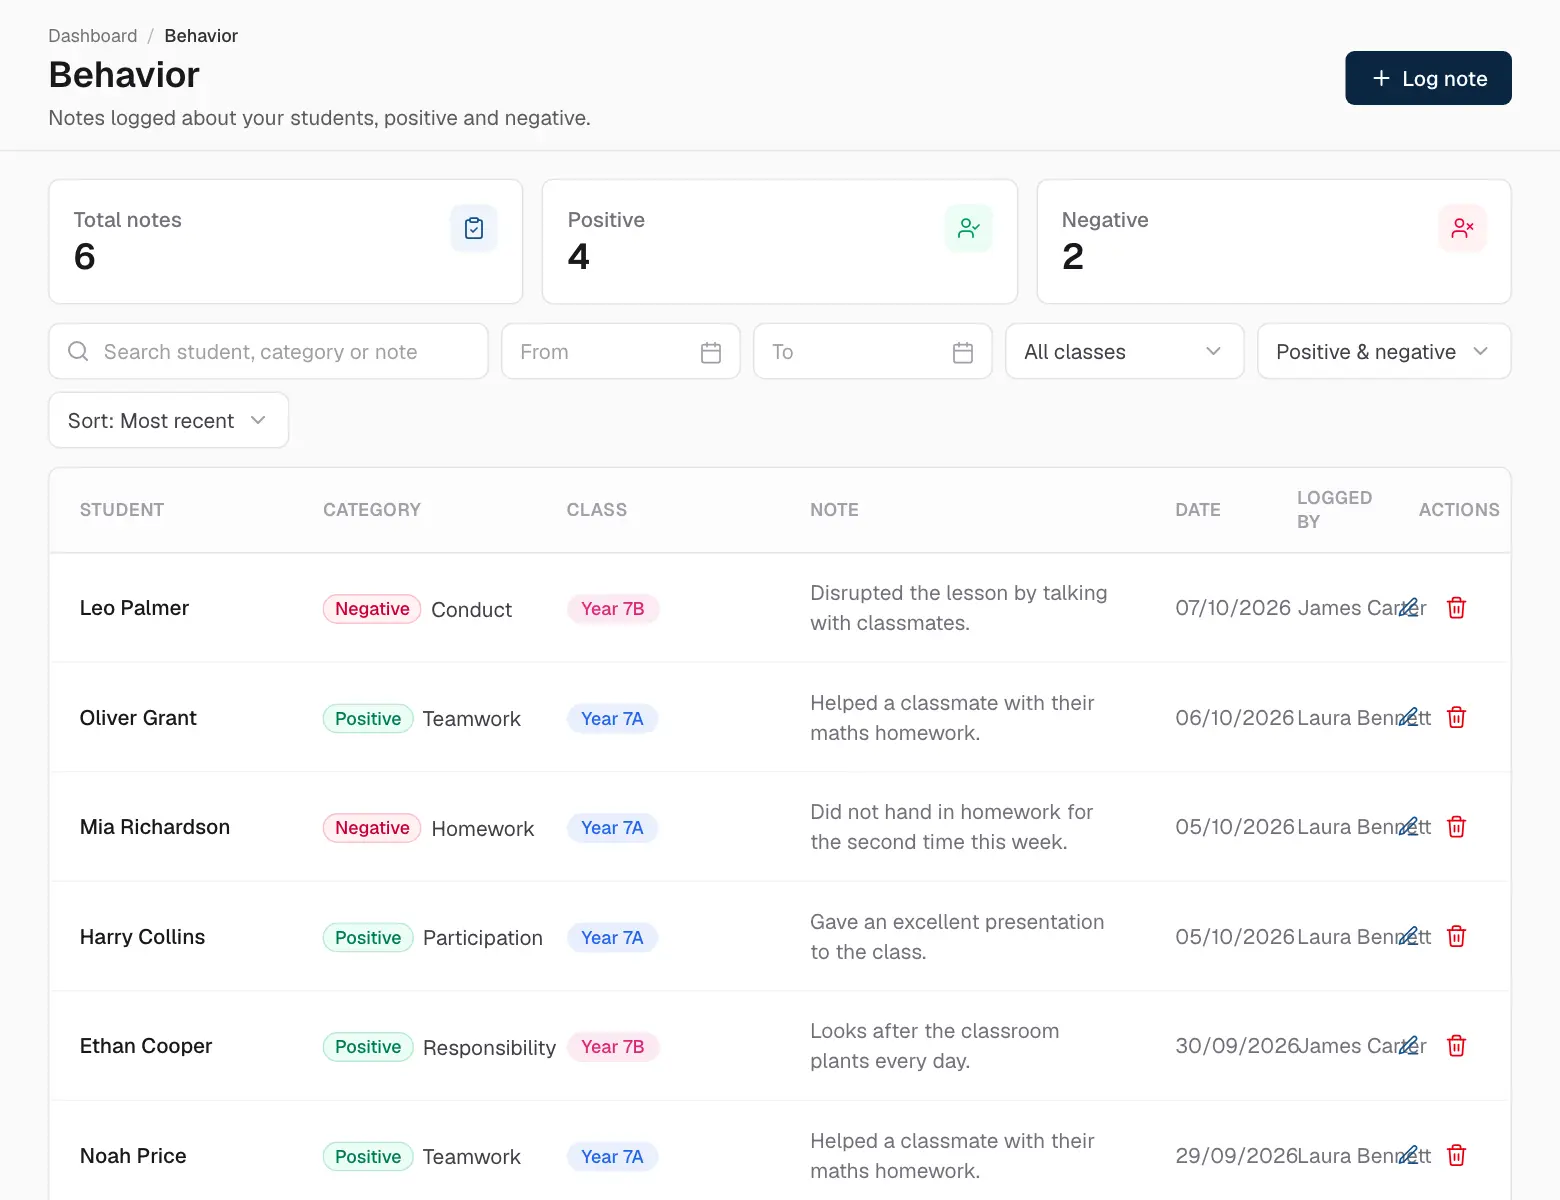
Behaviour notes record what's worth remembering about a student — the good and the not so good. Students and their parents see the notes about them.
Behaviour notes.
Click Log note (or the flag beside a student in a register).
Choose the student, Positive or Negative, and a short category such as Teamwork.
Write what happened and save.
Events
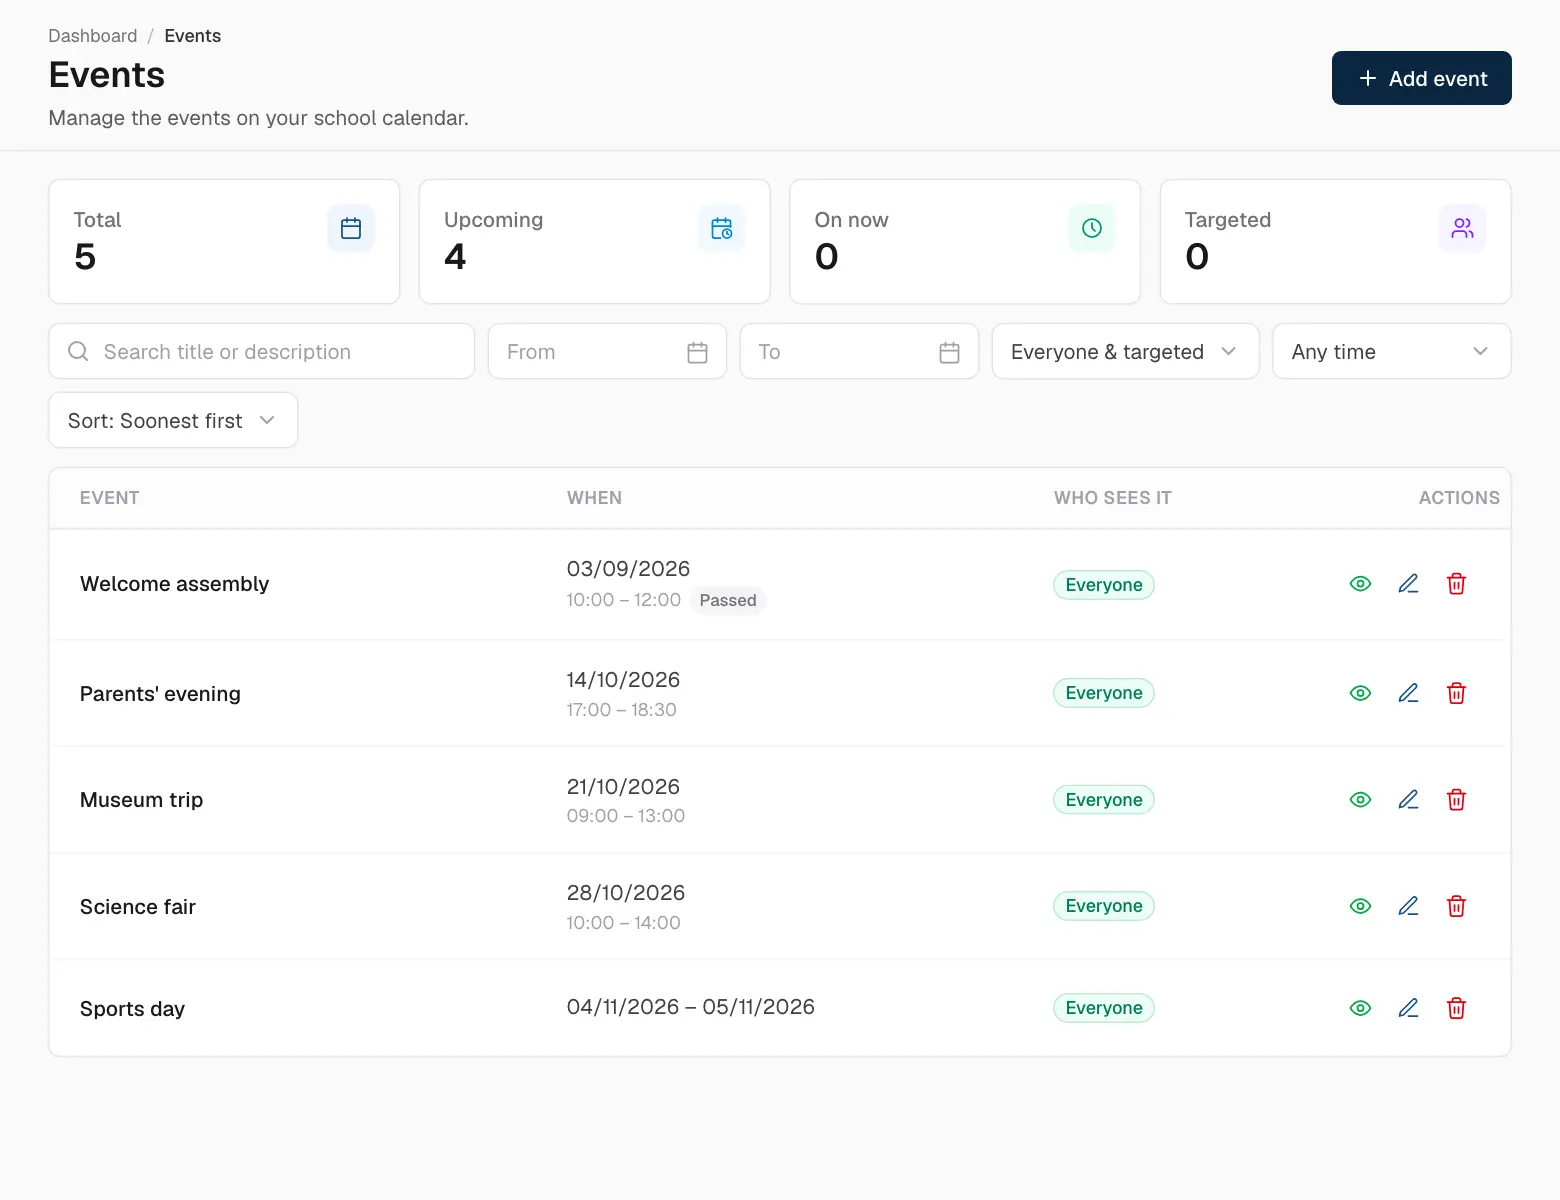
Events are what's happening at school: parents' evenings, trips, sports days. They appear on the calendar and on dashboards.
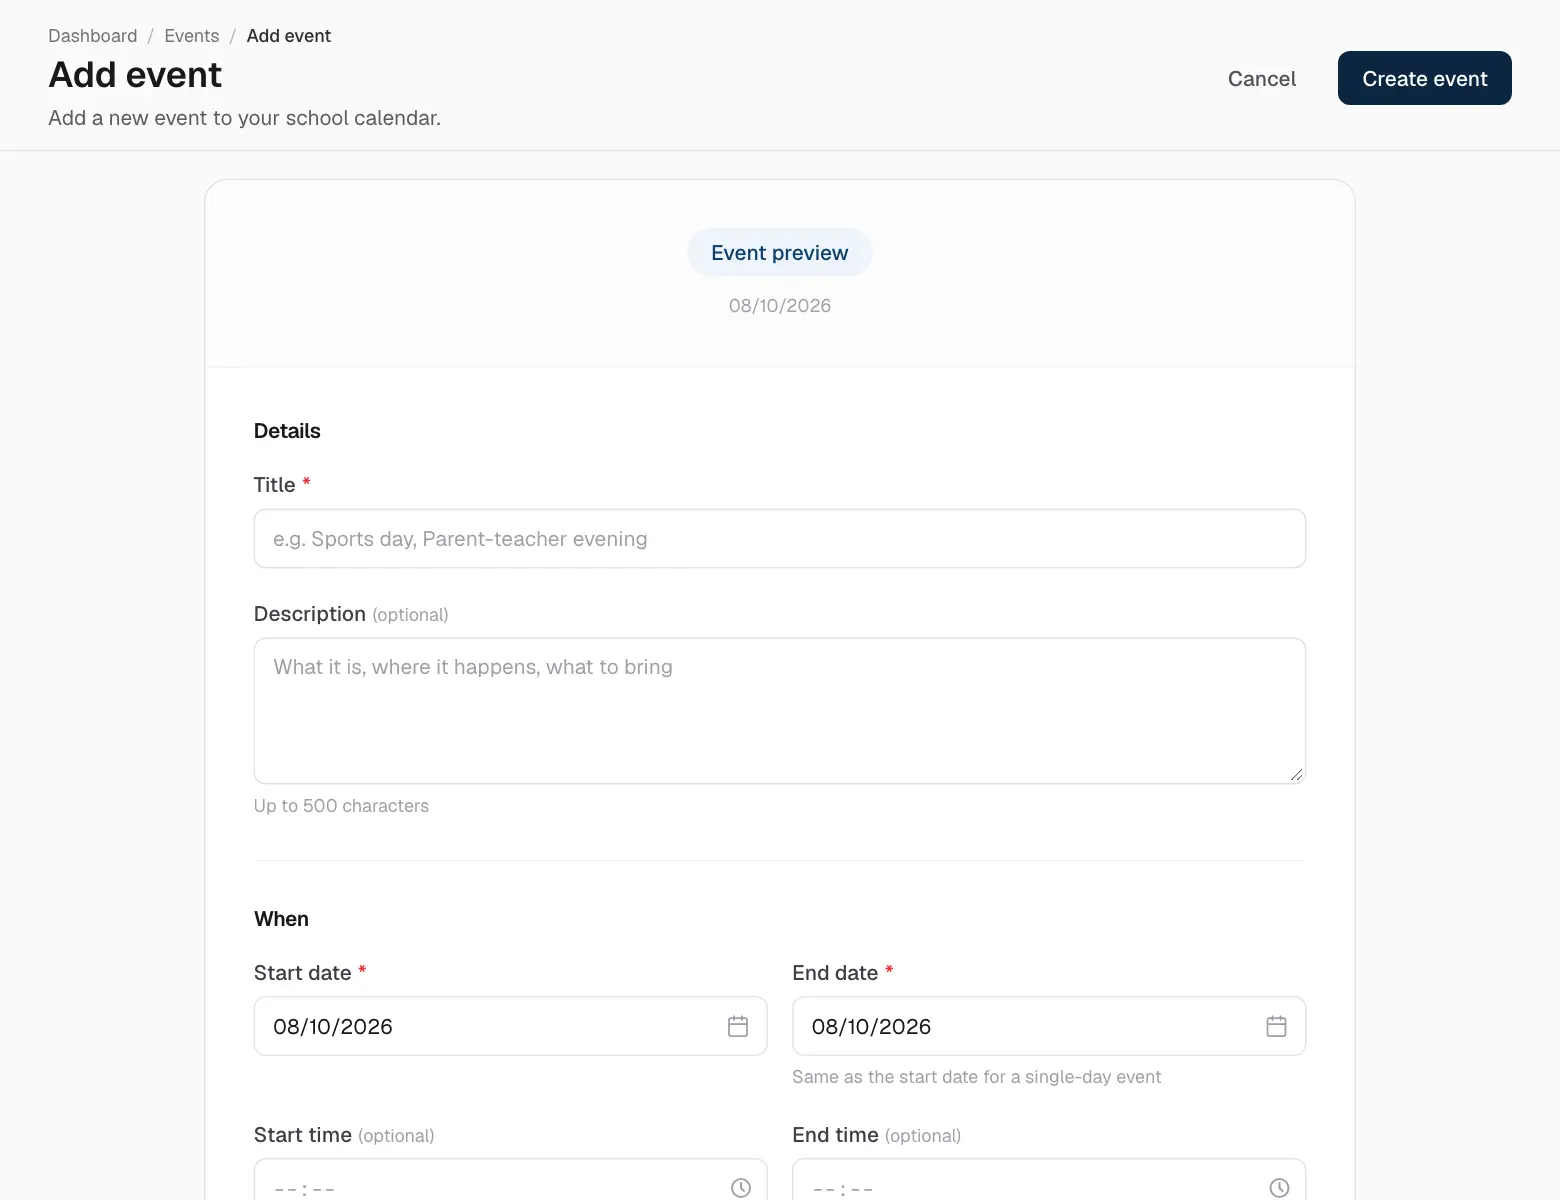
Click Add event.
Enter the title, description, dates and — if it has them — times.
Under Audience, choose Everyone or pick the people it's for.
Click Create event. Everyone in the audience gets a notification.
Adding an event.
Upcoming events.
07
Finance
Payments
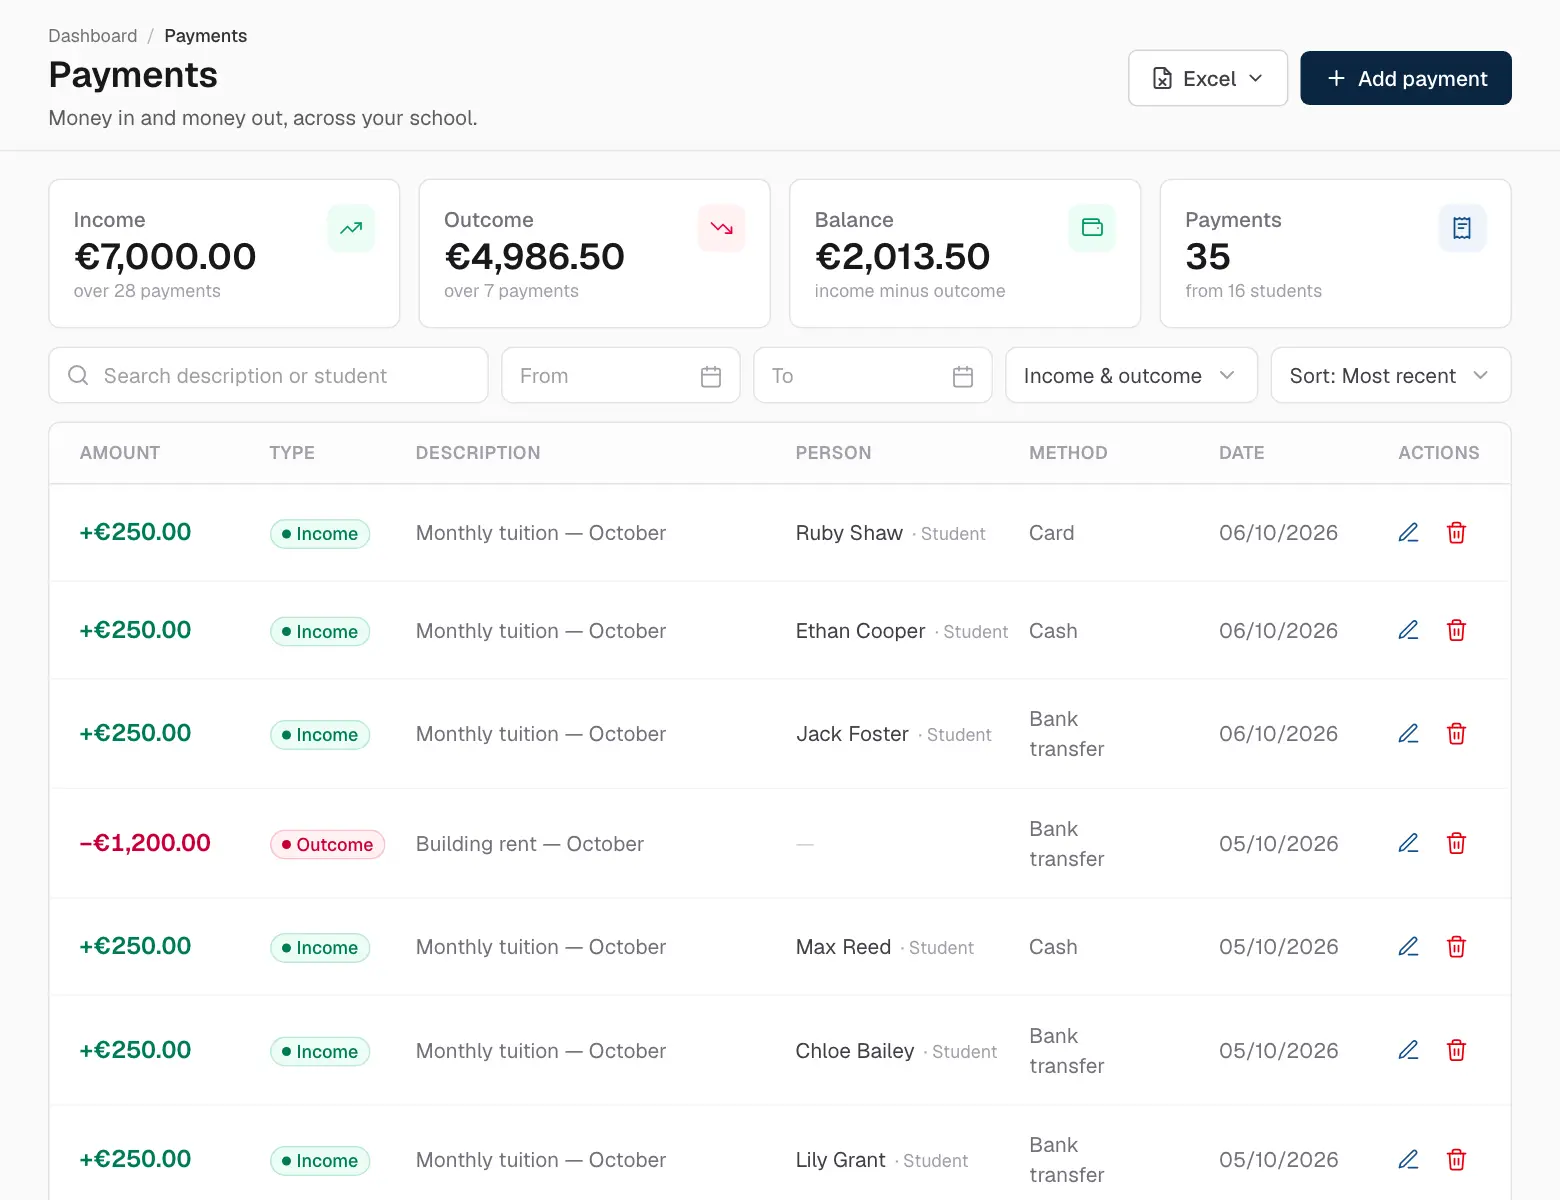
Payments is your school's ledger: money in (Income — tuition, for example) and money out (Outcome — salaries, rent, supplies). The cards at the top show totals and the balance for the period you've filtered.
The payments ledger.
Click Add payment.
Choose income or outcome, then the amount, date, method and a description.
Optionally attach the person it's for — a student's fee, a teacher's salary.
Save. An invoice is created for it automatically.
Students and parents see the payments made in their name on their own Payments page.
Invoices
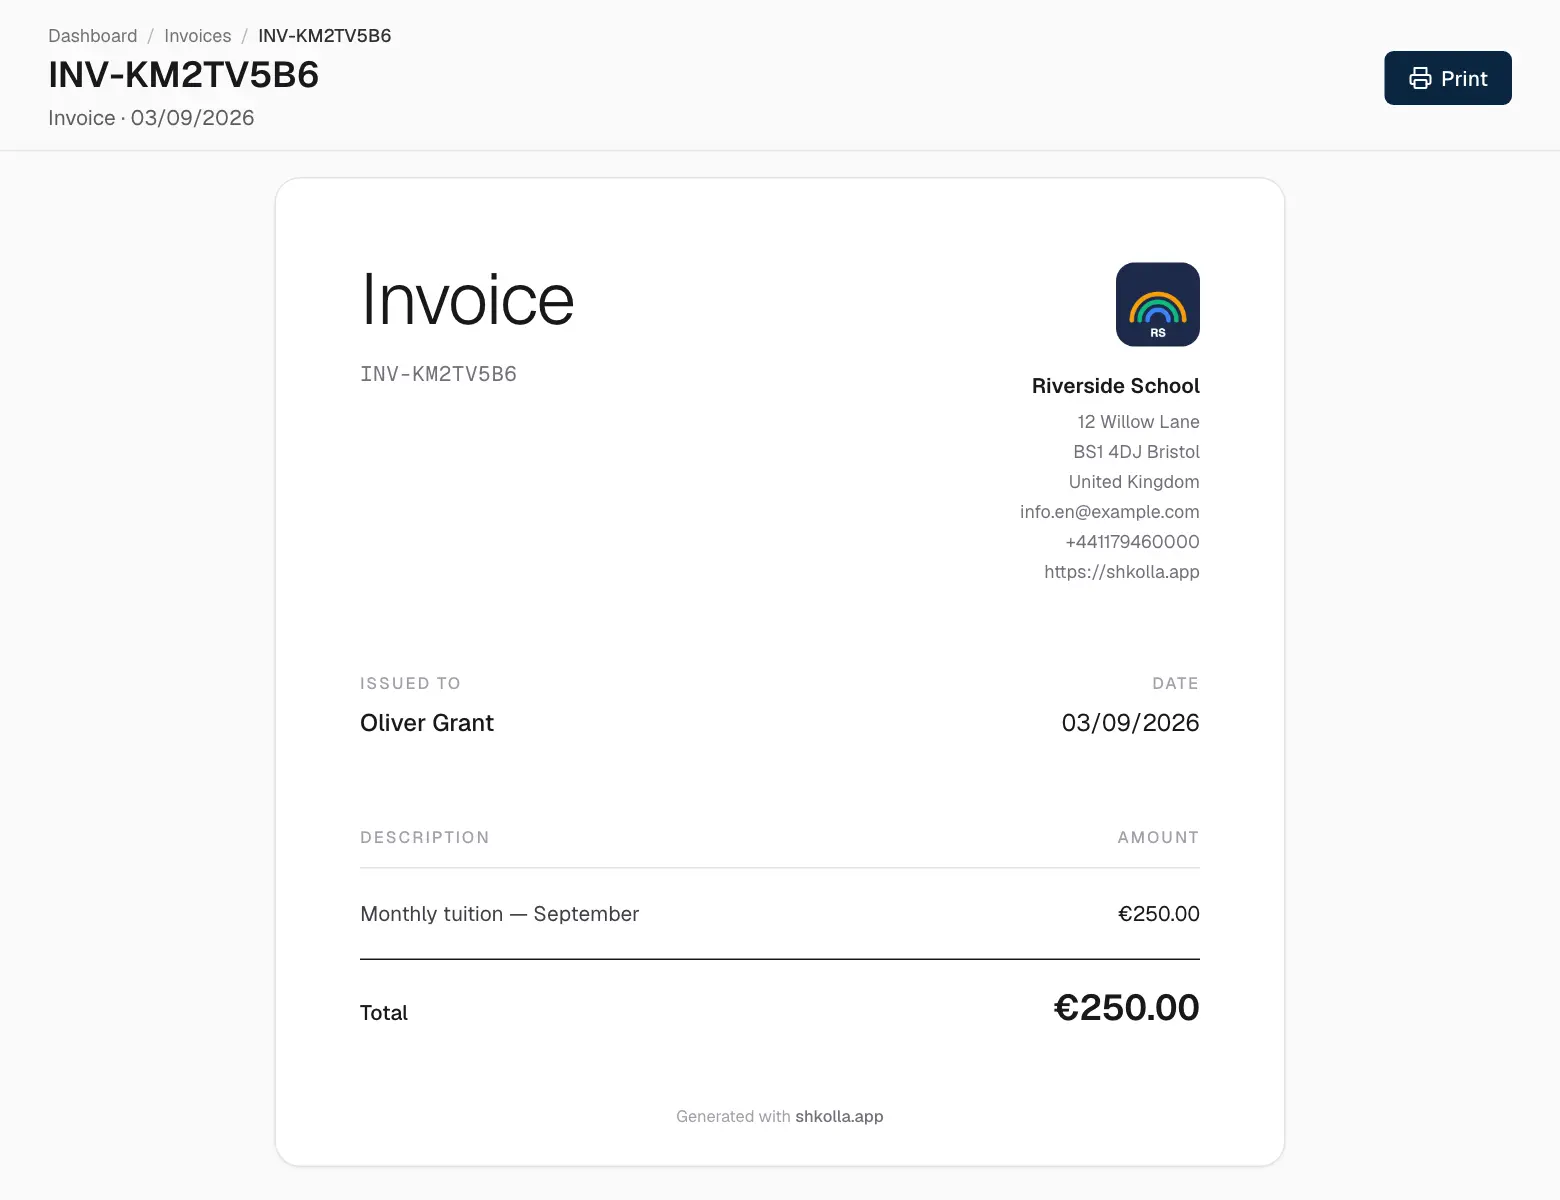
Every payment gets its own numbered invoice automatically. Invoices can't be edited — to correct one, edit its payment. Your logo, address and contact details come from Global information.
Open Invoices and click an invoice.
Click Print to print it or save it as a PDF.
An invoice.
08
School
Documents
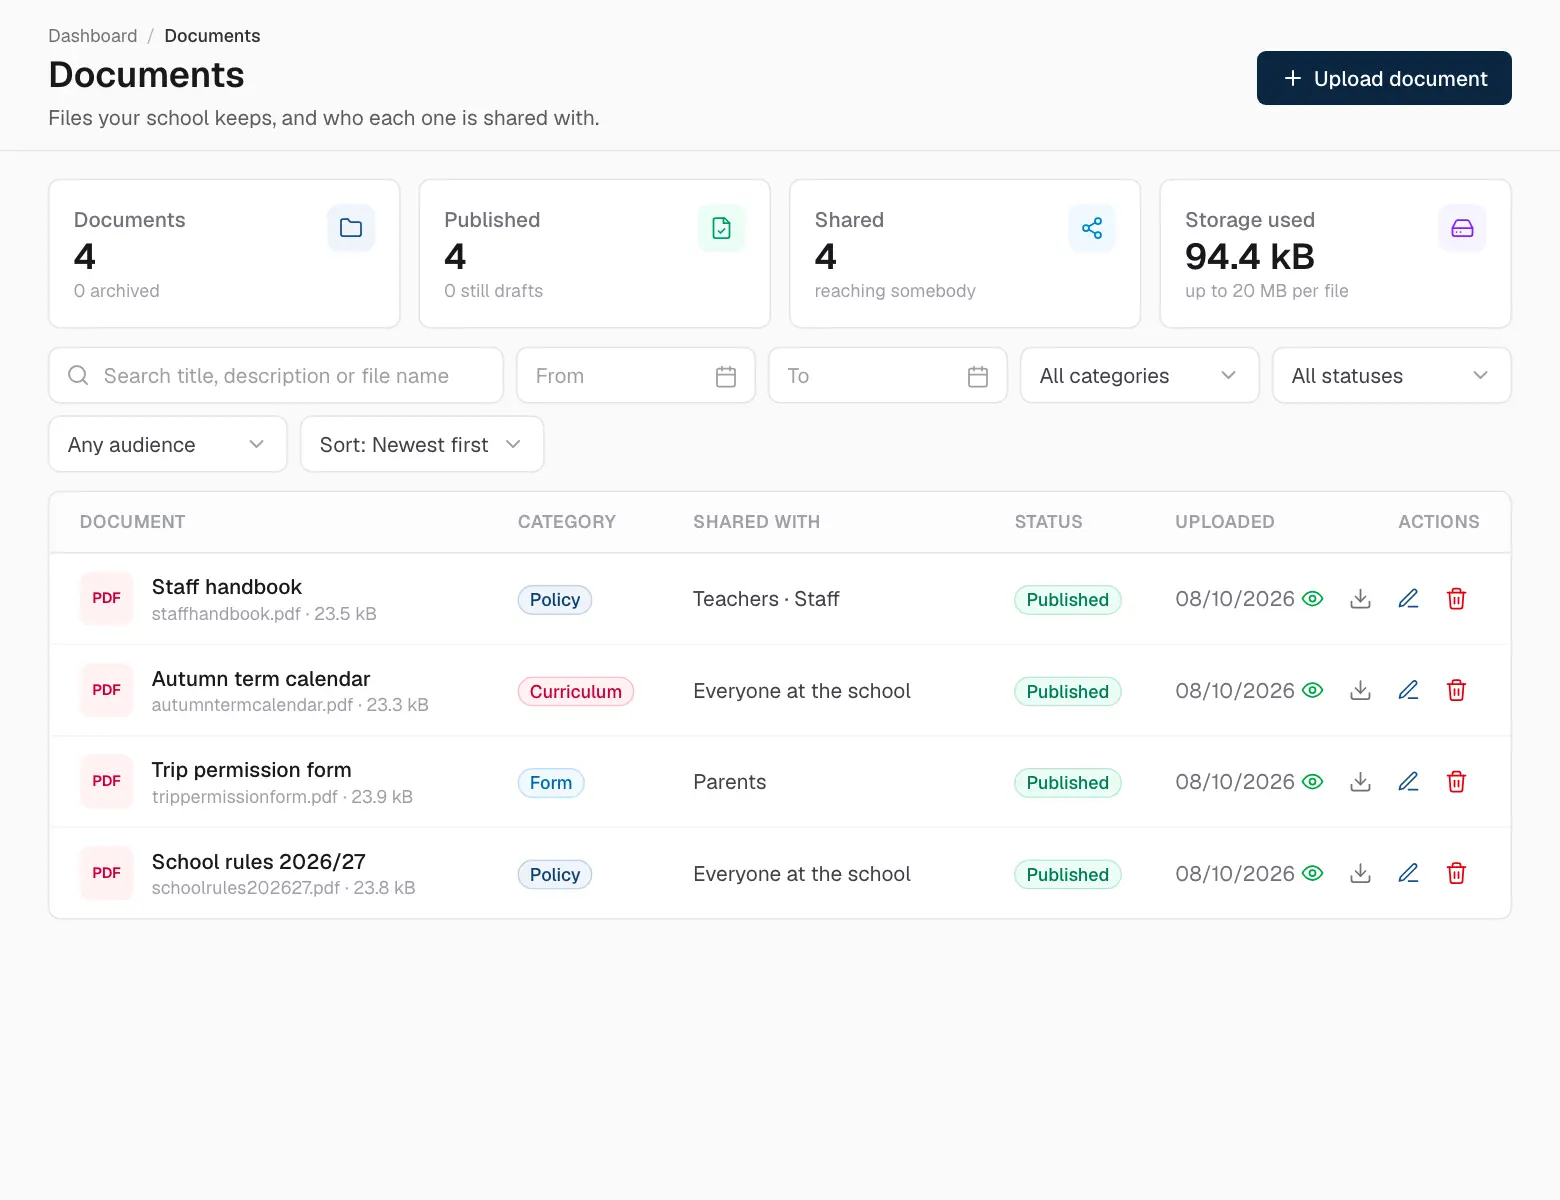
Documents is your school's filing cabinet: policies, forms, newsletters and reports. You decide who sees each file.
Documents.
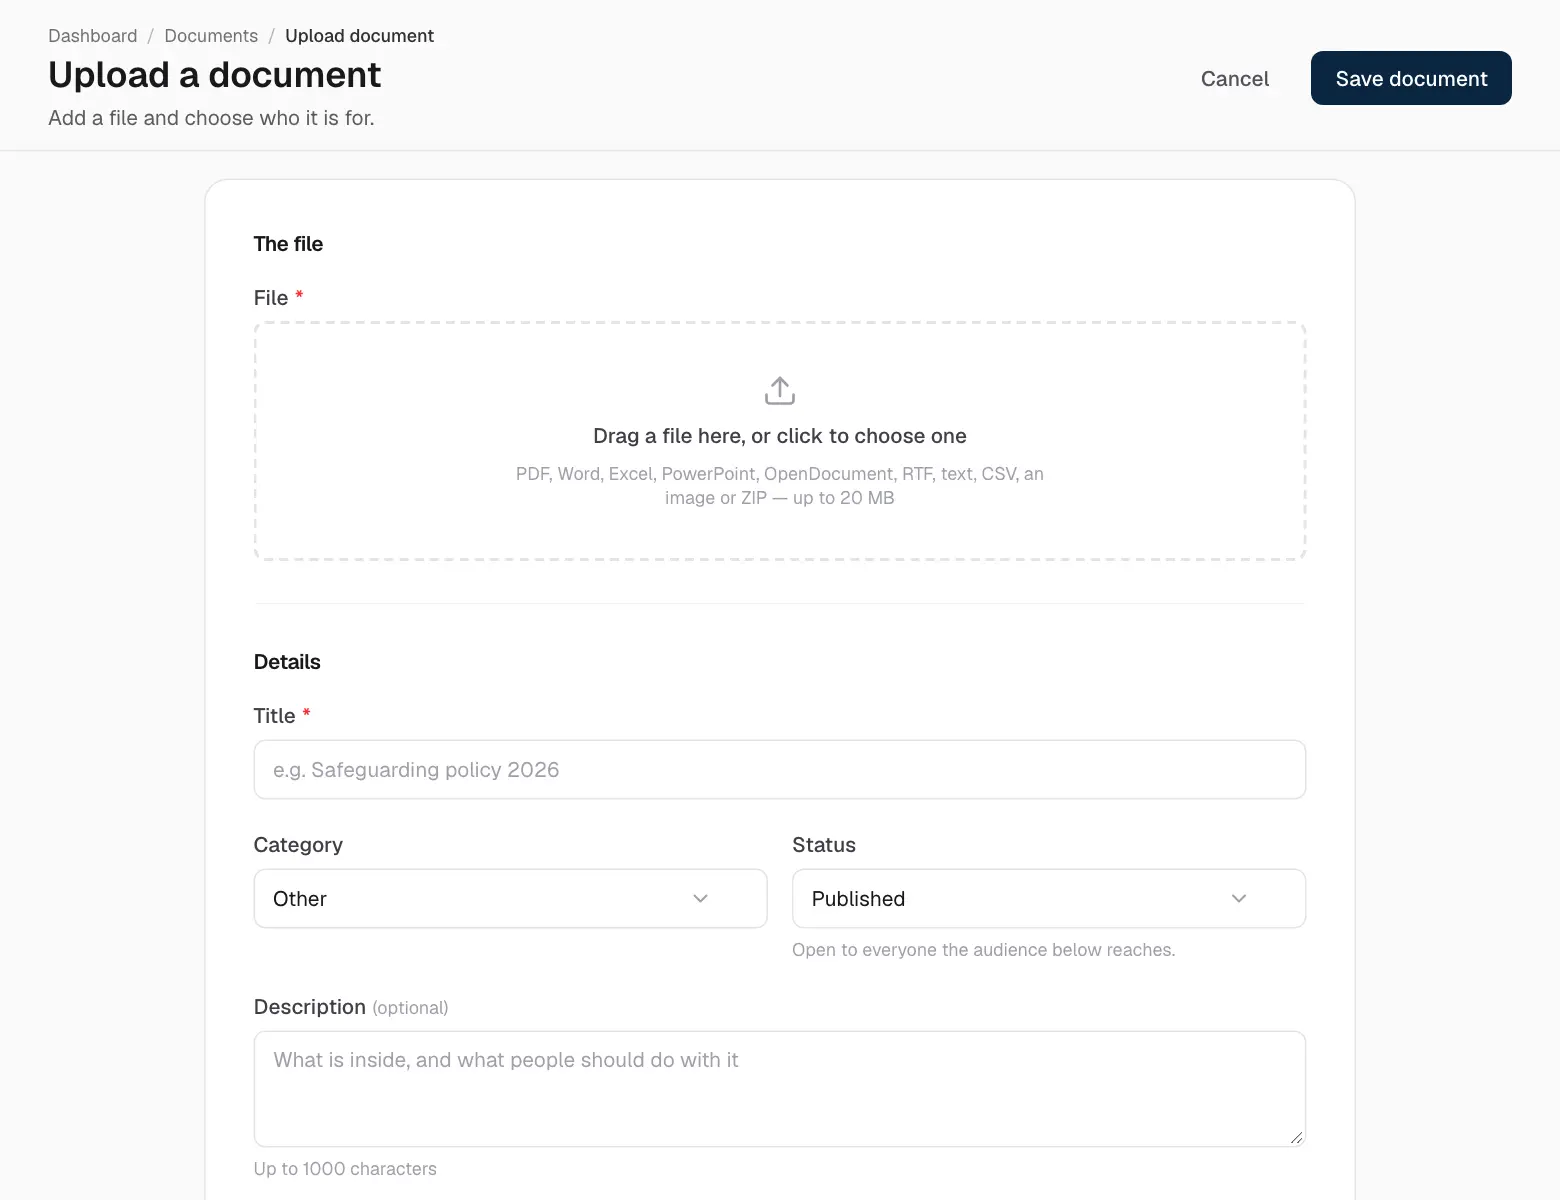
Click Upload document.
Drag the file in — PDF, Word, Excel, images and more, up to 20 MB.
Give it a title, a category and a description.
Under Audience, choose who sees it: just the office, Everyone, or specific roles, classes or people.
Set it to Published and save.
Uploading a document.
Vacations
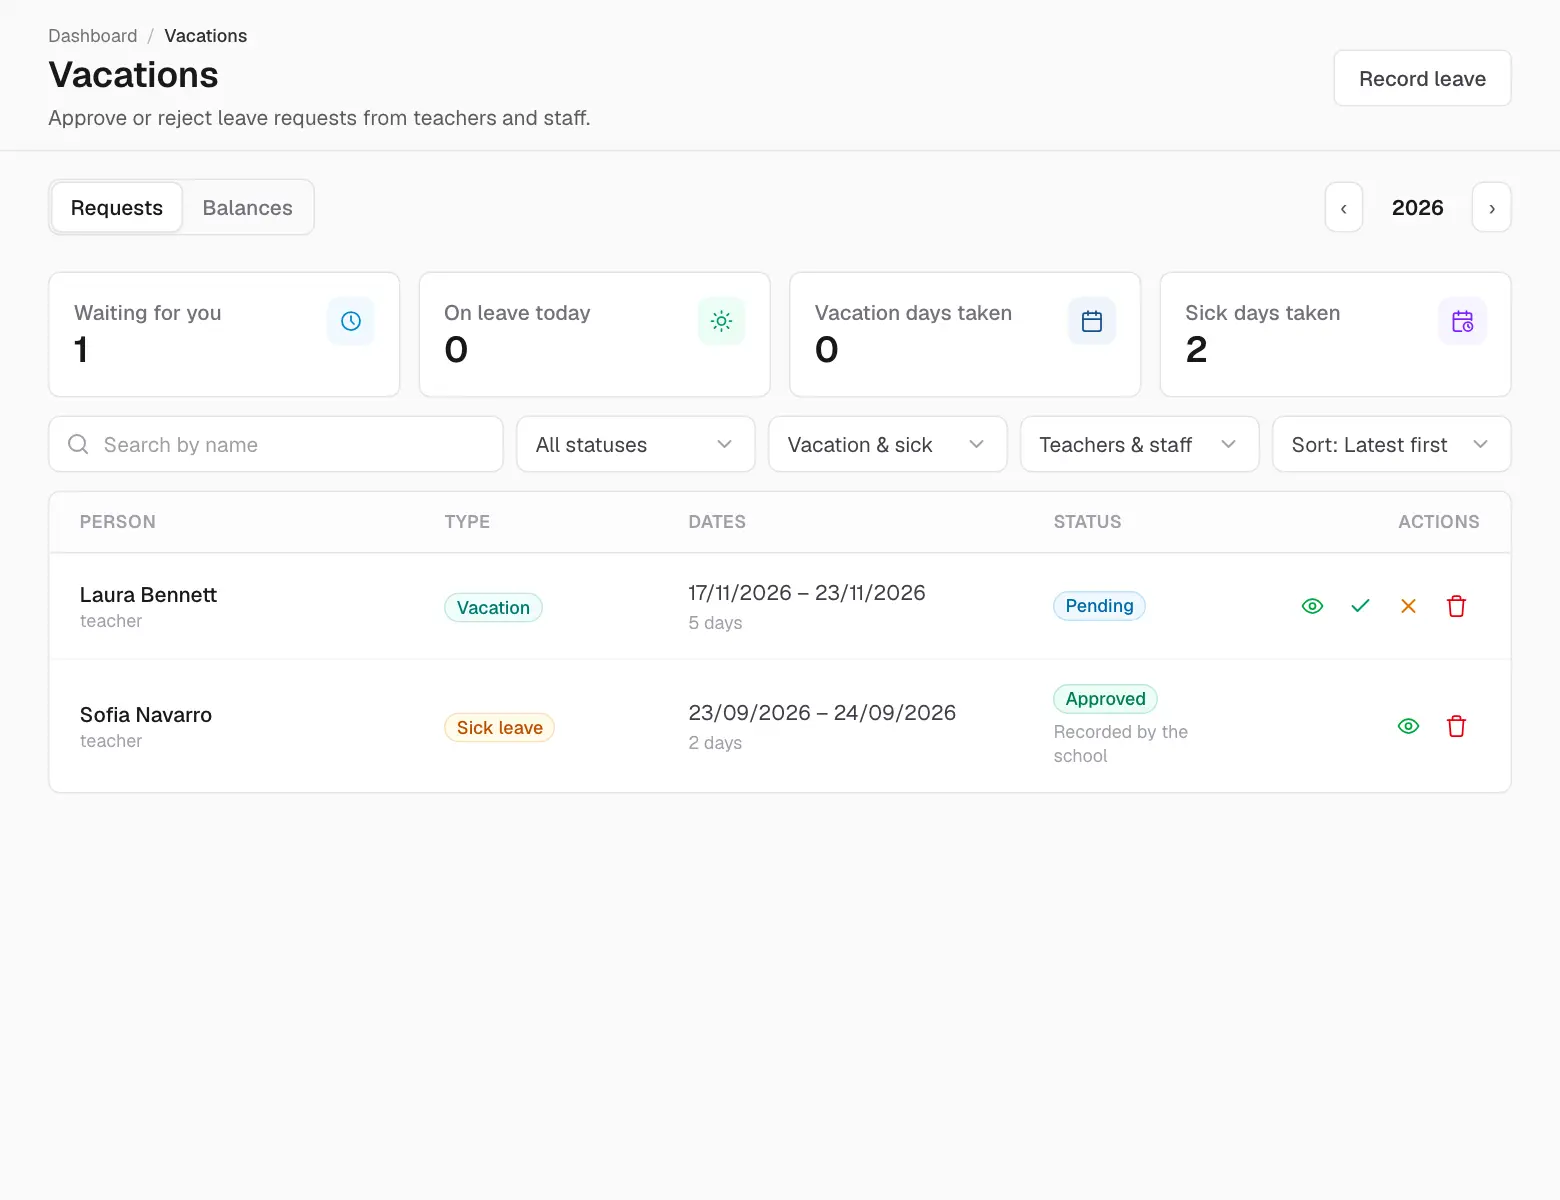
Teachers and staff request vacation and sick days in the app; you approve them here.
Leave requests.
Requests — requests waiting for you come first. Use the tick to approve (Approve) or the cross to reject (Reject); you can add a reply either way.
Balances — each person's allowance for the year: vacation and sick days, what's taken and what's carried over.
Record leave — enter leave yourself, for example when someone phones in sick.
Approved leave shows on the calendar, and the person gets a notification either way.
Global information
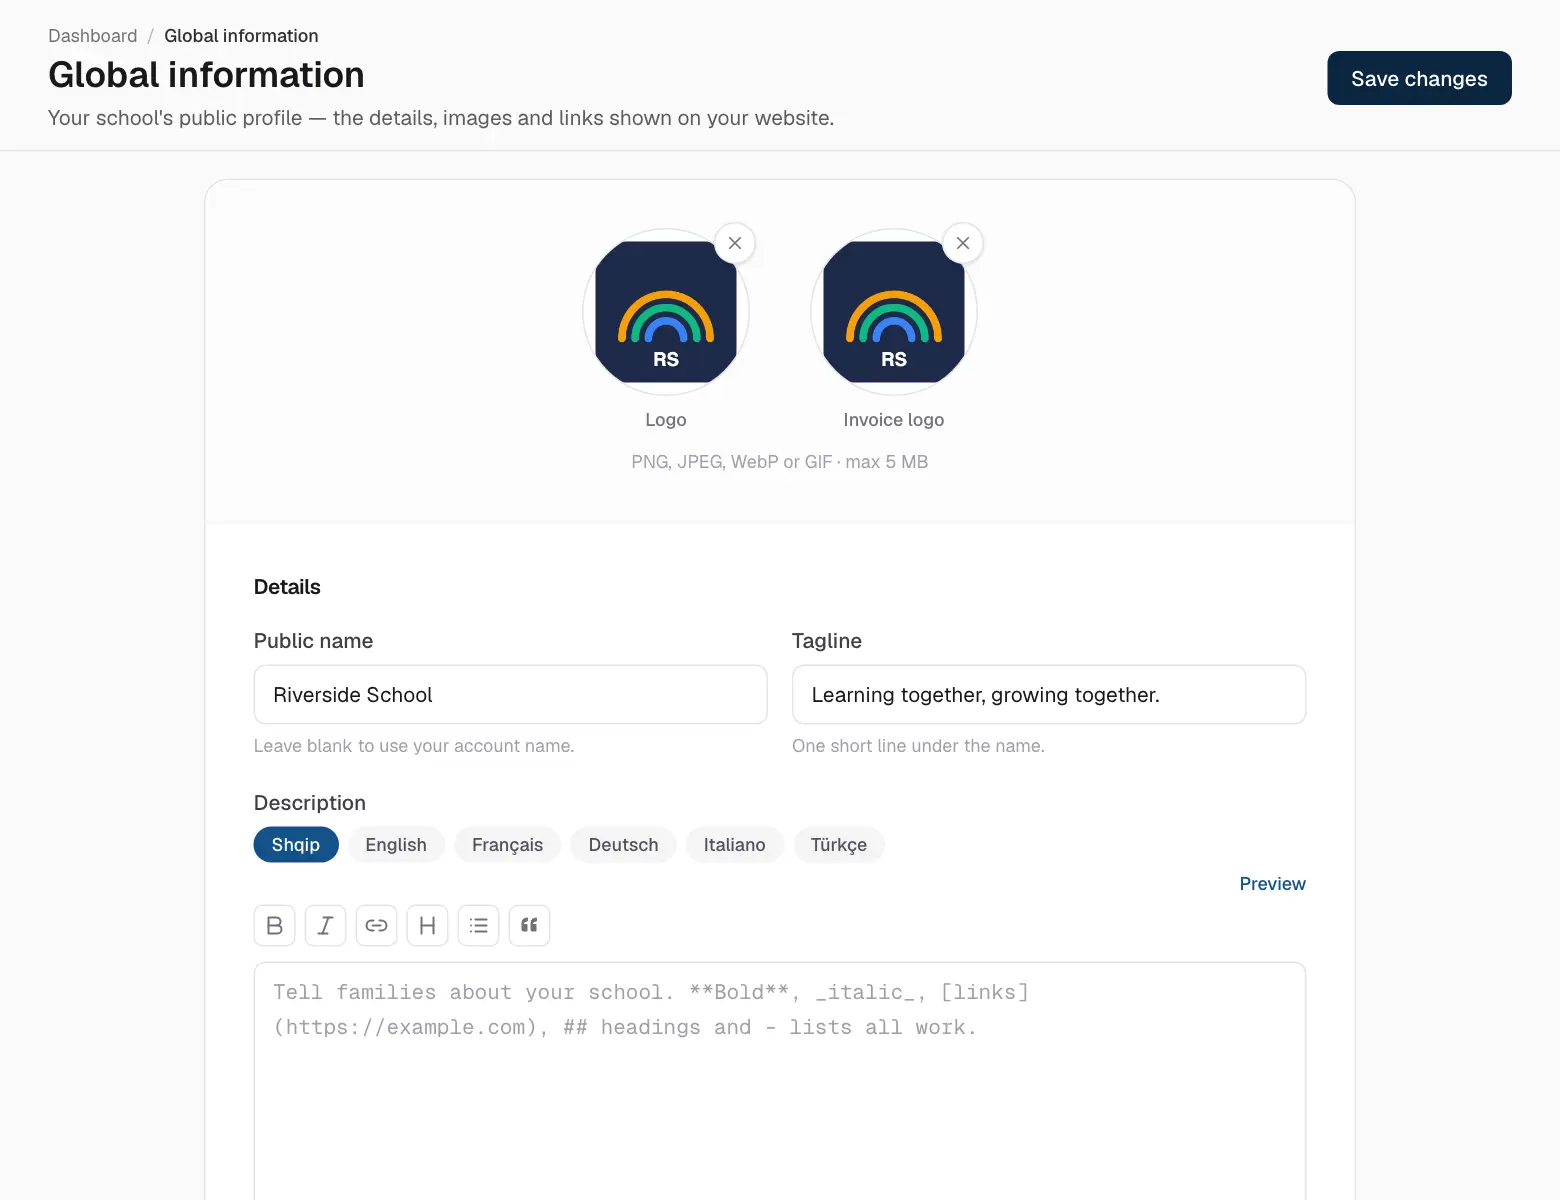
Global information is your school's public profile: name, tagline, description (in several languages), contact details, address and map, social links, logo and photos.
Your school's profile.
Your logo and contact details are printed on invoices and report cards, so keep them current.
Audit log
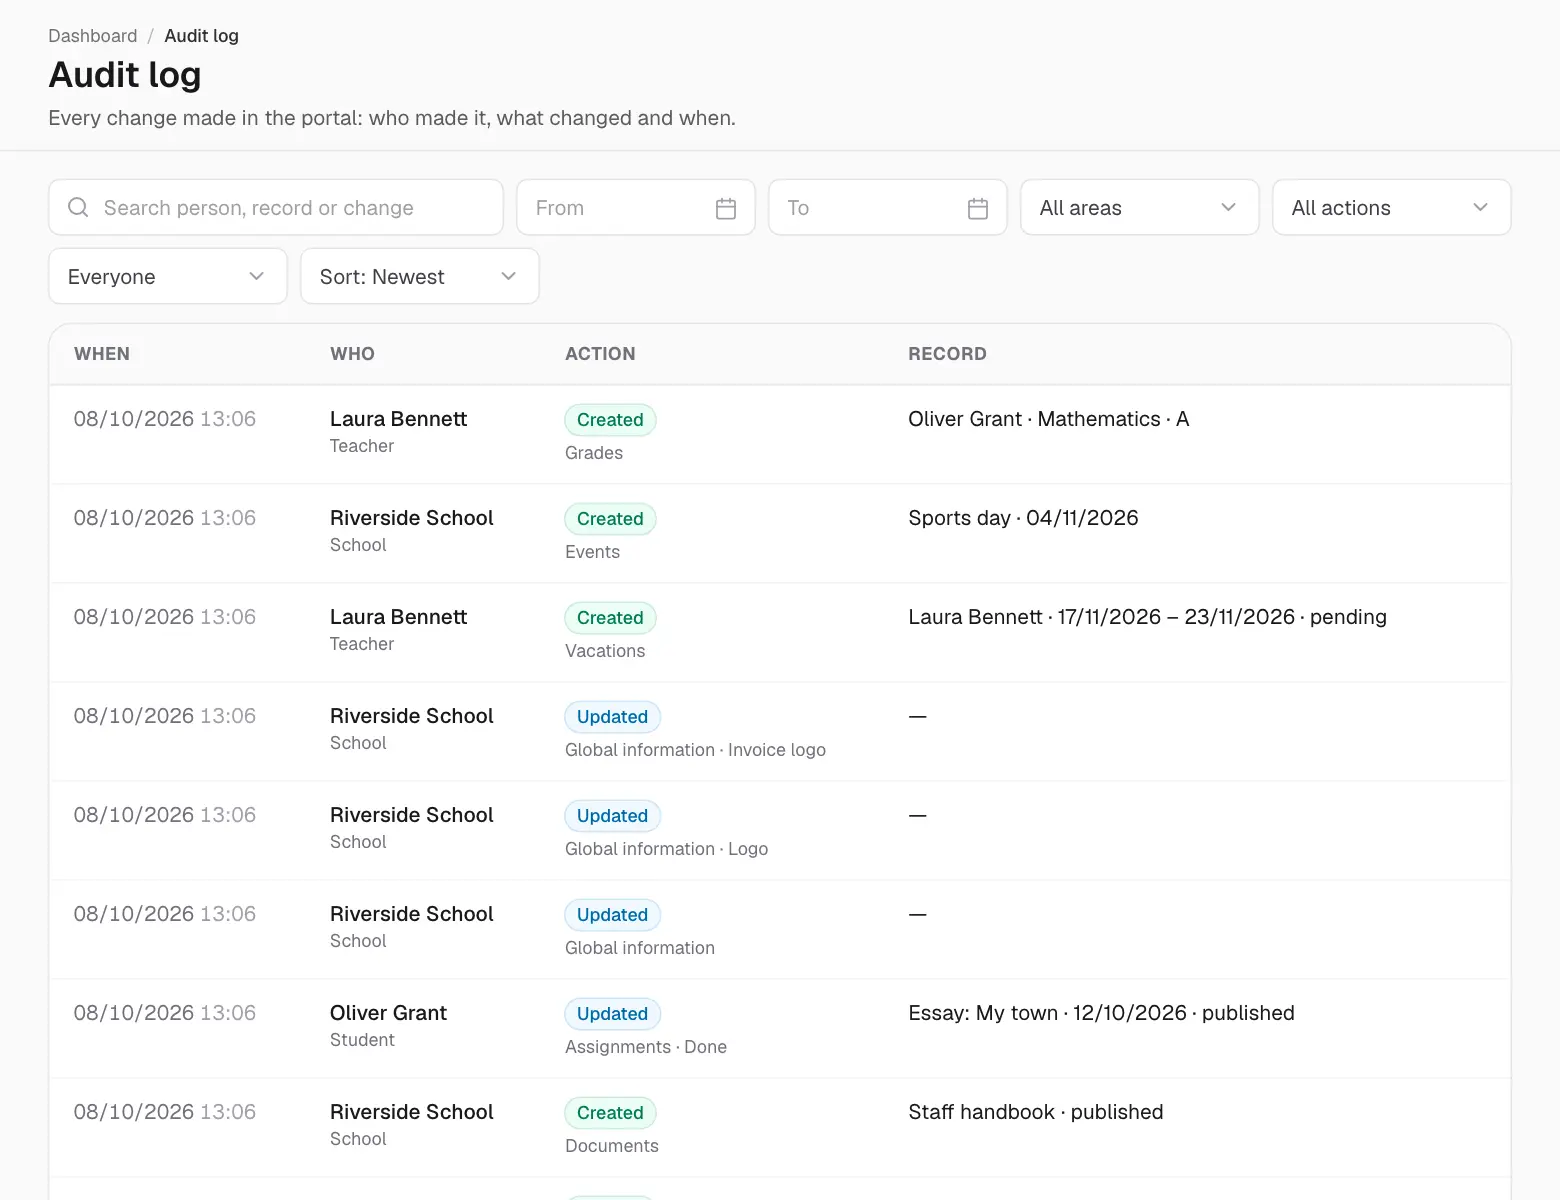
The Audit log records who changed what, and when — every addition, change and deletion, by anyone at the school. Filter by person, type and date to find out what happened.
The audit log.
Settings
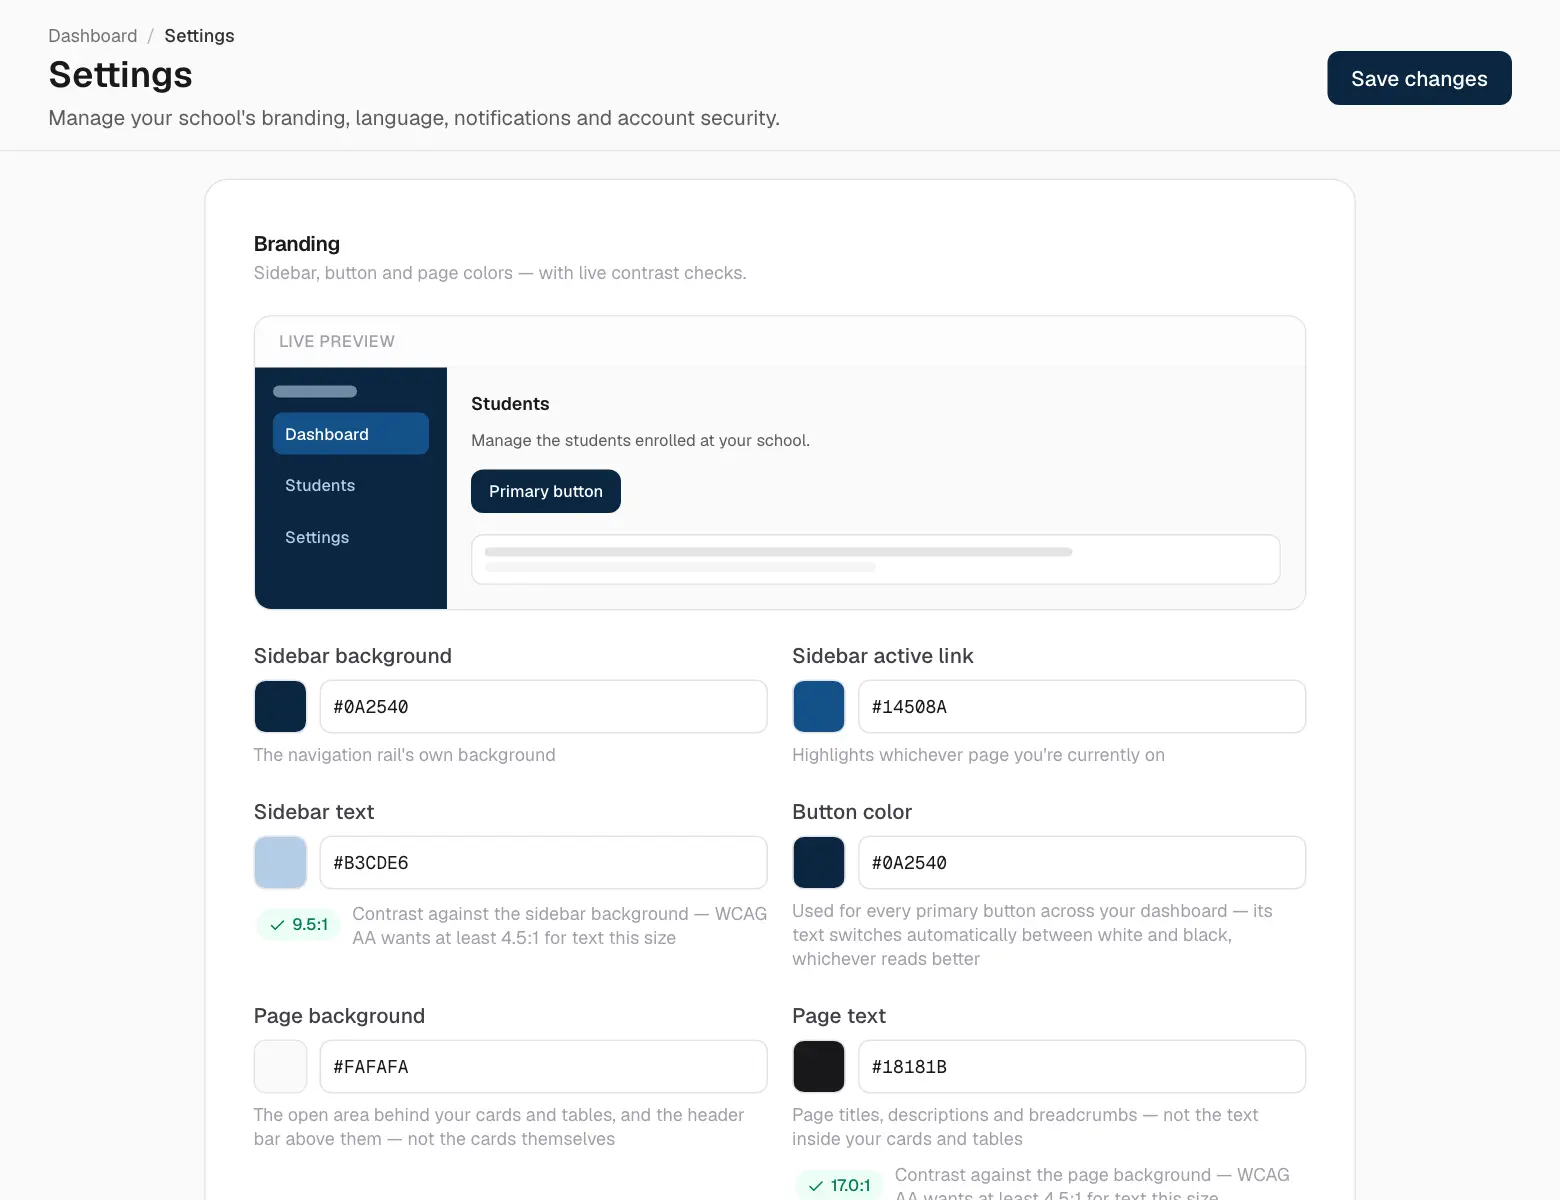
Settings holds your school-wide choices. Change what you need and click Save changes.
Branding, with a live preview.
Branding — the colours of the sidebar, buttons and pages, with a live preview and a readability check.
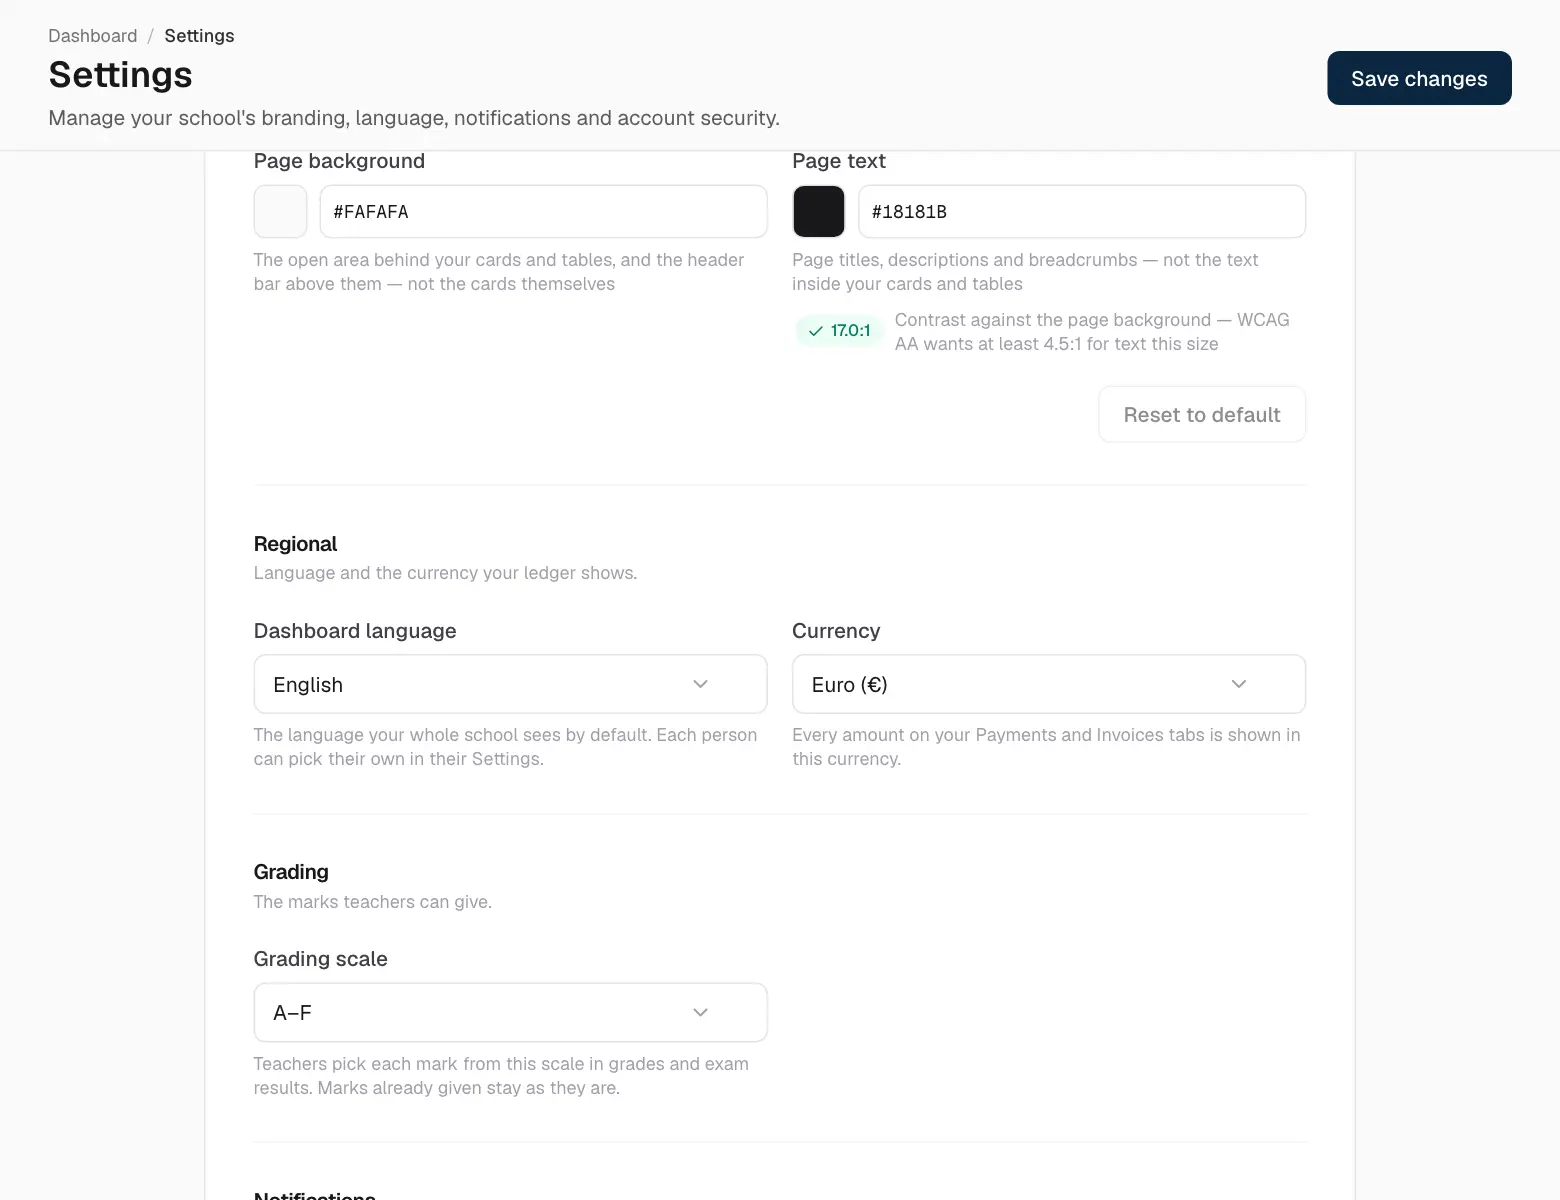
Regional — the app's language for everyone at your school, and your currency.
Grading — your grading scale: 1–5, 4–10, 1–10, A–F, or free marks.
Notifications — sounds and desktop notifications.
Security — change your password, or sign out of every other device.
Language, currency and grading scale.
09
Messages and notifications
Messages
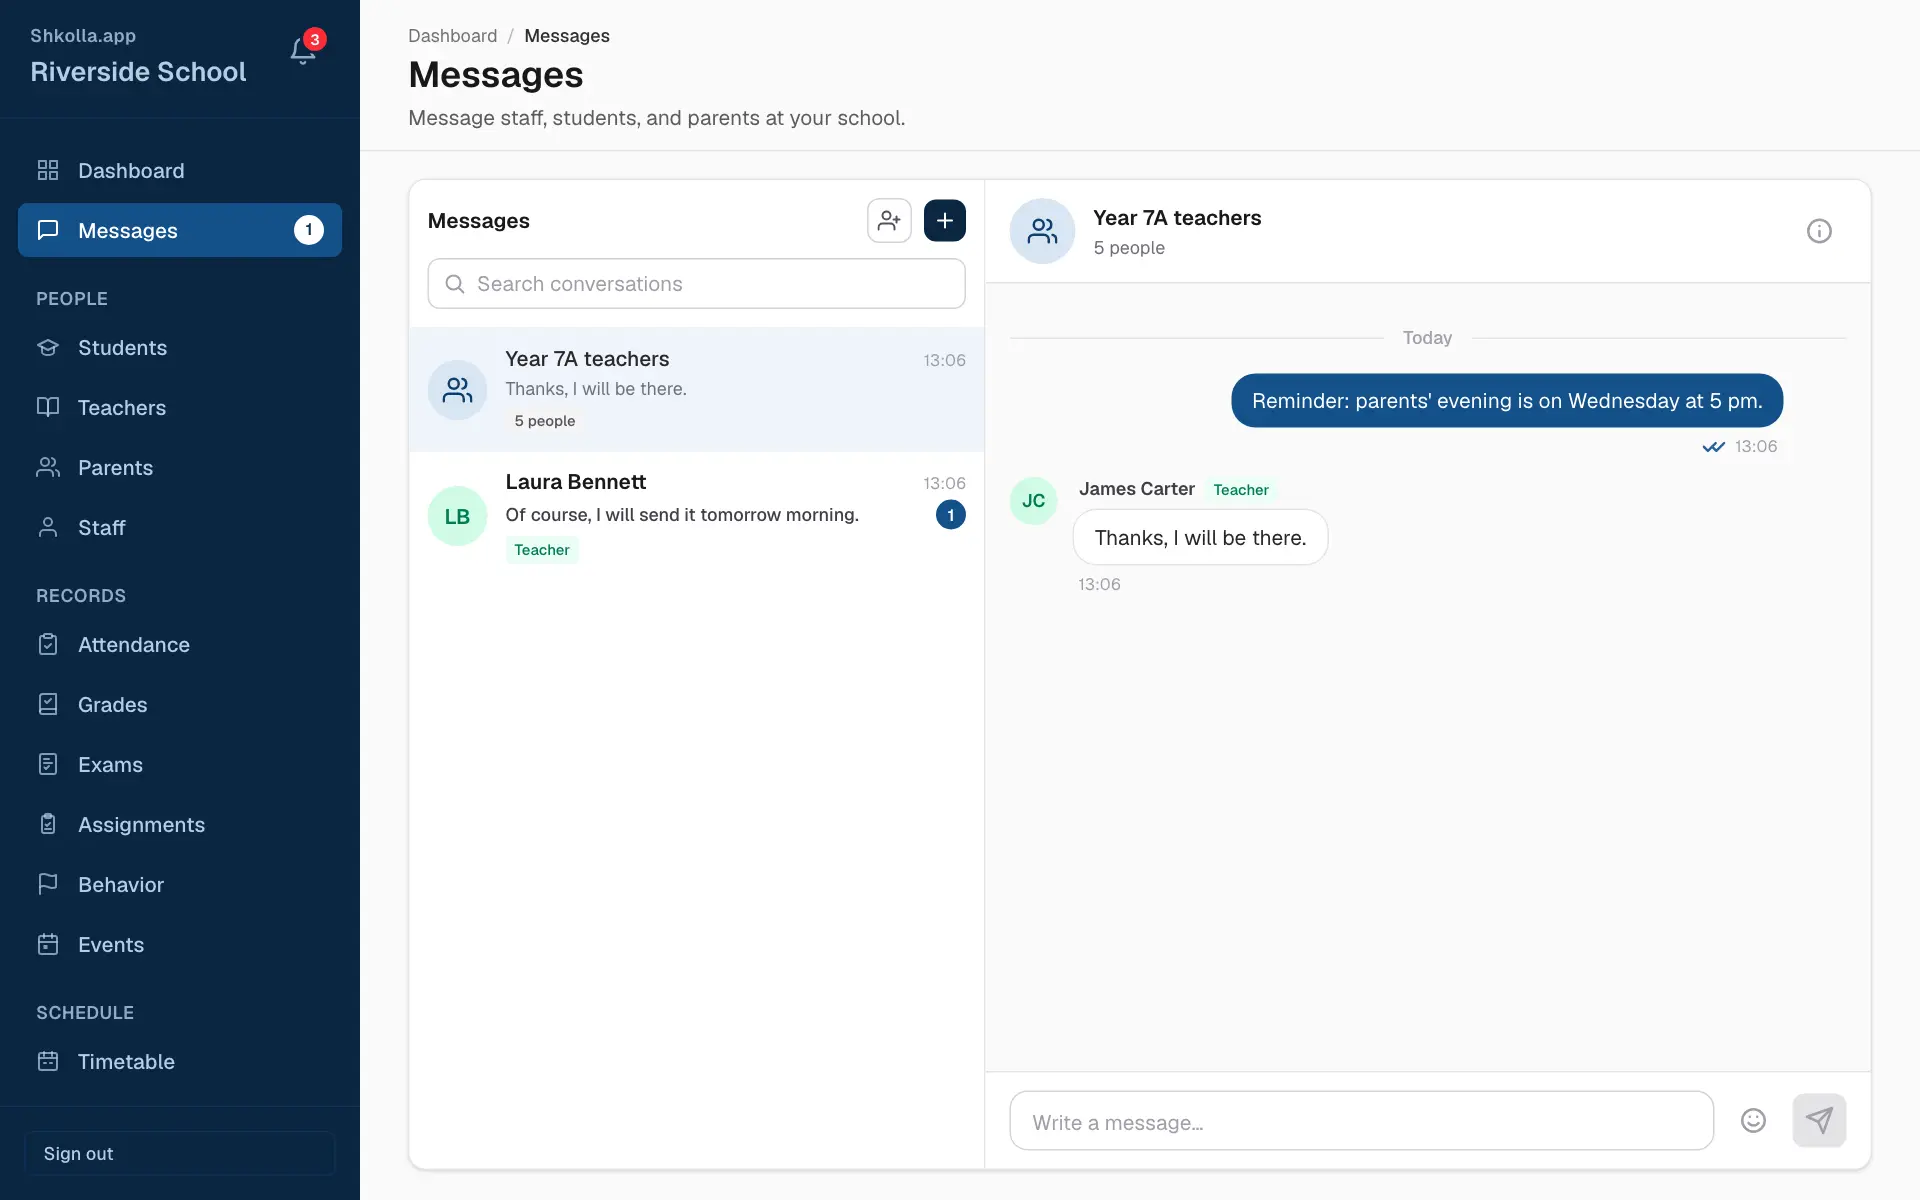
Messages is a private chat for your school community.
Messages.
Click Messages in the sidebar.
Click + (New message) and choose who to write to.
Type your message and press Enter.
Your conversations are on the left; a blue number counts unread messages.
You can only message people you're connected to at school — for example your teachers, your classmates, your children's teachers and the school office.
The school, teachers and staff can also start a group with New group chat — handy for a class's teachers or a committee.
Notifications
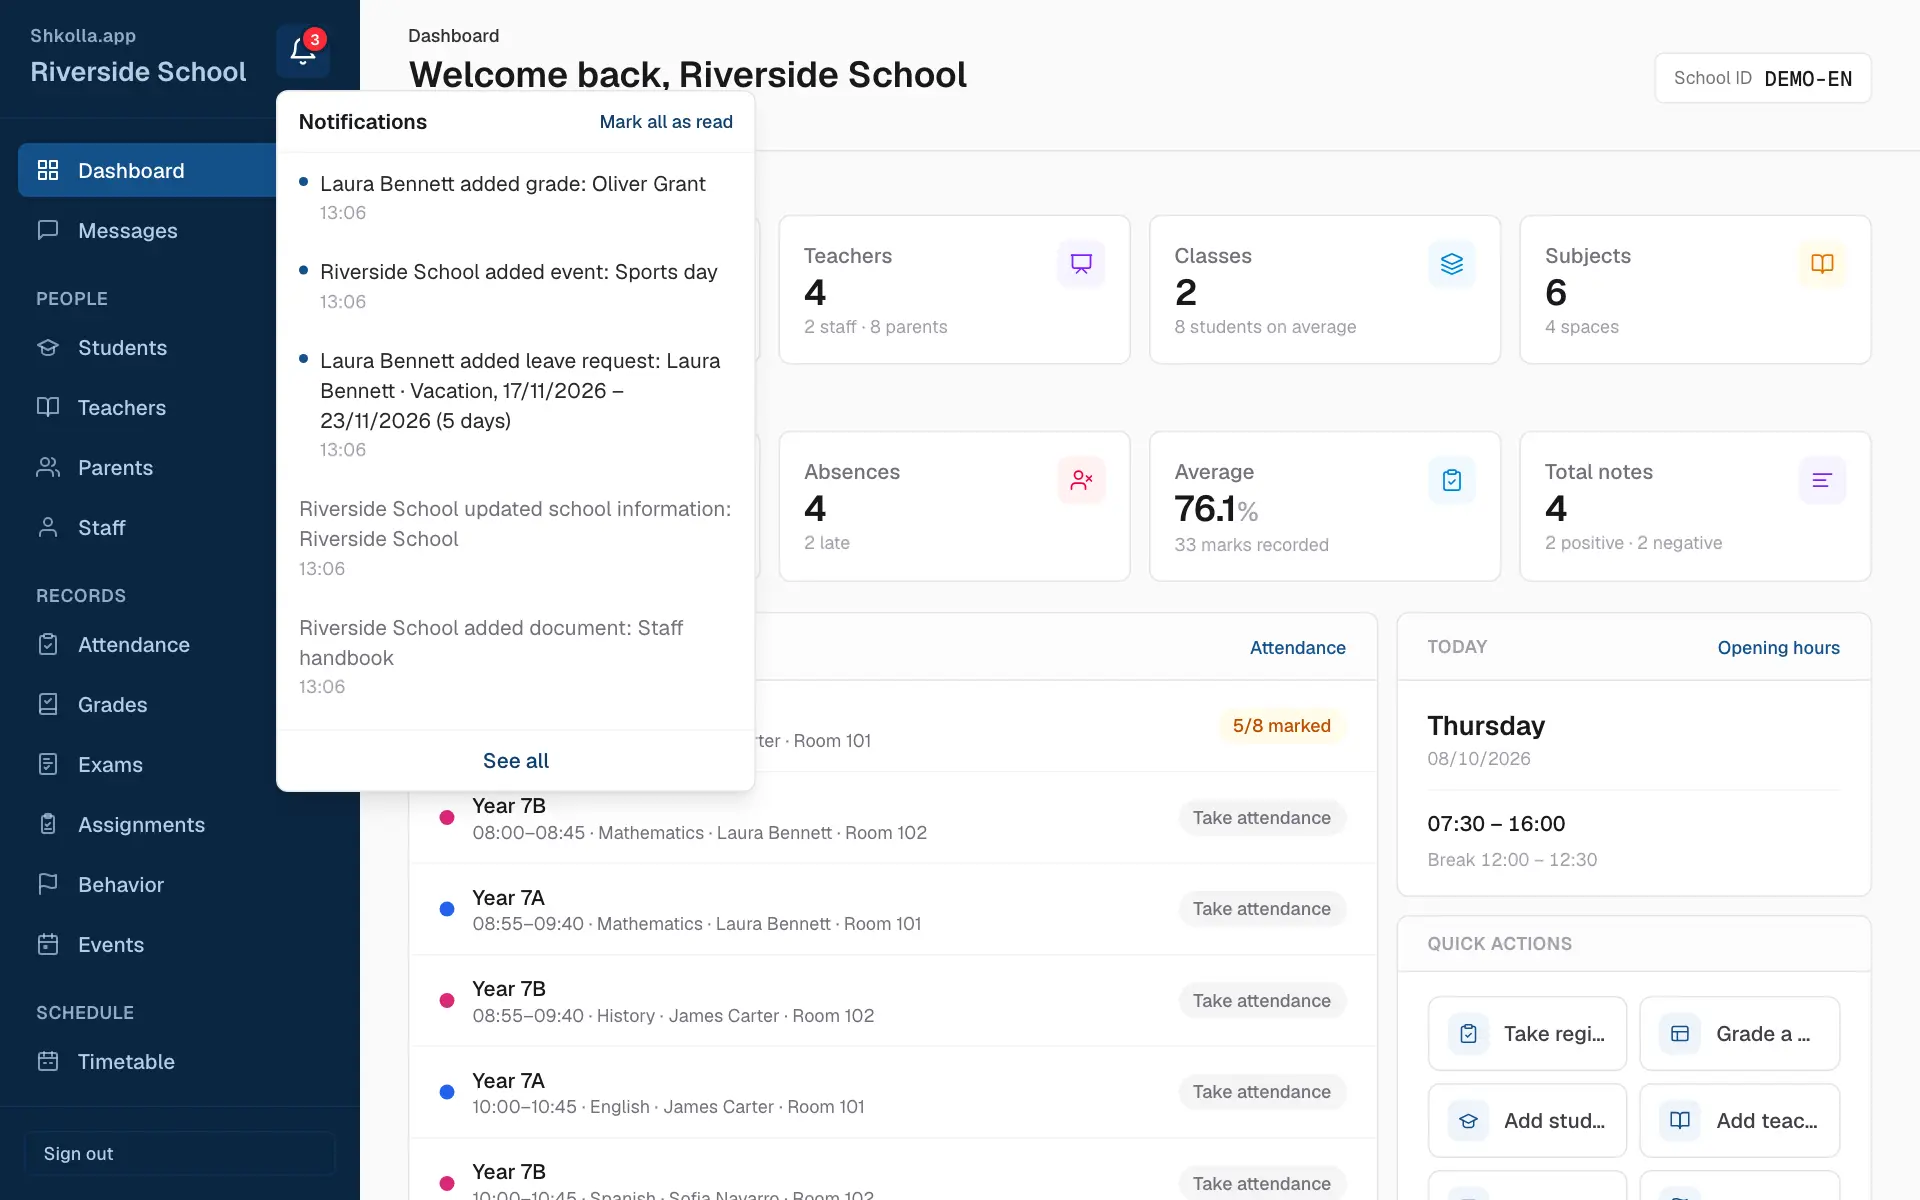
The bell at the top of the sidebar tells you when something new happens — a grade, an assignment, an event, a leave request…
Your latest notifications.
Click the bell to see the latest, and click one to open it.
Mark all as read clears the red badge.
See all opens the full history.
10
Questions and answers
Questions and answers
Someone forgot their password. Edit them on their page and type a new password under Login Credentials.
A teacher can't see a class. Add them to the class's teachers in Classes.
A parent can't see their child. Link the child under Children on the parent's page.
A staff member is missing a tab. Open their page in Staff and tick View for that tab.
Someone can't sign in. Check their status is active and that the school isn't using an old password.
How do I change the language? Settings → Regional for the whole school; everyone can also choose their own.
Where are our invoices? Every payment creates one automatically — see Invoices.
 Shkolla.app